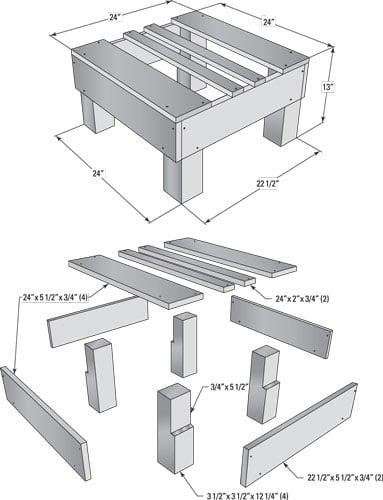
The figure shows plans to help you build your own elevated hive stand. The dimensions of this stand are ideal for a Langstroth hive (eight or ten frames), a Warre hivé, or to hold a couple of five‐frame nuc (nucleus colony) hives. The generous top surface not only accommodates the hive, but there’s some extra surface area to place your smoker, tools, and the frames you remove for inspection.

Building materials list
The table lists what you need to build this elevated hive stand.| Lumber | Hardware | Fasteners |
|---|---|---|
| 2–8' lengths of 1" x 6" cedar or pine lumber | Optional: weatherproof wood glue | 30–6 x 2" deck screws, galvanized flat-head Phillips with coarse thread and sharp point |
| 1–8' length of 4" x 4" cedar posts | Optional: a pint of exterior latex or oil paint, exterior polyurethane, or marine varnish to protect the wood from the weather |
Cut list
This section breaks down the elevated hive stand into its individual components, and the table provides instructions on how to cut and assemble those components.| Quantity | Material | Dimensions | Notes |
|---|---|---|---|
| 4 | 4" x 4" cedar posts | 12-1/4" x 3-1/2" x 3-1/2" | These are the leg posts of the stand. Rabbet 5-1/2" by 3/4" deep along one end of the post (this rabbet accommodates the narrow sides of the stand). |
| 4 | 1 x 6 of cedar or pine | 24" x 5-1/2" x 3/4" | These are the long sides of the stand and wide struts for the top. |
| 2 | 1 x 6 of cedar or pine | 24" x 2" x 3/4" | These are the narrow struts for the top. |
| 2 | 1 x 6 of cedar or pine | 22-1/2" x 5-1/2" x 3/4" | These are the short sides of the stand. |
You can adjust the stand’s height to suit your needs by adjusting the length of the 4‐inch-by-4‐inch cedar posts. Longer legs result in less bending over during inspections. But keep in mind that the higher the stand, the higher your honey supers will be, potentially making it more difficult to lift the heavy, honey‐laden supers off the hive.

