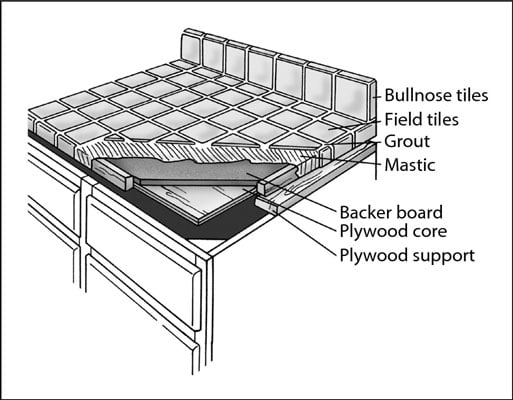
Ceramic countertops are popular, and making and installing one is a manageable DIY project for most homeowners. You need straight-edged tiles and bull-nose tiles for your countertop. Bull-nose tiles come in two styles: a single rounded edge for use along a straight edge, and a double bull-nose (two adjacent rounded edges) for use on outside corners. Using a wet saw, you must cut them to length and miter them to fit inside and outside corners. The backsplash on a ceramic tile top can be installed over a separate particleboard core or directly on the wall. The top of the backsplash can end with a bull-nose tile or extend to the underside of wall cabinets.
Here’s a quick look at the basic steps for building a ceramic tile countertop:
Cut and position the plywood core so it fits against the wall flush with the face of the cabinets. Secure it to the cabinets with drywall screws.
Drill pilot holes through the plywood into the top edges of the cabinets. Measure carefully and pencil a line to guide (center) pilot hole placement. Lift the top to apply construction adhesive, and replace it to drive the screws.
Cut tile backer board, such as cement board, and test its fit.
To cut cement board, score the surface with a utility knife guided by a straightedge, snap to break it along the scored line, and complete the cut of the reinforcing material with your utility knife.
Attach the backer board cement board screws or exterior-rated drywall screws, as suggested by the manufacturer.
For a more rigid installation, use a notched trowel to apply mastic or thinset mortar over the plywood before attaching the backer board.
Apply self-adhering fiberglass mesh tape over any joints and fill in the screw-head holes with a latex underlayment filler or thinset.
Allow the filler to dry and then sand it smooth.
Attach a 1 x 2 board to the front edge, making sure it’s flush with the top of the backer board.
Nail and glue the board to the plywood with 4d finishing nails.
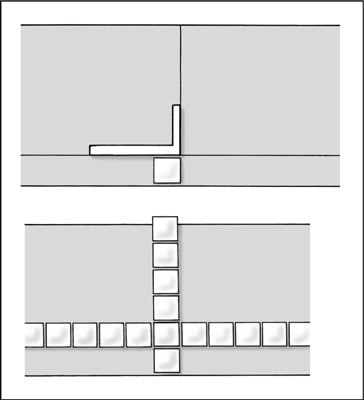
Determine the position of the first course and draw a line parallel to the front of the countertop to indicate where the back edge of the tiles will align.
Position bull-nose tile (or countertop edge trim tile) on the front edge and a field tile on the top separated by a tile spacer. Add more spacers on the back edge and place a board against it. Then trace a line along the board to mark the edge of the first course of field tiles.
Measure the length of the countertop and mark the centerline perpendicular to the line you just drew.

Align one leg of the square with the line and the other with the mark you made to indicate the centerline.
Dry-fit rows of tile along the lines, using tile spacers.
On a straight counter, determine whether it’s best to center a tile on the centerline or align an edge with it. Choose whichever leaves you with the widest tile at the ends. If you have a countertop that turns a corner, lay out the tiles starting at the corner. On a countertop that wraps two corners, lay out tiles starting at the corners and plan the last (cut) tile to fall in the center of the sink.
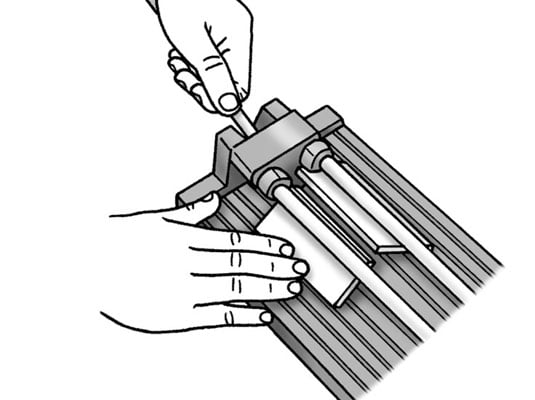
Use a tile cutter to make straight cuts on field and bull-nose tiles.

If you have a countertop edge trim, have your supplier cut it with a wet saw after all tiles are in place.
To make curved cuts, freehand score the area on the tile to be removed with a glass cutter. Then use a tile nipper to break off numerous small pieces until the cutout is complete.
After you dry-fit and cut all the tiles, secure them to the substrate with mastic or thinset mortar, as advised by your tile supplier.
Apply the mastic or thinset with a notched trowel to ensure a uniform coat, and use plastic tile spacers between tiles to ensure even spacing. Allow the mastic or thinset to set up for at least 24 hours.
Fill the gaps between the tiles with grout by using a rubber grout float.
Hold the float at a 45-degree angle to the tiles and use a sweeping motion to force grout into the gaps. Wipe off any excess grout with a damp sponge. Let the grout dry for about an hour and then wipe off any haze on the tile.
Seal the grout with a penetrating silicone grout sealer.

Although sealing the grout seems like a tedious job (and it is!), it’s critical that you do it to keep the grout from staining and to extend its useful life.

