The most direct way to connect a Nexus 7 tablet to a computer is by using a wire — specifically, the wire nestled cozily in the heart of a USB cable. You can do lots of things after making the USB connection. It all starts with connecting the cable.
The Nexus 10 tablet has the ability to connect with a USB peripheral, such as a mouse or keyboard — or any number of USB devices when a USB hub is attached. Not every USB device is supported, however, specifically devices that require supplemental drivers.
The mini-HDMI connection on the Nexus 10 is used to connect the tablet to an HDTV. That way you can view the tablet's screen, watch a movie, or enjoy a photo slideshow on a large screen.
How to connect the Nexus 7 to your computer
The USB connection between the Nexus 7 and your computer works fastest when the devices are physically connected. You make this connection happen by using the USB cable that comes with the tablet. Like nearly every computer cable in the Third Dimension, the USB cable has two ends:
The A end of the USB cable plugs into the computer.
The other end of the cable plugs into the bottom of the Nexus 7.
The connectors are shaped differently and cannot be plugged in either backward or upside down.
After you understand how the cable works, plug the USB cable into one of the computer’s USB ports. Then plug the USB cable into the Nexus 7.
Unlike other Android devices, the Nexus 7 doesn’t show a USB connection status icon atop the screen when the connection is made.
By connecting the Nexus 7 to your computer, you are adding, or mounting, its internal storage to your computer’s storage system. This process allows file transfers to take place.
Even if you don’t use the USB cable to communicate with the computer, the Nexus 7’s battery charges when it’s connected to a computer’s USB port — as long as the computer is turned on, of course.
How to deal with the USB connection in Windows
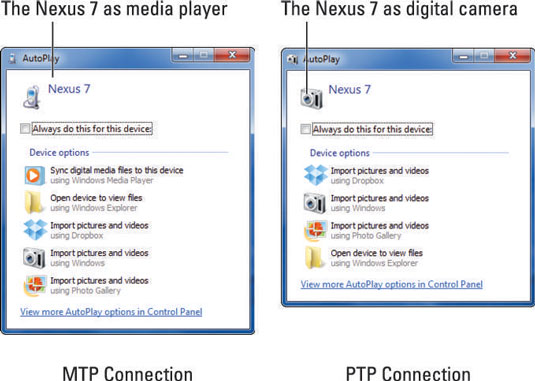
Between the Nexus 7 and your PC, you’ll find it’s the PC that exhibits the most concern when the two devices are connected. You’ll most likely see an AutoPlay dialog box appear when the tablet is first connected. Two different AutoPlay dialog boxes can appear, depending on how the USB connection is configured on the Nexus 7.

In Windows 8, things work differently. This prompt appears on the screen: Tap to Choose What Happens with This Device. Click or touch the prompt to view suggestions similar to those found in the AutoPlay dialog boxes.
Choose an option from the AutoPlay dialog box or just close the dialog box.
The AutoPlay dialog box may not appear when you connect the Nexus 7 to your PC. It’s possible to configure Windows not to display that dialog box, though if you’ve not messed with the AutoPlay settings, an AutoPlay dialog box shows up.
Even if the AutoPlay dialog box doesn’t appear, you can still access media and files stored on the Nexus 7 from your computer.
If you’re nerdy, you can open the Nexus 7’s icon in the Computer window; press the Win+E keyboard shortcut on your PC to see the Computer window. You find the Nexus 7 listed as either a Portable Media Player (MTP) or Digital Camera (PTP). Open the Nexus 7 icon to browse the tablet’s internal storage.
How to connect the Nexus 7 to a Mac
You need special software to goad your Nexus 7 and Macintosh into communicating; the Mac doesn’t natively recognize the tablet. Download the software from Android.com.
Install the software. Run it. From that point on, when you connect the Nexus 7 to the Macintosh, you see a special window appear, listing all folders and files found on the Nexus 7. Use the window for file management.
The Mac recognizes the Nexus 7 only if the tablet is configured as an MTP device.
How to configure the USB connection
Whether the Nexus 7 is recognized as a media device or a camera depends on how you configure the USB connection. If you’ve set the USB connection to MTP, the computer is fooled into thinking that the Nexus 7 is a portable media player. For the PTP connection, the PC believes the tablet to be a digital camera.
Set the Nexus 7’s USB mode by following these steps:
At the Home screen, touch the All Apps icon.
Open the Settings app.
Choose Storage.
Touch the Menu icon and then choose the command USB Computer Connection.
Choose either Media Device (MTP) or Camera (PTP).
The MTP connection isthe most flexible. If you find the Nexus 7 not recognized by your Windows computer, choose the PTP option.
MTP stands for Media Transfer Protocol. PTP stands for Picture Transfer Protocol. Don’t bother memorizing these terms.
How to disconnect the Nexus 7
The process is cinchy: When you’re done transferring files, music, or other media between your PC and the tablet, close all programs and folders you have opened on your computer — specifically, those you’ve used to work with the tablet’s storage. Then you can disconnect the USB cable. That’s it.
It’s a Bad Idea to unplug the tablet while you’re transferring information or while a folder window is open on your computer. Doing so can damage the Nexus 7’s internal storage, rendering unreadable some of the information that’s kept there. To be safe, close those programs and folder windows you’ve opened before disconnecting.
Unlike other external storage on the Macintosh, there’s no need to eject the Nexus 7’s storage when you’re done accessing it. Simply unplug the tablet. The Mac doesn’t get angry when you do so.


