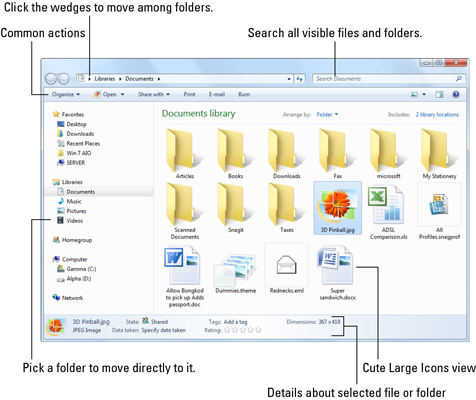
Windows Explorer is the main tool that you use to interact with Windows 7. You’ll need to use the Windows Explorer to view your libraries, files, and folders. You can access Windows Explorer by clicking the Start menu and then clicking either Computer or one of your many folders, such as Documents, Pictures, or Music.

The following tools make it easy to use Windows Explorer:
The Navigation pane. On the left side of the Windows Explorer window, you can click an item to see the files within. Items in the Navigation pane can include folders (such as Downloads); the Favorites list; the Windows 7 libraries (such as Documents and Music); other computers in your Homegroup; other drives on your computer; or other computers on the network.
Use the “breadcrumb” navigation bar to move around. Click the wedges at the top of the Windows Explorer window to select from available folders.
Windows 7 lacks the Up One Level folder button found in Windows XP. However, you can usually go up one level in Windows 7 by holding down the Alt key and pressing the up arrow. Also, the folder one level up normally appears in the "breadcrumb" at the top, so you can just click it there.
Details box. If you click a file or folder once, details for it appear in the Details box at the bottom of the Windows Explorer window.
Command bar. Most of the actions you might want to perform are listed in the Command bar. Many other actions are accessible by right-clicking the file or folder.
Hidden menu bar. If you click Alt, Windows Explorer shows you the old menu bar (File, Edit, View, Tools, Help) from previous versions of Windows with dozens of functions tucked away.
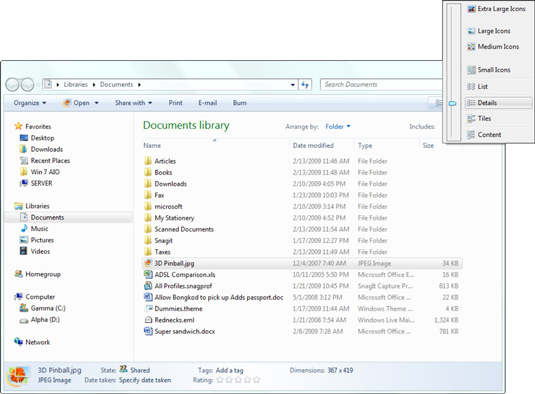
When Windows Explorer opens for the first time, you’ll see the Large Icons view. Although it's impressive, if you’re looking through a folder that contains many files, you’ll probably want to switch to Details view (click the Views button and choose Details). You’ll see a much more succinct list that requires less scrolling.

The other advantage to Details view is that you can sort the list of files by clicking one of the column headings — Name or Date Modified, for example. You can right-click one of the column headings and choose More to change what columns are visible.
Every Windows Explorer window has a button in its upper-right corner, next to the Help question mark, that lets you turn on the Preview pane — a strip along the right side of the window that, in many cases, shows a preview of the file you selected. This is a cool but slow feature. Unless you really need it, you’ll probably want to turn off the Preview pane.


