Excel 2013 enables you to add digital signatures to the workbook files that you send out for review. After checking the spreadsheet and verifying its accuracy and readiness for distribution, you can (assuming that you have the authority within your company) digitally sign the workbook:
To add a digital signature to your finalized workbook, you follow these steps:
Inspect the worksheet data, save all final changes in the workbook file, and then position the cell pointer in a blank cell in the vicinity where you want the signature line graphic object to appear.
Excel adds the signature line graphic object in the area containing the cell pointer. If you don’t move the cell cursor to a blank area, you may have to move the signature line graphic so that graphic’s box doesn’t obscure existing worksheet data or other graphics or embedded charts.
Choose Insert→Text→Signature Line→Microsoft Office Signature Line on the Ribbon.

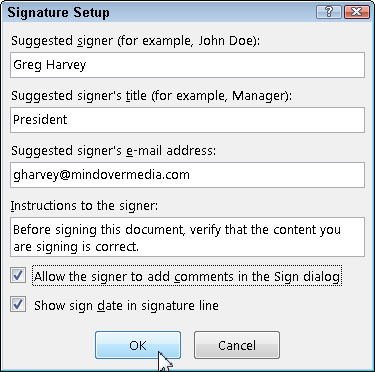
Excel displays the Signature Setup dialog box.
Fill in the Signature Setup dialog box's text boxes.
Type the signer’s name into the Suggested Signer text box and then press Tab.
Type the signer’s title into the Suggested Signer’s Title text box and then press Tab.
Type the signer’s e-mail address into the Suggested Signer’s E-Mail Address text box.
(Optional) Select the Allow the Signer to Add Comments in the Sign Dialog check box if you want to add your own comments.
(Optional) Deselect the Show Sign Date in Signature Line check box if you don’t want the date displayed as part of the digital signature.
Click OK to close the Signature Setup dialog box.
Excel adds a signature line graphic object in the vicinity of the cell cursor with a big X that contains your name and title.
Double-click this signature line graphic object or right-click the object and then choose Sign from its shortcut menu.

If you don’t have a digital ID with one of the subscription services or aren’t a Windows Live subscriber, Excel opens a Get a Digital ID alert dialog box asking you if you want to get one now. Click Yes and then follow the links on the Available Digital IDs Web page to subscribe to one.
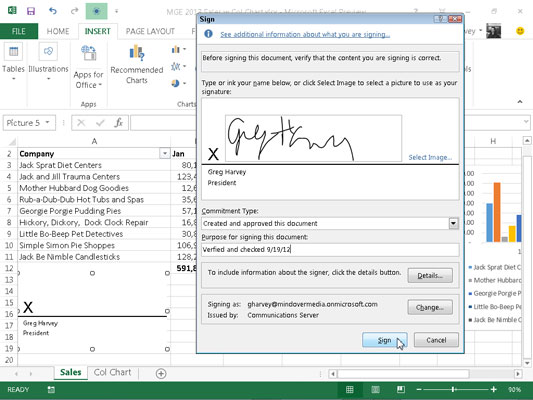
Otherwise, Excel opens the Sign dialog box.
Add your signature to the list box containing the insertion point.
To add your signature, click the Select Image link on the right, select a graphic file that contains a picture of your handwritten signature in the Select Signature Image dialog box, and then click Select. If you’re using a touchscreen device or your computer has a digital tablet connected to it, you add this signature by physically signing your signature with digital ink.
Click the Commitment Type drop-down list box and choose one of the options from its drop-down menu: Created and Approved This Document, Approved This Document, or Created This Document.
If you selected the Allow the Signer to Add Comments in the Sign Dialog check box, the Sign dialog box contains a Purpose for Signing This Document text box that you fill out in the next step.
Click the Purpose for Signing This Document text box and then type in the reason for digitally signing the workbook.
(Optional) Click the Details button to open the Additional Signing Information dialog box, where you can add the signer’s role and title as well as information on the place where the document was created.
(Optional) Click the Change command button to open the Windows Securities dialog box and then click the name of the person whose certificate you want to use in the list box and click OK.
By default, Excel issues a digital certificate for the person whose name is entered in the Suggested Signer text box.
Click the Sign button to close the Sign dialog box.

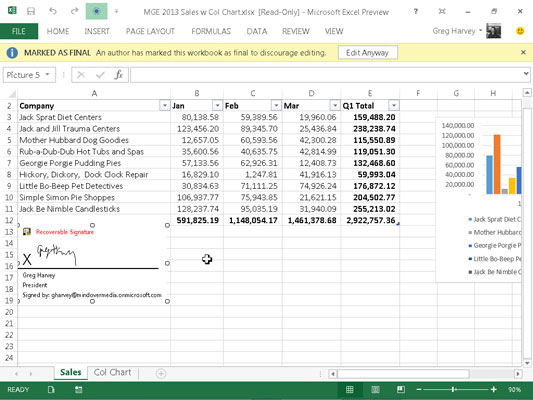
Excel closes the Sign dialog box. Immediately after closing the Sign dialog box, Excel adds your name to the digital signature graphic object and displays the MARKED AS FINAL alert at the top of worksheet


