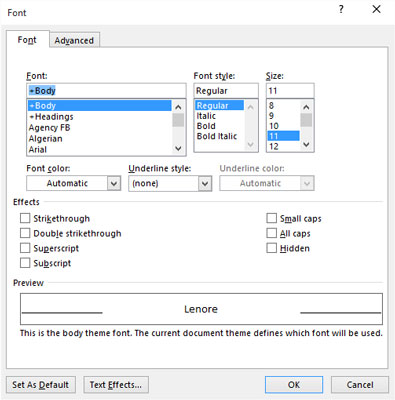
Word 2016 features a single location where all your font-formatting dreams can come true. It's the neatly organized Font dialog box, shown in the following figure.

To summon the Font dialog box, obey these steps:
Click the Home tab.
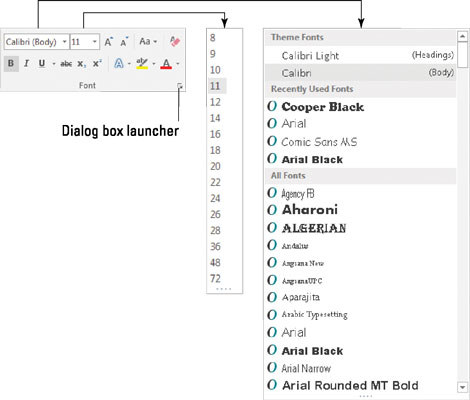
In the Fonts group, click the dialog box launcher button.
The button is found in the lower-right corner of the Font group.
 Use the Dialog box launcher to open the Font dialog box.
The Font dialog box contains all the commands for formatting text, including quite a few that didn't find their way into the Font group on the Ribbon. As with all text formatting, the commands you choose in the Font dialog box affect any new text you type or any selected text in your document.
When you've finished setting up your font stuff, click the OK button. Or click Cancel if you're just visiting.
Use the Ctrl+D keyboard shortcut to quickly summon the Font dialog box.
The best benefit of the Font dialog box is its Preview window, at the bottom. This window shows you exactly how your choices affect text in your document.
The Font names +Body and +Heading refer to the fonts selected by the current document theme. This is done so that you can use Word's theme commands to quickly change body and heading fonts for an entire document all at one time.
Click the Font dialog box's Text Effects button to access interesting text attributes such as Shadow, Outline, Emboss, and Engrave.
The Font dialog box's Advanced tab hosts options for changing the size and position of text on a line.
The Set as Default button in the Font dialog box is used to change the font that Word uses for a new document. If you prefer to use a specific font for all your documents, choose the font (plus other text attributes) in the Font dialog box, and then click the Set as Default button. In the dialog box that appears, choose the option All Documents Based on the Normal Template, and then click the OK button. Afterward, all documents start with the font options you selected.


