Troubleshooting problems in Linux (or any operating system) can encompass many hardware and software issues. Whether the problem is the operating system, the hardware, or a service giving you fits, you can use some basic troubleshooting techniques to start your investigations:
- Document the problem. Write down any and all symptoms that the system is showing, including actions you can and can’t do. Jot down any information you see in error messages.
- Examine the Linux log files. You can find most of these in the
/var/logLook for the word “error.” - Compare your problem system with a working system running the same distribution and version. Sometimes, comparing configuration files and settings may uncover the problem or narrow the possibilities.
- Check connections. Check to make sure that all the hardware is connected properly and powered on. Verify that all cables and connections are attached properly. There’s always someone, somewhere, accidentally kicking a cable out from a wall connection.
- Remove new hardware. Remove any hardware that you have changed or added recently (before the problem started) and see whether the problem disappears. If so, you can probably conclude that the new or changed hardware (or its driver) is the culprit and start researching solutions.
- Reduce the number of active programs. Stop running unnecessary services and applications that aren’t related to the problem at hand. You may more easily figure out what’s happening if other services and applications aren’t getting in the way.
- Check to see whether the problem is reproducible. Does the same sequence of events produce the same problem? Suppose that when you try to print to a color printer, nothing happens. If nothing happens every time you attempt to print, the problem is reproducible. If, instead, sometimes your information is printed and at other times it isn’t, the problem pattern isn’t the same and isn’t reproducible — or it's caused by something more complicated than just clicking one button. Unfortunately, problems that are nonreproducible are more difficult to resolve because it seems that no set pattern of events re-creates those problems.
If you don’t have any problems to troubleshoot (yet), document your environment before you do. Making a backup of your /etc directory and your /boot directory is a great place to start.
Tip #1: “The Linux Installer Froze”
When you’re installing Linux, the installation may just freeze. If it does, wait a bit and make sure that the installation program really froze. (Sometimes, the software just takes a while to process information.) If the software looks like it has frozen, there’s no harm in rebooting your computer and starting over — just as you would do with any operating system installation. Sometimes, you can reboot and never have that problem again. At other times, the problem may happen twice in a row and then be fine the third time. Be sure to try several times before giving up.If the installation still freezes in the same spot or close to the same spot, go to the distribution’s support pages. These pages may talk about some known problems and solutions that can help you and should show you how to join discussion lists to get more assistance. Otherwise, diagnosing the problem can be tricky and may seem more like voodoo than science. Here are some tips:
- If this problem happens repeatedly at exactly the same spot, you may have a bad installation ISO image or DVD burn. See the next tip, “Checking Your Distribution Burns,” and then return here if that technique doesn’t solve your problem. Otherwise, try the DVD or USB stick in another machine if possible and see whether the installation fails in the same place there. If you purchased an installation DVD from someone, contact their technical support team. If you burned the ISO image onto a DVD yourself, try burning a new copy at a slower speed, or if your PC can boot from a USB device, burn it onto a USB stick.
- If this problem happens repeatedly at exactly the same spot and you don’t have a bad installation disk, the trouble may be with one of your machine’s hardware components. If you can, try trading hardware between machines. If not, you may need to choose a different machine on which to install Linux or try another distribution.
- If the problem seems to happen randomly, your particular Linux distribution may not be compatible with that particular machine. Again, you can try using another distribution and see whether it detects your hardware. If not, try trading some hardware around, installing Linux on another machine.
If you’re not sure whether your installer has frozen, try pressing various combinations of Alt+F#, where # corresponds to one of the function keys. Depending on the distribution, the installer has not completely frozen if you can see different screens when you try this technique.
Tip #2: Checking Your Distribution Burns
Some Linux distributions (such as Ubuntu and openSUSE) provide the option to check the installation medium for errors. If your installation keeps dying while the installer program is placing packages on your hard drive, follow these steps to try to fix it:- Place the DVD into your drive.
- Reboot the machine.
- Wait until you reach the boot menu. If you’ve changed your mind and just want to start the installation, use the Tab or arrow keys to select Skip and then press Enter.
- Use the Tab or arrow keys to select the option to inspect the installation media.
- Press Enter to begin the media check. The Media Check status box opens and shows you the name assigned to the DVD and how much progress has been made. At the end of the inspection, the Media Check Result dialog box opens.
- Look at the text after
and the result is. If the result isPASS, nothing is wrong with the DVD itself. Your installation woes are caused by something else.
FAIL, the DVD you just tested is flawed. If you purchased this DVD, you need to talk to the company you purchased it from to see whether you can get a replacement. On the other hand, if you burned your own DVD from an ISO file, I recommend doing one of the following:
- Burn the DVD again, at a slower speed.
- Burn the DVD again on a newer drive with BurnProof technology or something similar.
Tip #3: “I Told the Installer to Test My Graphics, and They Failed”
The installer may have guessed wrong about what hardware you have. Double-check the settings as best you can. If they look right, try choosing a lower resolution for now and testing again, and if that fails try a lower number of colors and test again. You can then try setting things back the way you want them after the machine is fully installed and updated, when it hopefully has a fix for whatever the problem might be.Tip #4: “The Installer Tested My Graphics Fine, but My GUI Won’t Start”
If your Linux installation program showed you a GUI desktop saying that you were ready to proceed with the rest of the installation, you probably expected that the GUI would start with no problem. Unfortunately, that doesn’t always happen.If you boot your machine for the first time and see error messages when you’re trying to enter the GUI automatically or when you type startx to start the GUI manually, type system-config-display at a command prompt to start a program that can help you fix the problem.
Tip #5: “I Think I’m in Linux, but I Don’t Know What to Do!”
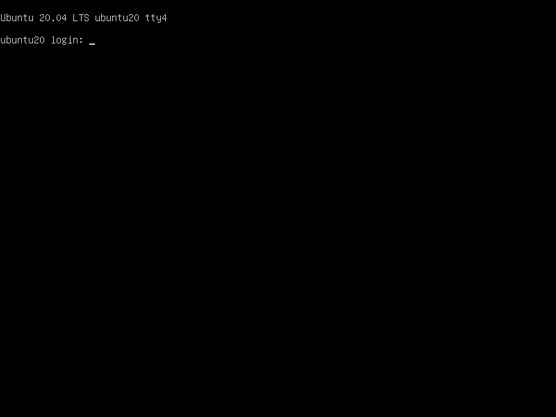
Two different screens tend to cause panic to folks new to Linux. The first of these screens, shown in the figure, is in fact a sign that you installed the software and booted the machine successfully. Jump for joy! It’s just that you’re booting into the command-line environment rather than the GUI environment. If you reach a screen similar to the one shown, the computer is asking you to log in with the username for an account and a password that you created during the installation process. A Linux command-line login prompt.
If you created only the root account, you can log in there as root.
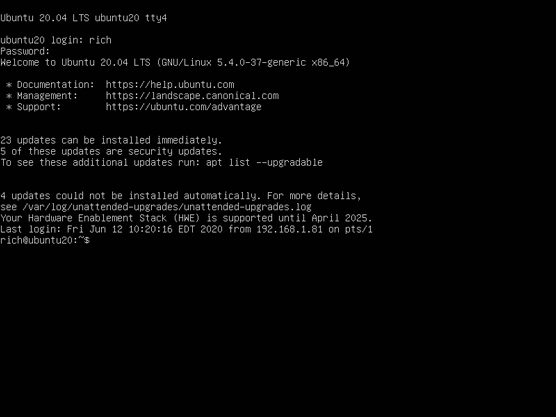
After you enter the username and password, you find yourself at the screen shown , which just happens to be the second spot where people get worried. If you see this screen, you have not only booted properly into Linux, but you’re also logged in and using the machine! Give yourself a good pat on the back. Logged in at the Linux command line.
What do you do from here? Anything you want. Type startx to start up the GUI. If you didn’t install any GUI (which means you selected a minimal install option with no graphical interface, or you actually unselected graphics), you may want to reinstall, or you have to add all the tools by hand (which is not a quick job!).
Tip #6: “I Don’t Want to Boot into This!”
Are you booting into the command-line environment when you want to use only the GUI? Or are you finding that you’re already booting into the GUI and you would rather boot to that nice, clean, black-and-white command line screen? You’re not stuck with either of these options. You can change them at any time.You can press Ctrl+Alt+F# (F# refers to function keys F2 through F6) to change out of the GUI to a command line terminal at any time and then Ctrl+Alt+F2 or Ctrl+Alt+F8 to switch back.
Tip #7: Changing Your Boot Environment “Permanently”
The word permanently is in quotes in the heading because you can, of course, go back and change this setting later, if you want. Permanently just refers to the fact that after you have made this change, every time you boot the system, it automatically goes into the preferred environment until you change it.To make this change you need to determine what startup method your Linux distribution uses. Currently there are two popular Linux startup methods:
- SysVinit: The original method used in Linux, copied from the Unix world. This uses a set of scripts that the OS runs at boot time. The configuration files determine which services to start, and what mode (command line or GUI) to start.
- Systemd: The systemd startup method is a relatively new startup method developed specifically for Linux. Instead of startup scripts it uses configuration files.
ps -p 1
If the result shows the systemd program is running as PID 1, your system uses the systemd startup method. If the result shows the init program is running as PID 1, your system uses the SysVinit startup method.
For systems that use the systemd startup method, follow these steps to change the default boot environment:
- In the GUI, open a command line terminal.
- Type the following:
sudo systemctl set-default multi-user.target - Reboot the system.
sudo systemctl set-default graphical.target
For distributions that use the SysVinit startup method, you need to manually edit what’s called a run level. Fortunately, these distributions use the same run level settings, so the instructions are the same for all of them:
- In the GUI, open a command line terminal.
- Type the following:
sudo cp /etc/inittab /etc/inittab.oldThis creates a backup of the currentinittabfile. Now, if something happens while you’re editing theinittabfile, you can always restart fresh with the old version. - Open the
inittabfile in your preferred text editor. - Scroll down until you find a line similar to the following:
id:5:initdefault:This line appears near the top of the file. What you’re interested in here is the number. In most mainstream Linux distributions, the number5tells Linux to boot into the GUI, and the number3tells Linux to boot into the command line. In the preceding example, therefore, I boot into the GUI. - Change the number in this line. If it’s a
5, change it to3, and vice versa. Make sure that all colons and other items are left properly in place, or else your machine will have problems booting later. - Save and exit the file. The changes go into effect the next time you reboot the system.
If you do end up having problems booting the system, just about any Linux LiveDVD distribution can be used as an emergency boot disk.
Changing your boot environment just for now
At any time, you can also have your Linux box switch between full command-line mode and full GUI mode.To switch between modes in a systemd startup method, do the following:
- To change from the GUI login to the command line login, open a terminal window and type:
sudo systemctl isolate multi-user.target
- To change from the command line login to the GUI login, type:
sudo systemctl isolate graphical.targetTo switch between modes in a SysVinit startup method, do the following:
- To change from the GUI login to the command-line login, open a terminal window and type:
sudo init 3
- To change from the command line login to the GUI login, type:
sudo init 5
Tip #8: “I Want to Change Screen Resolutions”
Do you want or need to swap between resolutions in the GUI on the fly? Suppose that you want to use 1,024 x 768, but you work on web pages and want to be able to see how they look in a browser at 800 x 600 or even 640 x 480. Your machine is very likely already set up to do this, but you just need to know how!If your machine is set up for it, you can change resolutions by pressing Ctrl+Alt+Plus, where Plus is the big key with the plus (+) sign on your number pad — you can’t use the plus (+) sign on the main keyboard for this one.
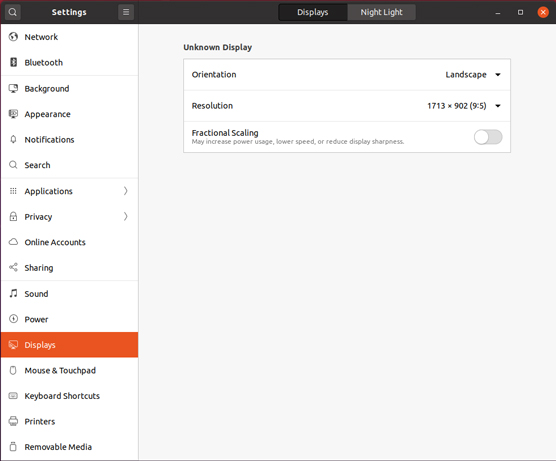
If that doesn't work in your desktop, often you can right-click an empty place in the desktop and choose Display. This is shown in the following figure for Ubuntu.
 The Display Settings window in Ubuntu.
You can change the display resolution settings at any time, and then change them back as you need!
Tip #9: “My GUI Is Hung, and I’m Stuck!”
One quick solution to this problem is pressing Ctrl+Alt+Backspace. If this doesn’t do the trick, your system is in really bad shape! Try to switch to a virtual terminal by using Ctrl+Alt+F5. If this key combination also does nothing, you need to reboot the machine.Tip #10: “Help, My Machine Hangs During Boot!”
When configuring a Linux machine, you may encounter problems with the GRUB2 bootloader program, which is what loads the Linux kernel. This program uses a configuration file to indicate the operating system or systems to which your system can boot, and the file also contains Linux startup settings.You can alter the GRUB2 boot settings "on the fly" as the system boots, but you have to get into the GRUB2 menu to do that. Some Linux systems (such as openSUSE) bring up the GRUB2 boot menu all the time, making it easy to make changes. Just press the E key while booting to edit the menu.
Unfortunately, many Linux distributions (such as Ubuntu) hide the GRUB2 boot menu and automatically jump into booting the system. To get to the GRUB2 menu to make changes you need to stop the boot process midstream.
Just how you do that depends on your system:
- For older systems that use BIOS firmware, hold down a Shift key as the system first boots. If you see the distribution splash screen you're too late; try again.
- For systems that use the newer UEFI firmware, hold down the ESC key as the system first boots. Again, if you see the distribution splash screen you're too late; try again.
Linux line in the configuration, add the word single to the list of options on that line, and then press F10 to reboot using the new options. Linux starts in single-user command line mode. From here you can look at the log files in the /var/log folder to see what previous boot attempts failed.
“Aaargh! I Forgot My Root Password! What Do I Do?”
Fear not. You have a way around this problem! You need to boot into single-user mode, which you can accomplish by rebooting your machine. When you see the blue screen with the words “Press any key to enter the menu,” press a key. At the GRUB boot screen, press E, which takes you to a configuration file. Use the arrow keys to go to the line starting withLinux, and press E again to edit that line. At the end of the line, add the word single, press Enter to put the change into place, and then press B to boot the machine.Type passwd and then enter the new password twice as directed. When you finish, type exit and then boot the machine normally.


