These D5300 features aren’t the sort that drive people to choose one camera over another, and they may come in handy only on certain occasions. But, they’re still fun to try!
Tag files with GPS data
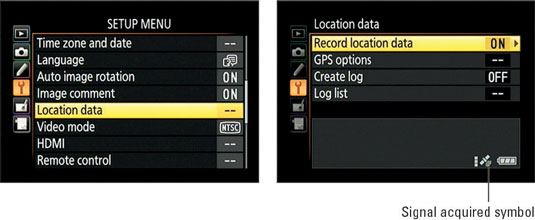
To enable GPS tagging, select Location Data from the Setup menu and set the Record Location Data option to On, as shown on the right. The camera begins searching for a signal, and the satellite symbol starts to blink. When the symbol stops blinking, the signal is acquired and the data will be added to your next file.
The other three options enable you to control the following aspects of the system:
GPS Options: Select this menu item to access these three settings:
Standby Timer
Set Clock from Satellite
Update A-GPS Data
Create log and Log List: When GPS is enabled, turning this feature on tells the camera to log its current position at periodic intervals, even when you're not shooting.
Add hidden image comments
Through the Image Comment feature on the Setup menu, you can add hidden text comments to your picture files.
The text doesn't appear on the photo itself; instead, it's stored with other metadata. You can view the comment during playback in the Shooting Data display mode or along with other metadata in Nikon ViewNX 2. Enable the feature via the Image Comment option on the Setup menu.
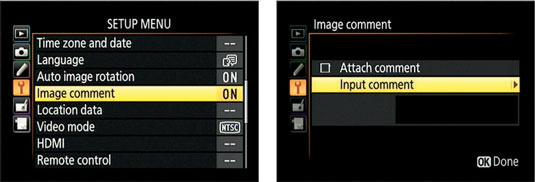
Press OK, highlight Input Comment, and press the Multi Selector right to display the keyboard screen.
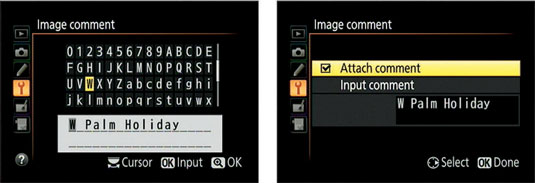
After entering your comment, press the Zoom In button. You should see your text comment underneath the Input Comment line. Highlight Attach Comment and press the Multi Selector right to put a check mark in the box and then press OK.
Create custom image folders
To create a custom folder, select Storage Folder from the Shooting menu and then highlight New. Press the Multi Selector right to display the same keyboard screen that appears when you add image comments. Enter a folder name up to five characters long.
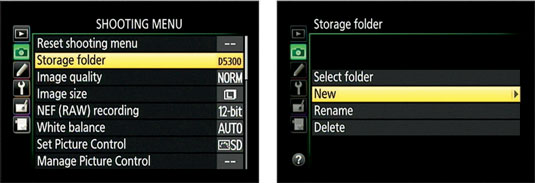
Press the Zoom In button. The folder you just created is automatically selected as the active folder.
Create your own menu
You can build a custom menu that holds up to 20 of the options you use most frequently. Here's how:
Display the my Menu menu.

If the Recent Settings menu appears instead, scroll to the end of that menu, select Choose Tab, press OK, select my Menu, and press OK again.
Highlight Add Items and press OK.
Select the menu that contains an option you want to add to your menu and press the Multi Selector right.

To add an item to your menu, highlight it and press OK.
Repeat to add more items to your menu.
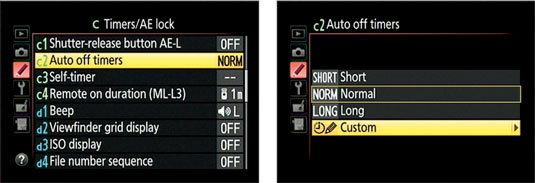
Adjust automatic shutdown timing
When the camera is in shooting mode, its standby timer feature saves battery power by shutting off the Information display and viewfinder after a period of inactivity. You can control the auto-shutdown timing through the Auto Off Timers option, found in the Timers/AE Lock section of the Custom Setting menu.
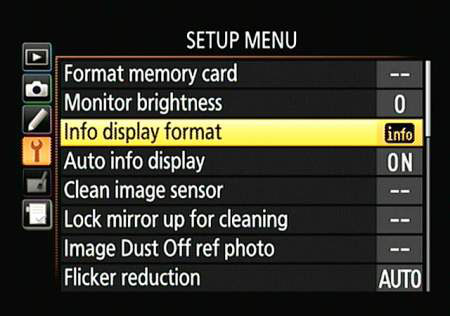
Change the look of the Information Display
By default, the Information display appears with the three large circular graphics. If you prefer, you can switch to the simpler design. You also can change the background color from black to blue or light gray.

Select the design via the Info Display Format option on the Setup menu. You can specify the design used for the P, S, A, and M exposure modes separately from the one used for the other modes.
Keep the Information Display hidden
Turn off the Auto Info Display option, and the Information screen appears briefly when you first turn on the camera, but after that, you must press the Info button to display it. Because the monitor is one of the biggest drains of battery power, you may want to set the option to Off if your battery is running low.
Customize a few buttons
You can customize the following buttons:
Function (FN) button: Establish this button’s behavior via the Assign Fn Button option, found on the Controls submenu of the Custom Setting menu.

Choose from these settings:
Image Quality/Size
ISO Sensitivity
White Balance
Active D-Lighting
HDR mode
+ NEF (RAW)
Auto bracketing
AF-area mode.
Viewfinder grid display
Wi-Fi
AE-L/AF-L button: This button is related to the autoexposure and autofocusing systems. You can set the button to perform the following functions via the Assign AE-L/AF-L Button, found on the Controls section of the Custom Setting menu:
AE/AF Lock
AE Lock Only
AE Lock
AF Lock Only
AF-On
Shutter button: The Timers/AE Lock section of the Custom Setting menu offers an option called Shutter-Release Button AE-Lock. This option determines whether pressing the shutter button halfway locks focus only or locks focus and exposure.

Reverse the Command dial orientation
By default, rotating the Command dial to the right raises the value that's being adjusted. You can tell the camera that you prefer to rotate the dial to the right to lower the values.
To do so, cruise to the Controls section of the Custom Setting menu and choose Reverse Dial Rotation. Press OK to access the second screen, where you can modify the dial orientation separately for Exposure Compensation and shutter speed/aperture adjustment. To reverse the dial orientation, highlight the setting and press the Multi Selector right to place a check mark in the box.

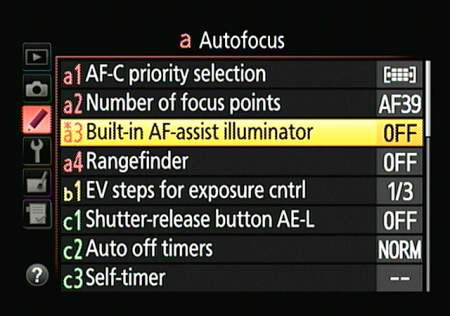
Turn off the AF-Assist Illuminator
In dim lighting, the camera may emit a beam of light from the AF-assist light, the little lamp just below the Mode dial, on the front of the camera. If that light could be distracting to your subject or others in the room, you can disable it by visiting the Autofocus section of the Custom Setting menu and setting the Built-in AF-Assist Illuminator option to Off.