Shooting screens
If you’ve used a Mac for long, you probably know that you can grab a picture of what’s on your screen by using the shortcuts Command +Shift+3 for the whole screen or Command +Shift+4 to select a window or part of the screen. Those shortcuts and features have been around since time immemorial.When you take a screenshot using your old-school shortcuts — Command +Shift+3 or Command +Shift+4 — a thumbnail of the screenshot appears in the lower-right corner of the screen.
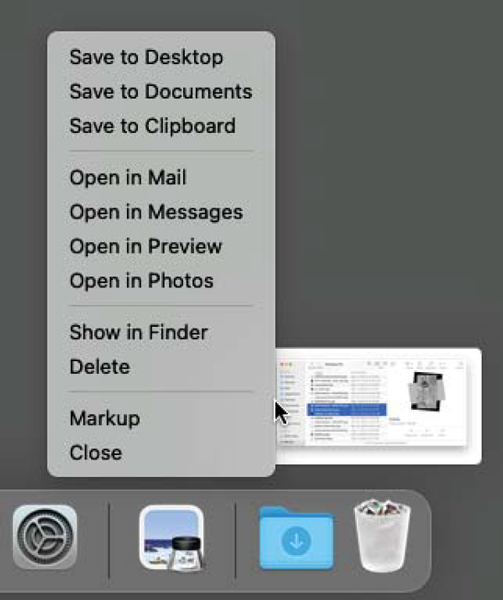
If you do nothing, the thumbnail disappears after about 5 seconds, and then the screenshot is saved on your desktop. To see additional options, right- or Control-click the thumbnail and choose from the shortcut menu, as shown.
 After you take a screenshot, a thumbnail appears in the lower-right corner of the screen; right- or Control-click for additional options.
Or just single-click the thumbnail before it disappears and the image opens in a window with Markup tools so you can annotate the image before you save it.
When you have finished annotating, click Done to save the screenshot and annotations to the desktop, or click Revert to close the overlay without saving your annotations.
If you don’t want to save a file at all, add the Control key to the keyboard shortcut (Command+Shift+Control+3 or Command+Shift+Control+3). Instead of saving the screenshot to a file, it will be sent to the clipboard, so you can paste it into any document that will accept an image from the clipboard.
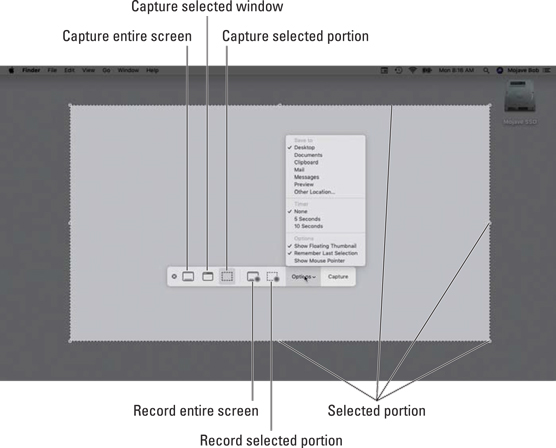
But it gets even better with one more fabulous screen-shooting shortcut that provides even more control over screenshots and adds the capability to record screen movies. This magical shortcut is Command +Shift+5, and it’s the only shortcut you really have to memorize because its floating toolbar, shown, includes all the functionality of the Command +Shift+3 and Command +Shift+4 shortcuts and more. The screenshot toolbar appears when you press Command +Shift+5.
Notice the Options pop-up menu, which lets you do the following:
- Change the destination for screenshots from Desktop (the default) to Documents, Clipboard, Mail, Messages, Preview, or Other Location
- Set a timer for shots
- Turn on and off the floating thumbnail
- Remember the last selection you made (or not)
- Show or hide the mouse pointer
Bottom line: Memorize Big Sur’s one keyboard shortcut to rule them all — Command +Shift+5 — and use it for all of your screen-capturing needs.
Dynamic desktop images
When you choose your desktop picture, you’ll find a pair of dynamic desktop options above all the normal desktop pictures in the Desktop & Screen Saver System Preferences pane.Because a picture is worth a thousand words, take a gander at this figure, which explains it all.
 A dynamic desktop at 4:33 PM (top) and 11:33 PM (bottom).
Recently used apps in the dock
A relatively new feature to the dock is the Recently Used Apps section, which displays icons for the last three apps you’ve launched, regardless of whether their icons are in the dock permanently.Mentions of Gallery view
Gallery view is great for browsing folders full of images.
Click an image and then use the arrow keys to see the next or previous image; click the Markup, Rotate, or More icon to edit the current image.And that retires the side, at least as far as features in Big Sur’s Finder are concerned. Onward!


