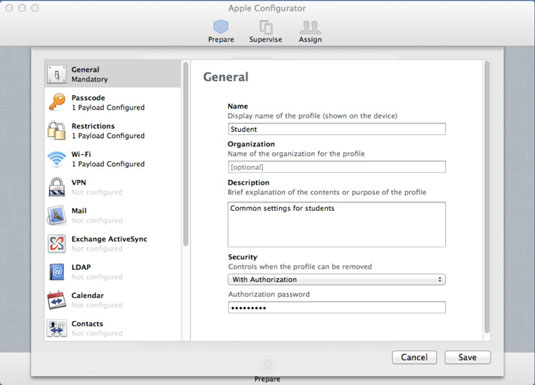
Assuming you want to setup a manageable group of iPads for classroom use (from 10 to 150 iPads), your best option is Apple Configurator. Use Configurator to setup new iPads, install iPad apps, and manage individual settings.
iPad device management has three stages: prepare, supervise, and assign. Each stage has a corresponding pane in Apple Configurator.

Prepare iPads for classrooms with Apple Configurator
The first stage prepares a set of iOS devices. The most common practices are as follows:
Create a master iPad. A master iPad has all the apps and settings you want to deploy. You use Configurator to back up this iPad and restore the backup to other devices. You can apply only one backup to any specific device.
Create a series of configuration profiles, which are then deployed to devices and users. A profile is essentially a template that consists of a combination of settings that applies to a specific group of users, such as students, teachers, or administrators, or to devices, such as library iPads, Science iPads, computer lab, and so on.
Unlike with backups, you can apply as many configuration profiles to devices as you’d like. For example, you may want to apply the library profile and the student profile to a group of iPads.
Profiles can be used to set restrictions such as disabling app downloads and in-app purchases; disabling apps such as FaceTime and iTunes; and disabling the capability to change e-mail accounts, multiplayer gaming, and many additional options.
Profiles determine and set e-mail accounts, wireless network connections, policy for passcode length, Safari preferences, common user contacts and calendars, and more. Also, you may create different profiles according to user. For example, you may want your teachers to have YouTube access and access to a wireless network that isn’t filtered. That can be easily accomplished by creating and applying a different user profile for teacher iPads.
Additional options include the installation of a specific version of iOS and, more important, whether to supervise devices. If you elect to configure a device as supervised, it means you can’t supervise it or sync it with any other computer running Apple Configurator or iTunes.
Supervise iPads in classrooms with Apple Configurator
The second stage in the deployment of iPads in the classroom is supervision; you access the settings for this stage under the Supervise tab in Configurator’s main toolbar. Typically, you would have your computer connected to a set of iPads in a cart or powered USB hub at this stage. When you connect supervised devices, they are erased, and you specify which configurations to restore.
You may supervise devices with an identical configuration that needs to be controlled and configured by Apple Configurator on an ongoing basis. Supervised devices can’t be synced with iTunes or Apple Configurator on a different computer.
The first two columns list your devices — those currently connected through a USB connection and other supervised devices that aren’t connected. The iPads are listed in groups, and you can add and organize devices into groups as needed.
A group is essentially a combination of settings and apps as defined by the third panel on the right. You would probably have a separate set of settings and apps for your science faculty than you might for the history faculty or for the students in third grade.
Select the device you want to configure, or click All to configure all devices in the current group. Make any changes in the Settings and Apps panes and then click the Apply button. You can also make changes to devices that are not currently connected, but those changes will not take effect until the next time the device is connected.
To add apps to a device or group, use the Volume Purchasing program. In Apple Configurator, click Prepare or Supervise, click Apps, and then click the Add App button at the bottom of the window. When you click the Apps tab in the Supervise pane, Configurator will display your purchased apps or prompt you for their location.
Apple’s Volume Purchasing Program (VPP) enables schools to purchase apps in larger quantities at a discount. A spreadsheet is created with redemption codes for each purchased install.
Add the paid app to Apple Configurator and then import the VPP codes for it by clicking the indicator next to the app with the numeral 0 in it. Select the Import Redemption Codes option and the spreadsheet containing the codes purchased for the app.
Assign iPads to students with Apple Configurator
This optional third stage enables you to assign any supervised device to a user you’ve defined within Apple Configurator. Supervised devices that have been assigned to users can be personalized with documents and data.
User data is backed up and restored each time a device is checked in or out so that users can access their data no matter which device they use. The Assign pane in Apple Configurator lists users and the devices each user has checked out. You can use the Assign pane to check out and check in devices, create users and user groups, and install and retrieve documents.


