Your PC doesn’t just sit there when other gizmos bump into it. The PC reacts instantly, installing software to access the gizmo. If the gizmo contains media, Windows asks you what to do next. That prompt is called AutoPlay.
Dealing with another device
Connecting another gizmo to your PC is met by a flurry of activity. If the device, or its type, is familiar to your computer, predicted actions occur. For example, inserting a musical CD might result in that music playing automatically.
For devices unknown to your computer, Windows attempts to make nice. First, Windows installs special software to control the device. This software falls under the category of device driver or just driver. Once that software is installed, you can begin using the device, such as a digital camera or perhaps a cell phone.
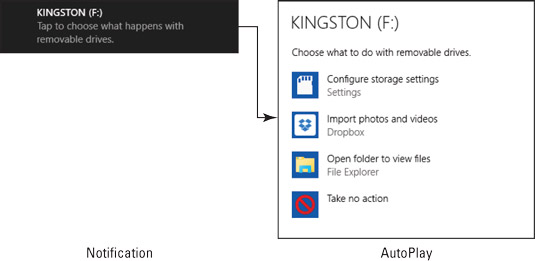
For storage devices and other media, you see a notice appear. Click or tap the notice to view an AutoPlay list.

In some versions of Windows, the AutoPlay list appears automatically, without the need to click a notification.
You use the AutoPlay list to instruct the PC how to handle the new device. Your choices are presented in a list, or you can choose to do nothing by dismissing the AutoPlay list or choosing the option Take No Action.
Here an example of how you can deal with another device:
Attach the device to your PC.
Connect a digital camera, phone, tablet, thumb drive, or other item to one of the computer’s USB ports. Or you can insert an optical disc.
Click the notification to display the AutoPlay list.
Choose a command, such as Open Folder to View Files.
For most external storage, you could open a File Explorer window to manage its files. For a media card from a digital camera, you might choose the option to import the photos.
Complete whatever action you chose in Step 3.
Some options, such as importing pictures or videos, require additional steps.
Here are a couple of other things to remember about AutoPlay
The AutoPlay choice appears as a list in Windows 10 (and in Windows 8). In earlier versions of Windows, AutoPlay shows up as a dialog box.
Windows may need to venture out to the Internet to hunt down drivers. If you see a prompt asking whether the PC can locate drivers on the Internet, click the Yes or OK button to proceed.
Manually summoning AutoPlay
If the AutoPlay list or dialog box doesn’t appear, or if it vanishes before you made a choice, you can display it again. Follow these steps:
Press Win + E to summon a File Explorer window.
In Windows 10, choose This PC from the list of locations on the left side of the window.
In older versions of Windows, the Computer window appears when you press the Win + E keyboard shortcut, which is where you need to be.
Right-click the drive icon representing the media you inserted.
Choose Open AutoPlay from the pop-up menu.
The AutoPlay list or dialog box appears, from which you can select an option.
Other items on the pop-up menu may actually be shortcuts to some of the items shown in the AutoPlay list. For example: Open to view a File Explorer window and examine files; Install or Run program; Import Pictures and Videos; and so on. Choose that item in Step 4.
Setting AutoPlay options
AutoPlay may prompt you or it may not. Or maybe you get sick of the prompts and just want to plug in a gizmo and deal with it later. To make such adjustments, you need to visit the AutoPlay settings.
In Windows 10, follow these steps to adjust the AutoPlay settings:
Open the Settings app.
Press the Win + I keyboard shortcut.
Click the Devices button.
From the left side of the window, choose AutoPlay.
You see the three categories for removable devices on the right side of the window.
 AutoPlay settings in Windows 10.
In Windows 10, you can disable AutoPlay by clicking the toggle and setting it to the Off position. Otherwise, set your choices for the three categories; choose an item from the menu based on what you want the PC to do automatically when that type of media is inserted.
In Windows 7, obey these directions to configure AutoPlay options:
Open the Control Panel.
Choose Control Panel from the Start menu.
Click the heading Hardware and Sound.
Click the AutoPlay heading.
You see a list of several — way too many — options for various items that can be inserted into your PC.
Three AutoPlay options are worth noting, and they apply to all AutoPlay conditions:
Choose a default. This setting appears when no option is chosen. Windows prompts you every time you insert the media.
Take no action. This option directs Windows not to do squat when you insert the media.
Ask me every time. This setting confirms that Windows always displays an AutoPlay list or dialog box.
Choose one of these options to control how Windows reacts when inserting specific media.
Another thing you can do in the AutoPlay settings window is reset a previous “do this all the time” type of setting. For example, if music always plays when you insert a CD, change that setting to Take No Action or Ask Me Every Time.


