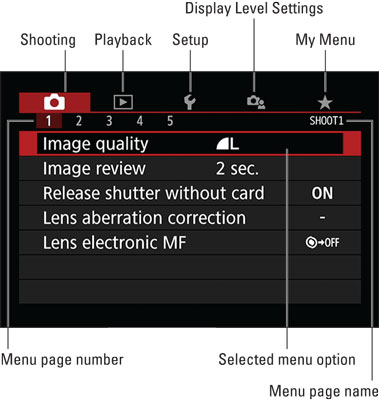
Here's how to display menus and adjust the options on those menus:
- Opening and closing menus: Press the Menu button to display the menus; press again to exit the menu system and return to shooting. You also can just press the shutter button halfway and release it to exit to shooting mode.
- Understanding menu screens: Which menus and menu screens appear depends on the exposure mode, which you set by rotating the Mode dial on top of the camera. Things also change when you switch from still photography to Movie mode, which you accomplish by rotating the On/Off switch to the movie-camera symbol. The figure shows a menu screen as it appears for normal photography in the advanced exposure modes (P, Tv, Av, and M).
However, the following menu elements are common to all exposure modes:
- Menu icons: Along the top of the screen, you see icons representing individual menus. In the advanced exposure modes, you get the five menus labeled: Shooting, Playback, Setup, Display Level Settings, and My Menu. The My Menu feature, which enables you to build a custom menu, isn't available in other exposure modes.
- Menu page numbers: Some menus are multi-page (sometimes called tabs) affairs. The numbers under the menu icons represent the various pages of the current menu.
o Shooting Menu 1 refers to page one of the Shooting menu, Shooting Menu 2 to page 2, and so on. How many pages appear for each menu depends, again, on the exposure mode and whether the camera is set to still photography or Movie mode.
The highlighted menu icon marks the active menu; options on that menu appear automatically on the main part of the screen. In the figure, Shooting Menu 1 is active, for example.
- Selecting a menu or menu page: You have these options:
- Touch screen: Tap the menu icon to select that menu; tap a page number to display that page.
- Quick Control keys or Main dial: Press the right or left cross keys or rotate the Main dial to scroll through the menu icons. If you use this technique, you have to scroll through all pages of a menu to get to the neighboring menu.
- Q button: Press the Q button to cycle through menu icons.
As you scroll through the menus, notice the color coding: Red for the Shooting menu, blue for the Playback menu; orangey-yellow (ochre?) for the Setup menu, teal for Display Level Settings; and green for My Menu.
- Select and adjust a menu setting: Again, you have a choice of techniques:
- Touch screen: Tap the menu item to display options for that setting. The current setting is highlighted; tap another setting to select it. On some screens, you see a Set icon; if it appears, tap that icon to lock in your selection and exit the settings screen.
- Quick Control dial, Quick Control keys, and Set button: Rotate the Quick Control dial or press the up or down Quick Control keys to highlight the menu setting and then press the Set button to display the available options for that setting. In most cases, you then use the Quick Control dial to highlight the desired option and press Set again. If you prefer, use the cross keys to highlight your preferred setting before pressing the Set button.
You can mix and match techniques, by the way: For example, even if you access a menu option via the control keys, you can use the touch-screen techniques to select a setting.
 You can access all menus only when the Mode dial is set to P, Tv, Av, or M.
Instructions from this point forward assume that you don't need to be told the specifics of how to select menus and menu options at every turn. So instead of stepping you through each button press or touch-screen tap required to adjust a setting, instructions simply say something like "Choose Image Quality from Shooting Menu 1." If choosing a menu option involves any special steps, however, instructions offer guidance.


