


The Retouch menu's Trim tool enables you to create a cropped copy of a photo right in the camera. However, always make this your last editing step because you can't apply any other Retouch menu tools to cropped images.
After you select Trim from the menu, you see the screen shown here. The yellow box represents the boundaries of the crop frame. Adjust the aspect ratio, size, and position of the frame as follows:
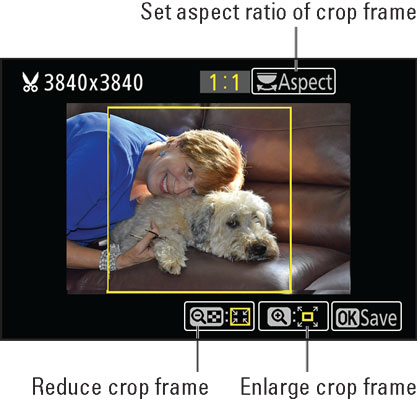 The yellow box indicates the cropping frame.
- Set the aspect ratio: You can choose 3:2, 4:3, 5:4, 1:1, and 16:9. (Hint: Use 1:1, as in the figure, to fit the frame size used for Facebook profile pictures.) To cycle through the settings, tap that Aspect symbol, labeled in the figure, or rotate the Command dial.


- Adjust the size of the crop frame: The current size, stated in pixels, appears in the upper-left corner of the screen. To reduce the frame size, press the Zoom Out button or tap the Zoom Out icon; to enlarge the frame, press the Zoom In button or tap the Zoom In icon. Each press or tap further shrinks or enlarges the frame. The range of sizes available depends on the original pixel count (resolution) of the photo.
- Reposition the frame. Drag your finger inside the crop frame or press the Multi Selector up, down, right, or left.
When viewing your photos in the default playback display mode (as well as certain other display modes), you see a scissors symbol near the Image Size readout. This symbol is different from the one that appears if you use the Resize option, which creates a lower-resolution version of the entire image, maintaining the original 3:2 proportions.


