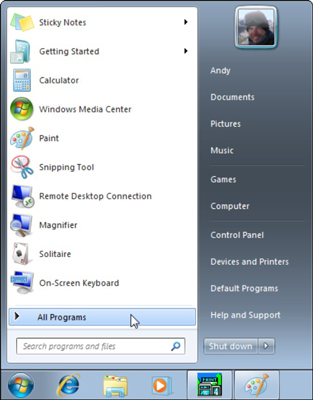
As with Windows Vista and Windows XP, the blue Start button in the bottom-left corner can lead you to just about anywhere on a PC. Although the Windows 7 Start Menu is similar to previous versions, there are some differences that you’ll want to get to know.
Click the Start button once, and a stack of menus pops out.

Your Start menu will change as you add more programs to your computer. Consequently, the Start menu on each computer will be arranged a bit differently. But it will always be split into two sides: one filled with icons, the other with words.
Left side — easy access icons
The left side constantly changes, always listing the icons of your most frequently used programs. Your most oft-accessed program eventually resides atop the stack.
If you see an arrow to the right of one of your frequently accessed programs, you can click it to see a list of the last few files you worked on.
Click the All Programs link near the Start menu’s bottom left to open a more extensive listing of the programs on your PC. To go back to the original menu view, just click the word Back.
Use the Search box (directly above the Start button) to find content. It could be a file, program, name of a song, or nearly anything else — even a few words inside a document. And unlike Windows Vista, this search actually works.
Spot something confusing on the Start menu’s right side? Hover your mouse pointer over the mysterious icon. Windows responds with a helpful explanatory message.
If you've upgraded from Windows Vista or Windows XP, you'll notice that the icons for Internet Explorer and Outlook Express are missing. Windows 7 dumped Outlook Express completely and moved the Internet Explorer icon to the taskbar. To reattach Internet Explorer icon atop the Start menu, click the Start button, choose All Programs, right-click the Internet Explorer icon, and choose Pin to Start Menu.
Right side — have it your way
The Start menu’s right side, by contrast, never changes (unless you want it to). Instead, it lists these places, each one leading to a special spot in Windows:
Your Name: Click here to see a folder containing most of your files and folders.
Documents: This command quickly shows the contents of your Documents library.
Pictures: Click here to see your stored digital photos and images.
Music: Store your digital music in here so Media Player can find it more easily.
Technically, the Start menu’s Documents, Pictures, and Music buttons don’t take you to those folders, but their libraries — Windows 7 term for a “super” folder that shows contents of several folders.
Games: Windows 7 offers most of the same games as Windows Vista, minus InkBall, and added Internet Checkers and Internet Backgammon.
Computer: This option displays your computer’s storage areas: folders, disk drives, CD drives, digital cameras, flash drives, networked PCs, and other places that hide your Most Wanted items.
Control Panel: This bundle of switches lets you adjust your computer settings.
Devices and Printers: This lists your printer, monitor, mouse, and other attached gadgets to make sure they’re working properly.
Default Programs: Click here to control which program steps in when you open a file.
Help and Support: Befuddled? Click here for an answer.
Shut Down: Clicking here turns off your PC. Or, click the icon’s little arrow to Switch User, Log Off, Lock, Restart, Sleep, or Hibernate.
Although the Start Menu's right side doesn't automatically change the way the left side does, you can change loads of things about it. You can decide to remove some of these options, change them to pop out menus and even change the way they behave when you click them. All of which are part of Microsoft's big push to improve your "user experience".
To customize your Start menu, right-click an empty area of the Start menu and choose Properties. Select the Start menu tab and click Customize. Choose the settings you want and click OK to save your changes.


