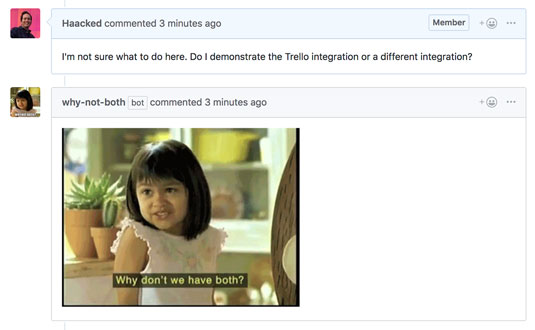
Here, you walk through building a simple GitHub App that brings a bit of levity to your issue discussions. There’s an old meme in the form of an animated gif with a little girl who asks the question, “Why don’t we have both?” The typical application of this meme is in response to a question that presents a false dichotomy. In other words, when someone presents a question with two choices, someone might respond with this image.
Introducing GitHub's Probot
GitHub apps are web applications that need to listen to HTTP requests. You have a lot of important details to get just right when building an HTTP request, such as what is the format of the data posted to the app? All these details can be confusing and time consuming to get correct when building a GitHub app from scratch. Knowing where to start is difficult.GitHub’s Probot framework comes in handy when getting started with a GitHub app. Probot handles much of the boilerplate and nitpicky details of building a GitHub app. It is a framework for building GitHub apps using Node.js. It provides many convenience methods for listening to GitHub events and for calling into the GitHub API.
Probot makes it easy to build a GitHub app, but it doesn’t solve the problem of where to host the app.
Hosting the GitHub app
A GitHub app can take many forms. It could be a Node.js app running in Heroku, an ASP.NET Core app running in Azure, a Django app running in Google Cloud — it doesn’t matter. It just needs to be persistent and available via the public Internet so that GitHub can reach it with event payloads.Setting all that up can be time consuming, so for our purposes, we use Glitch to implement a quick and dirty GitHub app.
Introducing Glitch
Glitch is a hosting platform for web applications that removes a lot of the friction with getting a web app up and running. Any app you create in Glitch is live on the web from the beginning. You don’t have to think about how you plan to deploy the code because any change you make is auto saved and automatically deployed.Glitch focuses on the community aspect of building apps. Every file can be edited by multiple people in real-time, in the same way you might edit a document in Google Docs. And every project can be remixed by clicking a button. This encourages a lot of sharing of code and learning from each other, which comes in handy when we build our own GitHub app.
Before you continue, make sure to create an account on Glitch if you don’t have one already.
Create a Probot Glitch app
After you have a rough understanding of Probot and have a Glitch account set up, you can build a Probot app on Glitch. Glitch lets you remix existing apps, and the good news is Glitch already has a Probot app that you can remix. This means you can create your Probot app with one click and a few customizations.To create your app, type the following URL into your browser: https://glitch.com/edit/#!/remix/probot-hello-world.
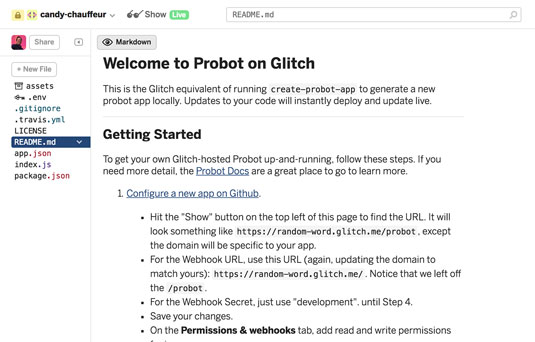
This command creates a brand new app in Glitch based on the probot-hello-world example with a randomly generated URL, as shown. As you can see, my app is called candy-chaffeur.
 The README page of a Glitch Probot app.
The left pane shows the list of files in your application. The README.md file contains step-by-step instructions to set up the hello-world Probot app. Follow these instructions carefully to set up the sample GitHub app.
One of the instructions mentions running the following command:
cat my-app-name.2018-06-20.private-key.pem | pbcopy
The purpose of the previous command is to copy the contents of your private key file into the clipboard so that you can paste it into the Glitch file. However, this command works only on a Mac. On Windows, you would run the following command (changing the file name to match yours):
type my-app-name.2018-06-20.private-key.pem | clipWhen you are done, install the app on a repository that you own and then create a new issue. A few seconds later, you should see a comment created by your bot with the words “Hello World!”.
Customize the app
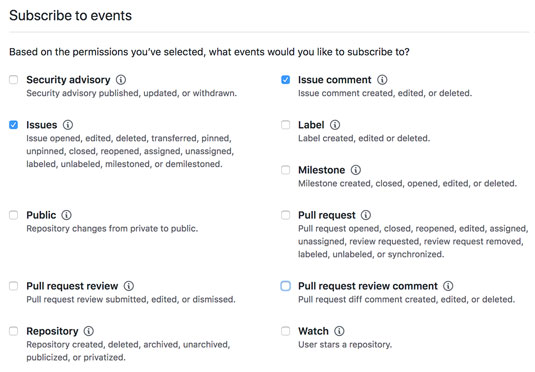
After you create a Probot app in Glitch and install it on GitHub, you can customize how the app responds to issue comments. When you followed the steps in the README, you subscribed to issue events. These events do not include when new comments are created. We need to also subscribe to issue comments.See a list of your apps here. Click the Edit button to navigate to your app. Then in the left navigation, click Permissions & events and scroll down to the Subscribe to events section. Check the Issue comment check box, as shown.
 Updating the event subscriptions for the GitHub app.
Click the Save changes button at the bottom to complete these changes.
Now you need to change your Glitch app to listen to new issue comments and respond appropriately. Edit the index.js file and replace the contents of the file with the following code:
module.exports = (app) => {
// Listens to new issue comments
app.on('issue_comment.created', async context => {
// Retrieves the comment text
const message = context.payload.comment.body
if (message.indexOf(' or ') > -1) {
const params = context.issue({
body: ' The why not both app in action.


