A symbol representing the current Drive mode setting appears in the Shooting Settings and Live View displays on your Rebel T6/1300D. The icon representing the Drive mode appears in a different area depending on your exposure mode; the left screens show you where to look when shooting in Scene Intelligent Auto, for example, and the right screens show where the icon hangs out when you use the advanced exposure modes. For viewfinder photography, the fastest way to get to the Drive mode setting is to press the left cross key.
Both of these show the icon that represents the Single Drive mode.
How you change the Drive mode depends on whether you're using Live View or the viewfinder to compose the picture:
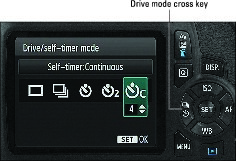
- Press the left cross key (not available in Live View mode). The key is marked by two of the Drive mode icons to help you remember its function. After you press the cross key, you see the settings screen displayed below. Again, you don't see all the options unless you shoot in the advanced exposure modes.
 For viewfinder photography, the fastest way to get to the Drive mode setting is to press the left cross key.
For the Self-Timer: Continuous mode, press the up or down cross key to set the number of continuous shots you want the camera to capture.
- Use the Quick Control screen. After pressing the Q button to enter Quick Control mode, select the Drive mode icon. (The left screen shows you where to look on the Shooting Settings screen; the right screen, the Live View display.) The name of the current setting appears at the bottom of the screen. Rotate the Main dial to cycle through the available settings or press Set to display the selection screen.
You must use this method to change the Drive mode when Live View is engaged; pressing the left cross key performs a focus-related function during Live View shooting.


