


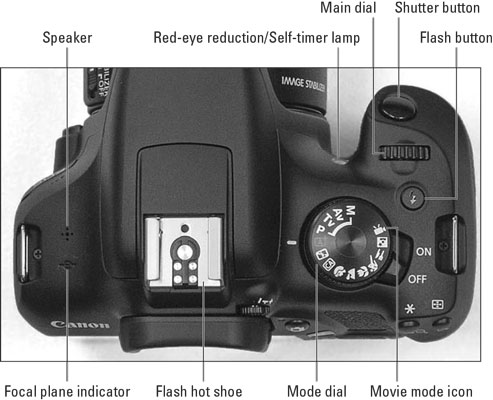
Topside controls on the Canon EOS Rebel T7/2000D
Your virtual tour begins on the top of the camera. Here's a guide to the many bits and pieces found there, starting in the upper-right corner and traveling clockwise:- Red-eye reduction/Self-timer lamp: When you set your flash to Red-Eye Reduction mode, this lamp emits a brief burst of light prior to the real flash — the idea being that your subjects’ pupils will constrict in response to the light, thus lessening the chances of red-eye. If you use the camera’s self-timer feature, the lamp lights during the countdown period before the shutter is released.
- Shutter button: You no doubt already understand the function of this button. But you may not realize that when you use autofocus and autoexposure, you need to use a two-stage process when taking a picture: Press the shutter button halfway, pause to let the camera set focus and exposure, and then press the rest of the way to capture the image. You’d be surprised how many people mess up their pictures because they press that button with one quick jab, denying the camera the time it needs to set focus and exposure. The beep you may hear is the camera telling you it was able to focus and is ready to take the photo.
- Main dial: You use this dial when selecting many camera settings. In fact, this dial plays such an important role that you’d think it might have a more auspicious name, but Main dial it is.
- Flash button: Press this button to raise the built-in flash in the advanced exposure modes (P, Tv, Av, and M).
- On/Off switch: I won't insult your intelligence by explaining what this switch does. But note that even when the switch is in the On position, the camera automatically goes to sleep after 30 seconds of inactivity to save battery power. You can adjust this timing via the Auto Power Off option on Setup Menu 1.
- Mode dial: Rotate this dial to select an exposure mode, which determines whether the camera operates in fully automatic, semi-automatic, or manual exposure mode when you take still pictures. To shift to Movie mode, rotate the dial so that it aligns with the movie mode icon, labeled in the following figure.
- Viewfinder diopter-adjustment dial: Use this dial to adjust the viewfinder focus to your eyesight.
- Flash hot shoe: This is the connection for attaching an external flash and other accessories such as the GP-E2 GPS Receiver.
- Focal plane indicator: The focal plane indicator marks the plane at which light coming through the lens is focused onto the camera's image sensor. That's important only if you need to document the specific distance between your subject and the camera, as you might if you were doing forensics work, for example. Basing the subject distance on this mark produces a more accurate measurement than using the end of the lens or some other point on the camera body as your reference point.
- Speaker: When you play a movie that contains audio, the sound comes wafting through these little holes.
 Here's a guide to controls found on top of the camera.
Back-of-the-body controls for the Canon EOS Rebel T7/2000D
Traveling over the top of the camera to its back, you encounter the smorgasbord of controls shown here.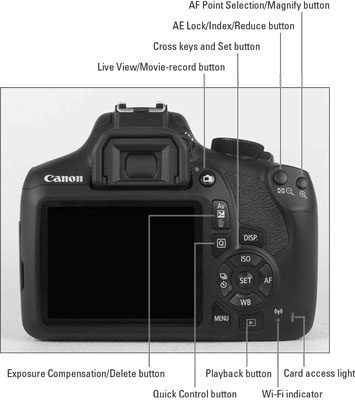 Having lots of external buttons makes accessing the camera’s functions easier.
Buttons with a white icon perform shooting mode functions; buttons with blue icons are used in playback. Some buttons sport dual colors, meaning that they come into play for both functions.
With that preamble out of the way, it’s time to explore the camera back, starting at the top-right corner and working westward (well, assuming that your lens is pointing north, anyway):
- AF Point Selection/Magnify button: In certain shooting modes, you press this button to specify which autofocus points you want the camera to use when establishing focus. In Playback mode you use this button to magnify the image display (thus, the plus sign in the button’s magnifying glass icon).
- AE Lock/Index/Reduce button: During shooting, you press this button to lock autoexposure (AE) settings and to lock flash exposure (FE).
This button also serves two image-viewing functions: It switches the display to Index mode, enabling you to see multiple image thumbnails at once, and it reduces the magnification of images when displayed one at a time.
- Live View/Movie-record button: Press this button to shift to Live View mode, which enables you to compose your pictures using the monitor instead of the viewfinder. When shooting movies, you press this button to start and stop recording. (You must first set the Mode dial to the Movie position.)
After you shift to Live View or Movie mode, certain buttons perform different functions than they do for viewfinder photography.
- Exposure Compensation/Erase button: In the P, Tv, and Av exposure modes, you press this button while rotating the Main dial to adjust exposure compensation, a feature that enables you to tell the camera to produce a brighter or darker photo on your next shot. If you shoot in the M exposure mode, you press the button while rotating the Main dial to change the aperture setting (f-stop).
During playback, press this button to erase pictures — thus the blue trash-can symbol, the universal sign for “dump it.”
- Q (Quick Control) button: Press this button to display the Quick Control screen, which gives you one way to adjust picture settings.
- DISP button: In Live View, Movie, and Playback modes, pressing this button changes the picture-display style. When menus are displayed, pressing the button brings up the Camera Settings display.
- Set button and cross keys: The following figure points out the Set button and the four surrounding buttons, known as cross keys. These buttons team up to perform several functions, including choosing options from the camera menus. You use the cross keys to navigate through menus and then press the Set button to select a specific menu setting.
The instruction “Press the left cross key” means to press the one to the left of the Set button, “press the right cross key” means to press the one to the right of the Set button, and so on.
During viewfinder photography — that is, when you're using the viewfinder and not the monitor to frame your shots — the cross keys also have individual responsibilities, which are indicated by their labels:
- Press the up cross key to change the ISO setting. This exposure-related control determines how sensitive the camera is to light. You can adjust this setting only when shooting in the P, Tv, Av, and M exposure modes. (If the Mode dial is set to one of those modes and nothing happens when you press this cross key or any other buttons, give the shutter button a half-press and release it to wake up the camera.)
- Press the right cross key to adjust the AF mode. This option controls one aspect of the camera’s autofocus behavior. Again, you can access this setting only in P, Tv, Av, and M shooting modes.
- Press the left cross key to change the Drive mode. The Drive mode settings enable you to switch the camera from single-frame shooting to continuous capture or self-timer/remote-control shooting.
- Press the down cross key to change the White Balance setting. The White Balance control enables you to ensure that colors are rendered accurately. The White Balance setting is also off-limits unless the Mode dial is set to P, Tv, Av, or M.
- Playback button: Press this button to switch the camera into picture-review mode.
- Menu button: Press this button to access the camera menus.
- Wi-Fi indicator: This lamp lights to indicate an active Wi-Fi connection.
- Card access light: This light glows while the camera is recording data to the memory card. Don't power off the camera or remove the memory card while the light is lit; you may damage the card or camera.
Front-left features of the Canon EOS Rebel T7/2000D
The front-left side of the camera sports three important features, labeled in the following figure:- Lens-release button: Press this button to disengage the lens from the lens mount so that you can remove it from the camera. While pressing the button, rotate the lens toward the shutter-button side of the camera to dismount the lens.
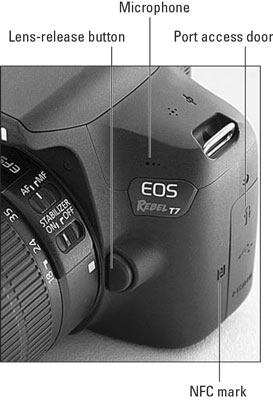 When recording movies, be careful not to cover the microphone with your finger.
- Microphone: This cluster of holes leads to the camera's microphone.
- NFC mark: Labeled here, this mark indicates where the camera emits the signal that enables your camera to communicate wirelessly to a smartphone or tablet via Near Field Communication technology.
- Connection ports: Hidden under the cover labeled port access door in the preceding figure are inputs for connecting the camera to various devices. The following figure labels each connection.
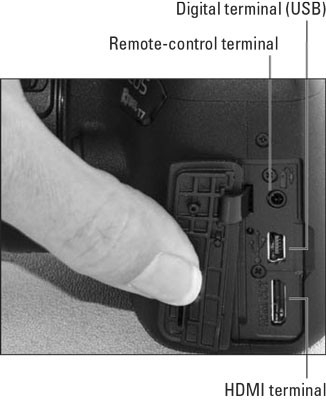 Inputs for connecting the camera to other devices are found under the cover on the left side of the camera.
- Remote-control terminal: You can attach a remote-control unit such as the Canon Remote Switch RS-60E3 wired controller here.
The RS-60E3 currently sells for about $20 and is a worthwhile investment for long-exposure shooting (such as nighttime shots and fireworks). By using the remote control, you eliminate the chance that the action of your finger on the shutter button moves the camera enough to blur the shot, which is especially problematic during long exposures.
- Digital terminal (USB port): This terminal is used for connecting your camera to a USB port on your computer so that you can download images to the computer. If your printer supports PictBridge technology, you can also print directly from the camera by connecting the two devices via their respective USB ports.
To take advantage of either option, you must buy a special USB cable. The least expensive option, the Canon IFC-400PCU cable, sells for about $15. But before you buy the cable, know that you can alternatively deliver images to your computer by using a memory-card reader.
The terminal also comes into play when you use the optional GPS receiver GP-E2; after attaching the unit to the flash hot shoe on top of the camera, you connect the unit’s cable to the digital terminal.
- HDMI terminal: For playback on a high-definition television or screen, you can connect the camera via this terminal, using an optional HDMI male to mini-C cable. You’ll pay about $50 if you buy Canon's version, the HTC-100 cable. Shop around for better deals on third-party cables if you like.

