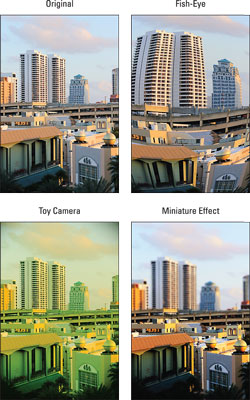
With the Creative Filters on your Rebel T6i/750D, you can add special effects to your pictures. For example, Julie used this feature to create the three versions of her city scene shown in the following figure.

When you use this feature, the camera creates a copy of your image and applies the filter to the copy; your original remains intact. If the original was captured using the Raw Quality setting, the altered image is stored in the JPEG format.
You can choose from these effects:
Grainy B/W: Creates a black‐and‐white photo with a speckled appearance.
Soft Focus: Blurs the photo to make it look soft and fuzzy.
Fish‐Eye: Distorts your photo so that it appears to have been shot using a fish‐eye lens, as illustrated in the top‐right image.
Toy Camera: Creates an image with dark corners — called a vignette effect. Vignetting is caused by poor‐quality lenses not letting enough light in to expose the entire frame of film (like in toy cameras). When you choose this effect, you can also add a warm (yellowish) or cool (blue) tint. For example, Julie applied the effect with a warm tint to create the lower‐left variation.
Miniature: Creates a trick of the eye by playing with depth of field. It blurs all but a very small area of the photo to create a result that looks something like one of those miniature dioramas you see in museums. Julie applied the filter to the city scene to produce the lower‐right variation. This effect works best on pictures taken from a high angle, like the one featured in the figure.
To try out the filters, take either of these approaches:
Quick Control screen: After setting the camera to Playback mode, press the Q button and then use the up/down cross keys to highlight the Creative Filters option, as shown on the left. Symbols representing the available filters appear at the bottom of the screen. Use the left/right cross keys to highlight a filter icon, as shown on the right in the figure, and then press Set. You'll see a preview of your photo with the currently selected filter active. You have the option of making changes to the settings before you apply and save, as described shortly.
![During playback, press Q to access Creative Filters. [Credit: Photo by Robert Correll]](https://cdn.prod.website-files.com/6634a8f8dd9b2a63c9e6be83/668fc8be59b11de247f2e111_489835.image1.jpeg) Credit: Photo by Robert CorrellDuring playback, press Q to access Creative Filters.
Credit: Photo by Robert CorrellDuring playback, press Q to access Creative Filters.Playback Menu 1: Highlight Creative Filters, as shown on the left in the following image, and press Set. The camera shifts to Playback mode, as shown on the right. Use the cross keys or Main dial to select a photo, press Set, use the cross keys to select a filter, and then press Set again.
![You also can access the filters from Playback Menu 1. [Credit: Photo by Robert Correll]](https://cdn.prod.website-files.com/6634a8f8dd9b2a63c9e6be83/668fc8be59b11de247f2e10c_489836.image2.jpeg) Credit: Photo by Robert CorrellYou also can access the filters from Playback Menu 1.
Credit: Photo by Robert CorrellYou also can access the filters from Playback Menu 1.
From this point, both methods work similarly. After you select a filter, use the left and right cross keys to make adjustments to specific filter settings. For example, Robert is adjusting the Grainy B/W effect on a photo of radishes on the left in the following figure. The right screen in the figure shows him previewing the Art Bold effect with a photo of flowers.

Press Menu to cancel and return to the screen where you can choose a different filter. Press Set to apply the filter. When asked, confirm that you want to save the image as a new file.


