


In addition, this mode has one other benefit: It's based on the same nine-point focusing grid used for viewfinder photography, so it may feel more familiar to you than the other Live View and Movie mode AF methods. Two of the nine focus points are labeled in the left screen. (The large rectangle in the center of the frame is not a focus point in this case; instead, it's used to magnify a portion of the subject to check focus.
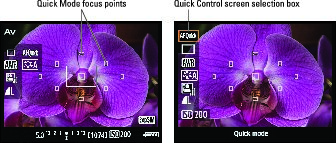 Quick AF Method offers nine focus points (left); to select which one you want to use, first activate the Quick Control screen and highlight the AF Quick option (right).
So why isn't Quick mode the default setting? Well, it's a little more complex to use. In addition, the monitor display goes dark during the time the camera is focusing, which can throw off the unsuspecting photographer. If those limitations don't affect you, here's what you need to know about using Quick mode.
First, press the Q button to enter Quick Control mode and set the AF mode to Quick, as shown on the left. You then see nine autofocus points in the center of the screen.
At this point, things differ depending on your exposure mode. In Scene Intelligent Auto, Flash Off, Creative Auto, and the scene modes (Portrait, Landscape, and so on), the camera automatically selects which of the nine points to use when focusing. Typically, focus is established on the closest object.
In P, Tv, Av, or M exposure mode, you can stick with the automatic point selection or choose one of the nine points. Here's how to make it work:
- Press the Q button to activate the Quick Control screen.
- Highlight the AF Quick option, as shown on the right.
- Press the up cross key to activate the focus-point display, as shown on the left.
 The active focus points turn red. By default, the Automatic mode is selected, and all nine points are active. The name of the setting appears at the bottom of the screen.
 - To change to single-point selection, rotate the Main dial.
All focus points but one turn gray, as shown on the right. The selected focus point remains red — the center point.
- To choose a different point, rotate the Main dial.
When you cycle through all the points, the camera shifts back to the 9-point, Automatic mode.
- To exit the focus-point screen and return to the Quick Control screen, press the down cross key.
- To exit the Quick Control screen, press the Q button.
The most confusing (and aggravating) aspect about this autofocusing setup is remembering that you have to press the up cross key to access the option that enables you to switch between auto and manual focus-point selection. And after you get to the selection screen, you have to remember not to try to use the command keys to choose a different point — which seems to be the natural way to go.
Instead, you rotate the Main dial to select a different focus point. The little wheel at the right end of the mode name reminds you of this fact. But there's no hint to help you remember that it's the up cross key that activates the focus point selection screen. This mode is a little more complex to use than the others.Anyway, after you choose to use all points (Automatic selection) or a single point (Manual selection), set focus by pressing and holding the shutter button halfway down. The monitor turns off, and the autofocusing mechanism kicks into gear. (It may sound as though the camera took the picture, but don’t worry — that isn’t actually happening.)
When focus is achieved, the Live View display reappears, and in Automatic selection mode, one or more of the focus points appears green to tell you which areas of the frame are in focus. For Manual selection, just your chosen point turns green. Focus remains locked as long as you keep the shutter button pressed halfway; press the button the rest of the way to take the picture.
If the camera can’t find a focusing target, the focus point (or points) turns red and blinks. Try using manual focusing, explained next, or getting a little farther from your subject — you may be so close that you're exceeding the minimum focusing distance of the lens.


