


The Trim tool enables you to crop right in the Nikon D7500 camera. To crop a photo means to trim away some of its perimeter. Cropping can often improve an image, as illustrated by this figure. When shooting this scene, the photographer couldn't get close enough to fill the frame with the ducks, as shown on the left. So she cropped the image after the fact to achieve the composition on the right.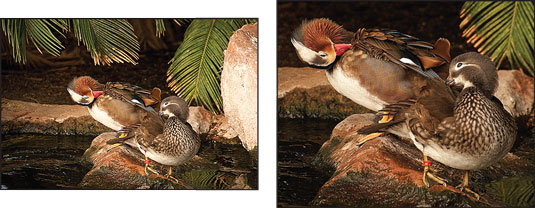 Cropping creates a better composition and eliminates background clutter.
 The yellow box indicates the cropping frame.
Cropping creates a better composition and eliminates background clutter.Always make using the Trim tool your last editing step because you can't alter the cropped version using any other Retouch menu tools.
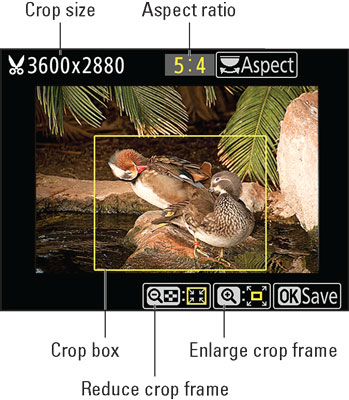
After you select Trim from the Retouch menu, you see the screen shown in the following figure. The yellow box indicates the cropping frame.The yellow box represents the crop frame, which you can adjust as follows:
- Set the crop aspect ratio. You can crop to one of five aspect ratios: 3:2, 4:3, 5:4, 1:1, and 16:9. The current aspect ratio appears in the upper-right corner of the screen. To cycle through the other settings, rotate the Main command dial.
- Adjust the crop frame size. For each aspect ratio, you can choose from a variety of crop sizes, which depend on the size of the original. Sizes are stated in pixels, with the current size displayed in the upper-left corner of the screen.
Use these techniques to change the crop-frame size:

- Shrink the cropping frame. Tap the Reduce symbol, labeled in the figure, or press and release the Zoom Out button. Each tap or button press further reduces the crop size.

- Enlarge the cropping frame. Tap the Enlarge symbol, also labeled in Figure 12-8, or press the Zoom In button.
- Shrink the cropping frame. Tap the Reduce symbol, labeled in the figure, or press and release the Zoom Out button. Each tap or button press further reduces the crop size.
If you're cropping in advance of printing the image, remember that to generate a good print, you need about 300 pixels per linear inch of the print — 1200 x 1800 pixels for a 4 x 6 print, for example. So keep an eye on the pixel count shown in the upper-left corner of the screen as you set the size of the crop frame.
- Reposition the cropping frame. Press the Multi Selector up, down, right, or left. Or just drag the frame around on the screen.

