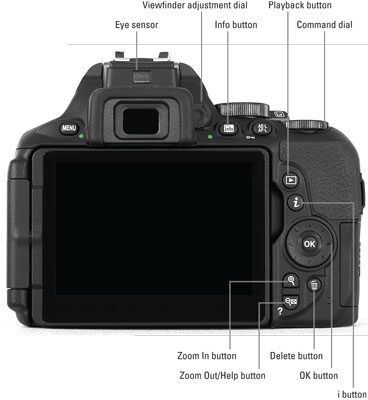
 For quick access to primary picture settings, press the i button.
- Menu button: Press this button to access menus of camera options.
- Viewfinder adjustment dial: Rotate this dial to adjust the viewfinder focus to your eyesight.
- Eye sensor: This window senses when you put your eye to the viewfinder and, in response, turns off the monitor to save battery power. Not working? Open the Setup menu and check the status of the item named Info Display Auto Off. The option should be set to On, as it is by default. If that's not the issue, you may simply need to press your eye closer to the viewfinder. Also, when you wear glasses, sometimes the sensor can't detect your eye. You do have the option of pressing the Info button, labeled in the figure, to turn the monitor on and off.

- Info button: When using the viewfinder to compose photos, press this button to display the Information screen, which shows key camera settings and various bits of information, such as the battery status. To turn off the screen, press Info again.
You also can display the screen by pressing the shutter button halfway and releasing it.
In Live View mode, pressing the Info button changes the type and amount of data that appears on the preview.

- AE-L/AF-L button: During shooting, pressing this button initiates autoexposure lock (AE-L) and autofocus lock (AF-L).
In playback mode, pressing the button locks the picture file — hence the little key symbol that appears near the button — so that it isn't erased if you use the picture-delete functions. (The picture is erased if you format the memory card, however.)

- Playback button: Press this button to switch the camera to picture-review mode. Chapter 8 details playback features.

- i button: During shooting, pressing this button activates a control strip that enables quick access to certain picture settings. Press i again to exit the control strip. In Playback mode, pressing the button brings up a small menu that enables you to rate photos, edit them using the Retouch menu features, and tag them for later wireless transmission to a smartphone or tablet.
- Multi Selector/OK button: This dual-natured control plays a role in many camera functions. You press the outer edges of the Multi Selector left, right, up, or down to navigate camera menus and access certain other options. At the center of the control is the OK button, which you press to finalize a menu selection or another camera adjustment.

- Delete button: Sporting a trash can icon, the universal symbol for delete, this button enables you to erase pictures from your memory card.


- Zoom In and Zoom Out buttons: These buttons have several purposes, depending on what camera function you're using:
- Picture playback: In still-photo playback mode, pressing the Zoom In button magnifies the image; pressing Zoom Out reduces the magnification. After you display a photo at its normal magnification, you can press Zoom Out repeatedly to shift to thumbnails view, which displays multiple image previews at a time, and then to Calendar view, which simplifies the job of tracking down all pictures taken on a certain date. Pressing Zoom In cycles the display in the other direction.
- Movie playback: Press Zoom In to increase audio volume; press Zoom Out to lower it.
- Live View mode: Pressing the Zoom In button magnifies the live preview so you can check focus more closely. Pressing Zoom Out reduces the magnification amount.
Additionally, if you see a question mark symbol on a menu screen or other display, pressing the Zoom Out button displays a Help screen that contains information about the feature you're using. (Note the question mark symbol beneath the button.)
Both buttons also come into play when you use certain other camera features, such as applying changes from the Retouch menu.


