How to give delegate permissions in Outlook with Exchange
Good managers delegate authority. Extremely busy people sometimes give an assistant the job of managing the boss’s calendar, schedule, and even email. That way, the boss can concentrate on the big picture while the assistant dwells on the details.When you designate a delegate in Outlook on an Exchange network, you give certain rights to the delegate you name — in particular, the right to look at whichever Outlook module you pick. Bear in mind, that person will see everything that appears in that module — no matter how personal; always choose a delegate you can trust with your deep, dark secrets. Oh, and try not to have too many deep, dark secrets; it’s very stressful trying to remember all of them.
To name a delegate, follow these steps:- Click the File tab, click the Info button in the Navigation pane on the left, and click the Account Settings button. A drop-down menu appears.
- Click the Delegate Access button. The Delegates dialog box opens.
- Click the Add button. The Add Users dialog box opens.
- Double-click the name of each delegate you want to name. The names you choose appear in the Add Users dialog box.
- Click the OK button. The Delegate Permissions dialog box opens, where you can choose exactly which permissions you want to give to your delegate(s).
- Make any changes you want in the Delegate Permissions dialog box.
If you make no choices in the Delegate Permissions dialog box, by default, your delegate is granted Editor status for your Calendar and Tasks, which means the delegate can read, create, and change items in those two Outlook modules. - Click OK. The Delegate Permissions dialog box closes. The names you chose appear in the Delegates dialog box.
- Click OK. The Delegates dialog box closes.
How to open someone else’s Outlook folder with Exchange
It’s fairly common for a team of people who work closely together to share calendars or Task lists; not only can they see what other team members are doing, but they can also enter appointments on behalf of a teammate — for example, if you work in a company that has sales and service people sitting side by side. As a service person, you may find it helpful if your partner on the sales side is allowed to enter appointments with a client in your calendar while you’re out dealing with other clients. To do that, your partner needs to open your Calendar folder.You can’t open another person’s Outlook folder unless that person has given you permission first, as I describe in the preceding section. After you have permission, you can open the other person’s folder by following these steps:
- Click the File tab and click the Open & Export button in the Navigation pane on the left.
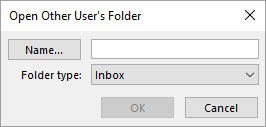
- Click the Other User’s Folder button. The Open Other User’s Folder dialog box opens, as shown in the figure.
- Click the Name button. The Select Name dialog box opens. (It’s really the Address Book.)
- Double-click the name of the person whose folder you want to open. The Select Name dialog box closes; the name you double-clicked appears in the Open Other User’s Folder dialog box.
- Click the triangle on the Folder Type box. A list of the folders you can choose appears.
- Click the name of the folder you want to view. The name of the folder you choose appears in the Folder Type box.
- Click OK. The folder you pick is now accessible to you, but it might not be obvious where to find it. For example, if you want to see the other person’s calendar, click the Calendar button and then open the Folder pane. The other person’s calendar appears in the Folder pane as a shared calendar.
 Pick another person’s folder to view.


