When you use the Nikon D3300’s built-in Raw processor, you can experiment with different Picture Control settings to see how each one affects the image. You have the same option when you use the free Nikon software, Nikon ViewNX, to process images. That program’s Raw converter, as well as those found in Adobe Photoshop and other third-party programs, offers additional ways to fine-tune color, contrast, and sharpness.
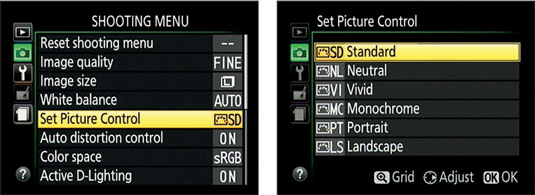
In all exposure modes except P, S, A, or M, the camera chooses the Picture Control setting for you. In P, S, A, or M mode, select the option you want to use from the Shooting menu, as shown in this figure.

There is a feature that may make Picture Controls a little more useful to some people: You can modify any Picture Control to more closely render a scene the way you envision it. For example, if you like the bold colors of Vivid mode but don’t think that the effect goes far enough, you can adjust the setting to amp up colors even more.
The following steps provide a quick overview of the process so that if you encounter the menu screens that contain the related options, you’ll have some idea of what you’re seeing:
Set the Mode dial to P, S, A, or M.
Choose Set Picture Control from the Shooting Menu.
Highlight the Picture Control you want to modify.
For example, the Vivid setting was highlighted on the left in this figure.
 After selecting a Picture Control, press right to display options for adjusting its effect on your pictures.
Press the Multi Selector right.
You see the screen shown on the right in the figure, containing sliders that you use to modify the Picture Control. Which options you can adjust depend on the Picture Control.
Highlight a picture characteristic and then press the Multi Selector right or left to adjust the setting.
A few pointers about the Nikon’s picture controls:
Some Picture Controls offer the Quick Adjust setting, which enables you to easily increase or decrease the overall effect of the Picture Control. A positive value produces a more exaggerated effect; set the slider to 0 to return to the default setting.
After you highlight an option, the vertical yellow bar on the slider bar indicates the current setting for the option. The line under the slider bar represents the default setting. For example, on the right screen, take a look at the Saturation setting. The bar under the zero indicates the default setting; the yellow bar two notches to the right shows the new setting.
To display a grid that lets you see how the adjusted Picture Control compares with the original and with other Picture Controls in terms of color saturation and contrast, as shown in Figure 6-18, press and hold the Zoom In button.
The letter representing the default setting appears gray; the one representing the adjusted setting, yellow, as labeled in the figure.
Note that the Standard and Portrait settings are identical in terms of contrast and saturation, so the P for Portrait doesn’t appear on the grid unless you selected that Picture Control initially.
You can’t change settings via the grid — it’s for informational purposes only. However, if you display the grid from the first Set Picture Control menu (refer to the left screen), you can press the Multi Selector up or down to select a different Picture Control. You then press right to access the adjustment screen.
 Press the Zoom In button to display a grid that ranks each Picture Control according to its level of saturation and contrast.
Reset all options to their defaults by pressing the Delete button.
Press OK.
To remind you that you adjusted the Picture Control, an asterisk appears next to the Picture Control name on the menu and by the Picture Control symbol in the Information and Live View displays.
Again, these steps are intended only as a starting point for playing with Picture Controls. Complete details are found in the electronic version of the camera manual, stored on one of the CDs that shipped with your camera.


