You can block text. But what can you do with those marked blocks of text? Why, plenty of things can be done to manipulate the text! You can apply a format to all text in the block, move a block, search through a block, proof a block, print a block, and even delete a block.
How to move a block
To move a block of text, you select the text and then cut and paste. This process is almost exactly the same as copying a block, although in Step 2 you choose the Cut tool rather than the Copy tool or press the Ctrl+X keyboard shortcut for the Cut command. Otherwise, all steps are the same.
Don't be alarmed when the block of text vanishes! That's cutting in action; the block of text is being moved, not copied. You see the block of text again when you paste it in place.
If you screw up, the Ctrl+Z Undo shortcut undoes a block move.
How to set the pasted text format
When you paste text in Word, the Paste Options icon appears near the pasted block of text, as shown in the margin. Don’t let it annoy you! That button allows you to select formatting for the pasted block because occasionally the block may contain formatting that, well, looks quite ugly after it's pasted in.
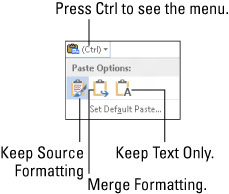
To work the Paste Options button, click it with the mouse or press and release the Ctrl key on the keyboard. You see a menu of options.

| Icon | Keyboard Shortcut Name | Description |
|---|---|---|
| K | Keep Source Formatting | The formatting is fine; don't do a thing. |
| M | Merge Formatting | Reformat the pasted block so that it looks like the text it’s being pasted into. |
| T | Keep Text Only | Just Paste in the text — no formatting |
To keep only text with a copied or cut block (no formatting), you can press the Ctrl key and then the T key after pasting. That’s two separate keys, not Ctrl+T.
Using the Paste Options icon is utterly optional. In fact, you can continue typing or working in Word and the icon bows out, fading away like some nebbish who boldly asked a power blonde to go out with him and she utterly failed to recognize his existence. Like that.
You can choose the Set Default Paste command after clicking the Paste Options icon to direct Word on how to permanently deal with pasted text. It’s a handy trick, especially when you find yourself repeatedly choosing the same Paste Options format.
How to copy or move a block with the mouse
When you have to move a block only a short distance, you can use the mouse to drag-move or drag-copy the block. This feature works best when you’re moving or copying a block to a location that you can see right on the screen. Otherwise, you’re scrolling your document with the mouse while you're playing with blocks, which is like trying to grab an angry snake.
To move any selected block of text with the mouse, just drag the block: Point the mouse cursor anywhere in the blocked text, and then drag the block to its new location. Notice how the mouse pointer changes, as shown in the margin. That means you’re moving the block of text.
Copying a block with the mouse works just like moving the block, except that you press the Ctrl key as you drag. When you do that, a plus sign appears in the mouse pointer. It’s your sign that the block is being copied and not just moved.
The Paste Options icon appears after you “drop” the chunk of text.
When you drag a block of text with the mouse, you’re not copying it to the Clipboard. You cannot use the Paste (Ctrl+V) command to paste in the block again.
A linked copy is created by dragging a selected block of text with the mouse and holding down both the Shift and Ctrl keys. When you release the mouse button, the copied block is inserted with a dark highlight. It's your clue that the copy is linked to the original; changes in the original are reflected. If not, right-click the linked copy and choose the Update Link command.


