To this end, Zoom makes it easy to schedule future meetings with others and to track attendee registration. What’s more, by scheduling meetings, you unlock additional features that can make your meetings more valuable for all concerned.
How to schedule a Zoom meeting
To schedule a meeting with an individual or group of people in advance, follow these steps:- Click on the Home icon at the top of the desktop client.
- Click on the blue Schedule button. Zoom displays the Schedule Meeting window shown.
 Scheduling a future Zoom meeting.
 - Customize your meeting’s settings. You can change its
- Topic and description
- Date
- Start and end time
- Meeting ID
- Audio and video options
- Integration with third-party calendar tools, such as Microsoft Outlook and Google Calendar
- Advanced options, including whether you’ve assigned any alternative hosts
Selecting Generate Automatically for the Meeting ID means that Zoom will produce and distribute a unique, disposable number. In other words, you won’t be using your PMI for this meeting.
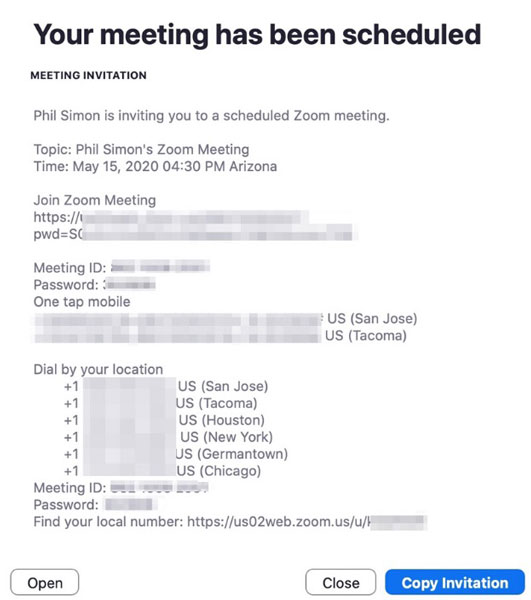
- When you finish, click on the blue Schedule button. You have now scheduled your meeting. Zoom displays a meeting-confirmation message with all the relevant information, such as the one shown here.
 Viewing a scheduled Zoom meeting.
From the meeting confirmation, you can perform the following actions by clicking on the related buttons:
- Open: Opens the calendar in your computer’s default calendar program.
- Close: Closes the window.
- Copy the invitation: Sends the meeting’s information to your clipboard. From here, you can paste it into an email or wherever you like.
View your scheduled meetings by clicking on the Meetings icon at the top of the Zoom desktop client.
Although you can host only one meeting at a time per device, you can schedule as many as you like in advance.
Zoom also lets users schedule meetings via the web portal and through different browser extensions.How to edit your scheduled meeting
Say that you’ve successfully scheduled your meeting. After thinking about it, though, you decide that you’d like to make a few changes. Sure, you can junk your meeting and wreak havoc with others’ calendars. A better way, though, involves editing your existing meeting — something that Zoom allows you to easily do by following these steps:- In the Zoom web portal, under the Personal header, click on Meetings.
- Click on the name of the meeting that you’d like to edit. Zoom presents basic information about your scheduled meeting.
- Click on the white Edit this Meeting button in the lower right-hand corner of the page.
- Make whatever changes you like. You can change the following:
- Topic
- Date and start and end time
- Meeting ID
- Audio and video options
- Advanced options, including whether you have assigned any alternative hosts
- Click on the blue Save button.
Collect participant input through polls
Bruce has scheduled an upcoming meeting with members of his E Street Band. During the call, he wants to solicit everyone’s feedback. Sure, attendees will be able to both chime in and enter text-based comments in the chat window. This type of unstructured data is often valuable, but collating it is typically messy and time-consuming, especially with larger groups. Structured data is far easier to collect and analyze. To this end, A better way in many cases is to conduct a poll — one that immediately displays results.Zoom reserves polls for customers on premium plans.
Enabling polling at the account level
To enable polling for all members in an organization, an admin or owner needs to follow these steps:- In the Zoom web portal, under the Admin header, click on Account Management.
- Click on Account Settings.
- Underneath the Polling section, click on the toggle button on the right-hand side of the page. It turns blue. Zoom displays a new window asking you to confirm your choice.
- Click on the blue Turn On button. Zoom confirms that it has updated your settings.
You need to enable polls only once at the account level.
Creating a poll for your scheduled meeting
After you activate polls, you can create one or more polls for an upcoming meeting:- In the Zoom web portal, under the Personal header, click on Meetings.
- On the left-hand side of the page, under Upcoming Meetings, click on the meeting for which you want to schedule a poll.
- Scroll to down the bottom of the page and click on the white Add button next to the words You have not created any poll yet.
- In the window that appears, enter the title of your question.
- (Optional) Select the Anonymous if you want to hide attendees’ responses checkbox.
- Type the name of your question.
- Indicate whether the question is single or multiple choice by selected the related checkbox.
- Enter the possible responses in the text boxes.
- (Optional) To continue adding questions, click on + Add a Question and repeat Steps 4 through 8.
- When you finish setting up your poll, click on the blue Save button.
You can now view the poll, as this figure displays.
 Saved poll for future Zoom meeting.
Note that Zoom ties polls to specific users’ PMIs, a minor but important point. Say that Hank needs to set up a meeting with the other DEA agents in his office. He is weighing his two options:
- Using his PMI: If he goes this route, then he can access all of the polls that he has created under his PMI.
- Allowing Zoom to automatically generate a disposable meeting ID number: If Hank selects this option, then his poll applies only to that specific meeting. As a result, he would not be able to recycle them or transfer them to another meeting.
Do what you like, but I wouldn’t let the transferability of polls drive your decision to use your PMI or not.
How to handle meeting registration
While optional, requiring participants to register for future meetings confers a number of obvious benefits, including counting the number of heads in advance. Beyond that, a company or your manager may mandate attendance at certain meetings.Requiring others to register for your meeting
Brandt is holding an important department-wide meeting and wants to ensure that all employees attend. As such, he requires registration by following these steps:- In the Zoom web portal, under the Personal header, click on Meetings.
- Click on the name of the meeting whose registration information you’d like to view.
- Click on the white Edit this Meeting button.
- Scroll down to the word Registration and select the Required checkbox.
- Click on the blue Save button. Zoom returns you to the main meeting page.
- (Optional) To the right of Registration Link, copy the unique URL or click on Copy Invitation to view more detailed information about the meeting.
- Distribute the link or meeting information to all meeting attendees however you choose.
Registering for a future meeting
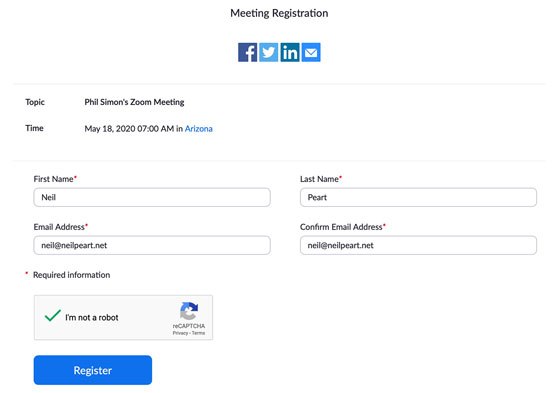
Brandt manages a staff of ten. He has required those folks to register for his monthly meeting. Further, he has distributed the link to attendees, maybe even via Zoom Meetings & Chat. When others click on that URL, they will see a form similar to the one displayed here: Zoom meeting registration form.
Viewing registrant data
After attendees fill out and submit a meeting registration form, Zoom stores their information. You can access it by following these steps:- In the Zoom web portal, under the Personal header, click on Meetings.
- Click on the name of the meeting whose registration information you’d like to view.
- Scroll down to the Registration tab and to the right of Manage Attendees, click on View.
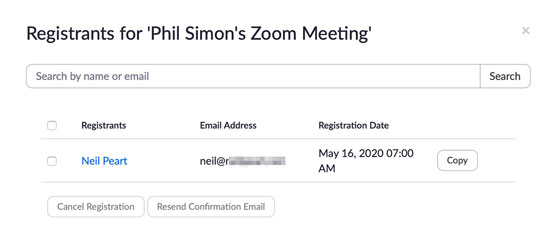
Zoom displays a window similar to the one shown.
 Viewing meeting registrants.
Click on the Edit button to customize your registration options even more.


