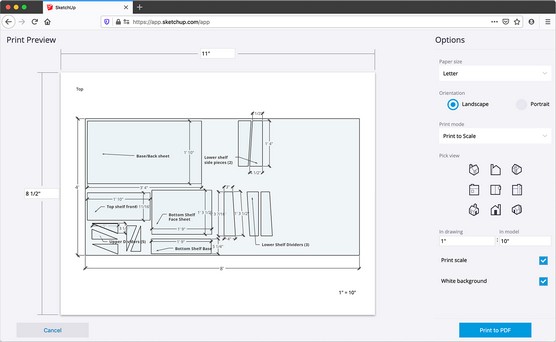
In some cases, you may want your prints to reflect the scale of your SketchUp design. In SketchUp for Web, scaled printing is available with a paid subscription (or as part of SketchUp for Schools). Here’s how printing to scale works in SketchUp for Web:
 You’ll need a paid subscription to print to scale in SketchUp for Web.
- Before entering the print preview, create orthographic views of your model and save them as a SketchUp scene.Scale is a notion that cannot be applied to model views in SketchUp’s perspective camera mode. To create an orthographic view, use the Search tool and type Ortho to activate the Parallel Projection camera mode. Then use view commands (and search queries) like Front, Top, or Align View to orient your camera as desired. When you have the orthographic view you want, create a new scene.
- Using Search, type Print to activate the print preview canvas.
- Click the Print Mode drop-down menu to the right of the canvas, select Scenes, and then choose the orthographic scene you just made.
- Click the Print Mode drop-down menu again, and choose Print to Scale.Notice that the view of your SketchUp model changes slightly. When you switch into this scaled printing mode, SketchUp resizes your model slightly and derives an arbitrary scale just below your list of scenes (see below).
- Set your desired drawing scale, and choose whether to display that scale on your printed page.You can assign any scale you want, but you probably want to pick one that will aptly display your SketchUp model view on the page you’re printing. You can type any units you like in the In Drawing and In Model fields, but the scale displayed in the canvas respects the unit settings in your model. You can change these in the Model Info panel, near the bottom of the utility tray on the right. Last, you can click the Print Scale check box to display the scale of your drawing on the printed page.
 You’ll need a paid subscription to print to scale in SketchUp for Web.
Want to learn more? Check out our SketchUp Cheat Sheet.


