One of the neatest ways to grab external data in Excel is through a web query. As you know if you’ve wasted any time surfing the web, Internet websites provide huge volumes of interesting data. Often, you’d like to grab this data and analyze it in some way. And fortunately, Excel provides an easy way to move such data from a web page into Excel.
With the Excel web Query tool, as long as the data that you want to grab or analyze is stored in something that looks like a table — that is, in something that uses rows and columns to organize the information — you can grab the information and place it into an Excel workbook.
To perform a web query, follow these steps:
Choose the File menu’s New command to open a blank workbook.
You need to place query results into a blank worksheet. Therefore, your first step might need to be to open a workbook with a blank worksheet.
If you need to insert a blank worksheet into an existing workbook, click the Insert Worksheet button. This button appears on the bottom edge of the worksheet next to the sheet tabs: Sheet1, Sheet2, Sheet3, and so on.
Tell Excel that you want to run a web query by choosing the Data tab’s Get External Data from web command.

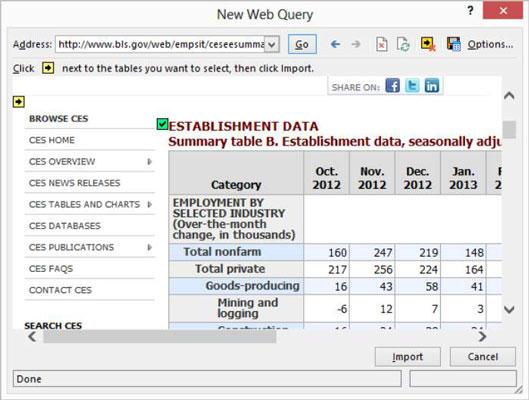
Excel displays the New Web Query dialog box.
Open the web page containing the table that you want to extract data from by entering its URL into the Address field.
The Bureau of Labor Statistics website provides tons of tabular information, so if you want to play along, go ahead and visit their website and poke around until you find a page that shows a table.
Identify the table by clicking the small yellow arrow button next to the table.
Excel places this small yellow right-arrow button next to any tables that it sees in the open web page. All you need to do is to click one of the buttons to grab the data that the arrow points to.
Excel replaces the yellow arrow button with a green check button.
Verify that the green check button marks the table that you want to import and then import the table data by clicking the Import button.

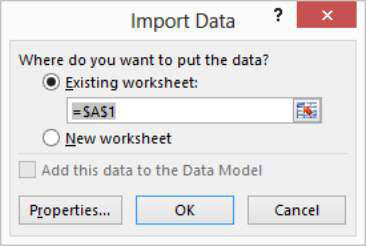
Excel displays the Import Data dialog box.
In the Import Data dialog box, tell Excel where to place the imported web data.
Select the Existing Worksheet radio button to place the table data into the existing, open, empty worksheet. Alternatively, select the New Worksheet radio button to have Excel place the table data into a newly inserted blank sheet.
Click OK.

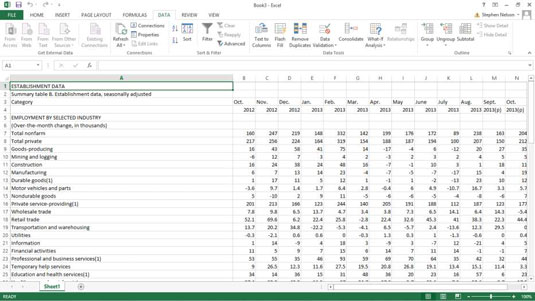
Excel places the table data into the specified location. Sometimes, grabbing the table data might take a few moments. Excel goes to some work to grab and arrange the table information.
Web query operations don’t always work smoothly. In this case, you might want to revisit the web page that displays the table and verify that you clicked the correct select button. The select button, again, is the small yellow button with the arrow that points to the table data.


