You also can print a basic report by clicking the Print button on any list page; the Print button appears just above the Action column.
How to work with a particular person in QBO
You can select a particular customer, vendor, or employee and view the transactions associated with that person as well as the person’s details, and you can attach files to the person. Here, you'll work with customers.To search for a particular person, type some characters that match the person or company name in the Search box that appears above the list of people.
 To find a particular person on a list, use the Search box that appears above the names on the list.
When you select any person from the list, QBO displays the page specifically associated with that person. The page has two tabs; in the following figure, you see the Transaction List tab; the other tab is Customer Details.
If you have enabled the Projects feature in your company, QBO displays a third tab called the Projects tab, which lists any projects you have created in your QBO company.
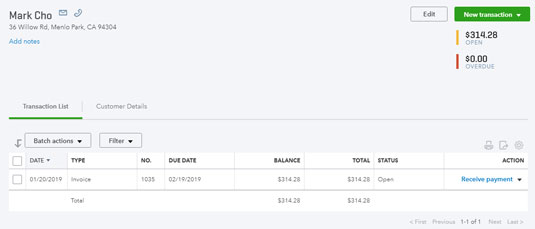 The Transaction List tab shows transactions in QBO associated with the selected person.
From either tab, you click the Edit button to edit information about that person, and you click the New Transaction button to add a transaction associated with that person.
From the details page of a person, you can attach files to keep track of important financial information. For example, you can attach a vendor’s 1099 document, a customer’s contract, or an employee’s receipts. You’re not limited to text documents; you also can attach photos. Simply drag and drop the item into the Attachments box at the bottom left side of the appropriate details page; if you prefer, you can click the box and a standard Windows Open dialog box appears so that you can navigate to and select the document you want to attach.
Each attachment can be no larger than 25MB. To view documents that you’ve already attached to a person, click the Show Existing link below the Attachments box and QBO opens a pane on the right side of the page showing the linked attachments.
You also can add attachments to a transaction. To view transactions that have attachments, you add the Attachments column to the table that appears on the person’s Transaction List page. Display the person’s Transaction List page and then click the table Gear button above the Action column. From the list that appears, click Show More. Show More changes to Show Less and a check box for Attachments appears; click it and the Attachments column appears as part of the table grid. You can identify it as the column heading with a paper clip. Displaying the Attachments column for one person displays it in the Transaction List table for all persons of that type. If attachments exist for any particular transaction, you’ll see the number of attachments in the column. Clicking the number lists the transaction’s attachments; clicking an attachment in the list opens that attachment.
You add attachments to the various transactions as you create them; only attachments associated with transactions appear on the various Transaction List pages, and attachments associated with a person appear on the associated person’s page.
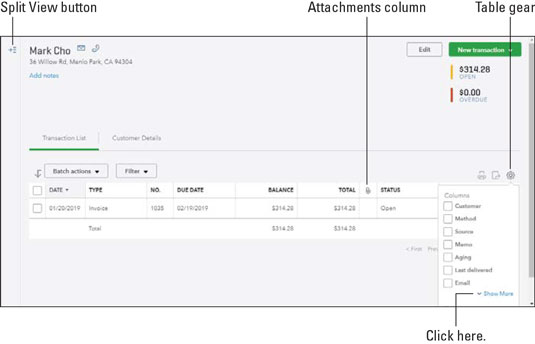 Adding the Attachments column to the table on the Transaction List.
When you finish working with one person, you can easily switch to another in that list using the list’s Split View list pane.
You can click the Split View icon (shown in the preceding image) to display a pane listing the people stored in the list (see the following image).
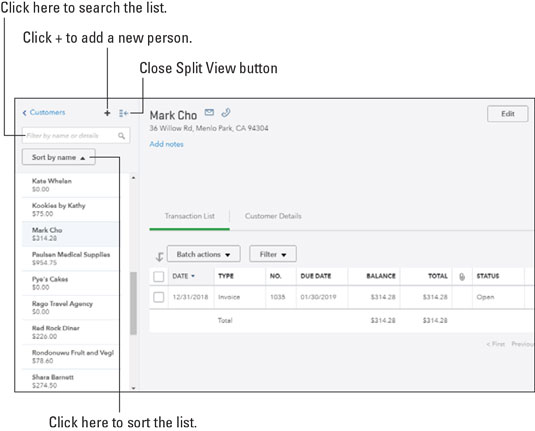 Displaying a list’s Split View.
From the list in the Split View pane, you can scroll down to find a person, or you can type a few letters of the person’s name or company name in the Search box at the top of the list to find that person in the list. Or, you can sort the list by name or by open balance. Click a person to switch to that person’s page.
To add a new person to the list, click the plus (+) symbol at the top of the list in the Split View pane. To display the Customers page, click Customers at the top of the Split View list or click Sales in the Navigation bar and then click Customers.
To close Split View, click the Close Split View button.
Sorting a list in QuickBooks Online
In addition to sorting in Split View, you can sort the lists on the Customers and Vendors page by name or open balance. By default, QBO sorts the entries on these pages alphabetically by name in ascending order.You can sort employees in alphabetical order and reverse alphabetical order, by pay method, or by status (active or inactive). You can’t sort contractors; QBO, by default, sorts them in alphabetical order.
To change the sort order for the Customers or Vendors lists, click Sales or Expenses in the Navigation bar and then click Customers or Vendors to display the appropriate page; for this example, I use the Customers page.Next, click the heading for the column by which you want to sort. If you click the Customer/Company column heading, QBO displays the customers in descending alphabetical order. If you click the Open Balance column heading, QBO sorts the list in Open Balance order, from lowest to highest.
How to export a QBO list to Excel
You can export a list of your customers or vendors to Excel.If you don’t have a copy of Excel on your computer, you can download and use the free mobile version of Excel.
Click the appropriate link in the Navigation bar (Sales or Expenses) to subsequently display either the Customers page or the Vendors page; the Vendors page is used in this example. At the right edge of the page, just above the Action column, three buttons appear. Click the middle button, and QBO exports the list to an Excel file; a button for the file appears at the bottom of the screen in Chrome.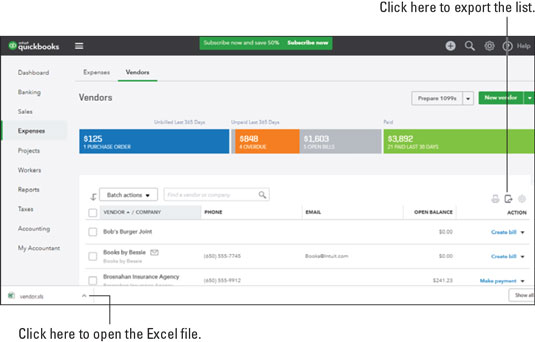 Exporting a vendor list to Excel.
Click the button at the bottom of the screen, and Excel opens the file. You can edit the file if you click the Enable Editing button in the yellow bar at the top of the window. And, for those of you using Excel mobile, you need to sign in using your Microsoft account to edit the file.
How to work with a batch of people in QBO
When you work with customers or vendors, you can take certain actions simultaneously for a group of people. For example, you can select specific vendors by clicking the check box beside each name and then send the same email to those vendors, pay bills online for the selected vendors if you are using the Bill.com add-on with QBO Essentials, Plus, or Advanced, or make the selected vendors inactive.You can use the Bill.com add-on to pay bills online from QBO; there is a full-service Bill.com app, but here, I’m talking about the add-on to QBO. You’ll find the Bill.com app available in the Intuit App Center. You can visit the store by choosing Apps from the Navigation pane. There is no monthly subscription fee for Bill.com, but there is a per transaction fee for each payment you process.
For customers, in addition to sending email, you can create and send statements to them, assign the selected customers to a customer type (you use customer type to group customers), and make the selected customers inactive.To use one of these actions for a group of people, click the appropriate link in the Navigation bar—Sales or Expenses—followed by the appropriate list page to display the associated page. For this example, I used the Customers page.
Next, click the check box beside the names you want to include in your action and then click the Batch Actions button. Select the action you want to take, and then follow the prompts onscreen to complete the action.
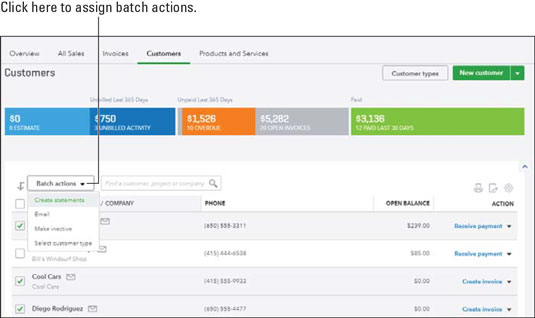 Performing an action for several customers.

