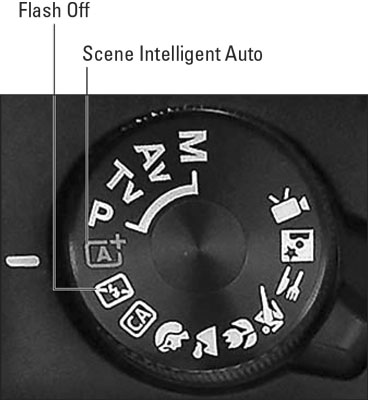
 Set the Mode dial to Scene Intelligent Auto or Auto Flash Off for point-and-shoot simplicity.
The name Scene Intelligent Auto stems from the fact the camera uses its digital brain to analyze the scene — it's an intelligent camera, see — and then selects the most appropriate settings for that scene.
Although the camera handles most picture-taking chores for you in both modes, you need to consider a few settings, starting with whether you want to use the viewfinder to compose the photo or enable Live View, which sends a live preview of the subject to the camera monitor. Your choice makes a difference in how the camera's autofocusing system works and, therefore, how you take the picture.Both sets of instructions assume that you're using the camera's default settings. To restore the defaults, set the Mode dial to P, Tv, Av, or M and then choose Clear Settings from Setup Menu 3. (You can't access this menu option in any of the point-and-shoot modes.)
Viewfinder photography in Scene Intelligent Auto and Flash Off modes
The following steps show you how to take a picture using Scene Intelligent Auto or Flash Off exposure modes, relying on the default camera settings and autofocusing. If your lens doesn't autofocus with the T7/2000D, ignore the focusing instructions and focus manually.1. Set the Mode dial to Scene Intelligent Auto.
Or, for flash-free photography, select the Flash Off mode.
2. Set the lens focusing method to autofocusing.On the 18–55mm kit lens, set the switch to AF.
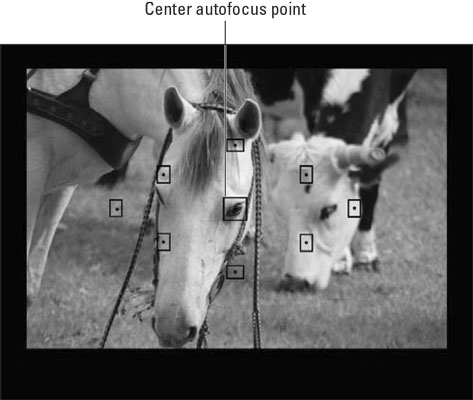
3. Looking through the viewfinder, frame the image so that your subject appears under an autofocus point.The autofocus points are the nine rectangles scattered around the viewfinder frame, as shown.
 The tiny rectangles in the viewfinder indicate autofocus points.
Framing your subject so that it falls under the center autofocus point (labeled in the figure) typically produces the fastest and most accurate autofocusing.
4. Press and hold the shutter button halfway down.The camera’s autofocus and autoexposure meters begin to do their thing. In Auto exposure mode, the flash pops up if the camera thinks additional light is needed. Additionally, the flash may emit an AF-assist beam, a few rapid pulses of light designed to help the autofocusing mechanism find its target.
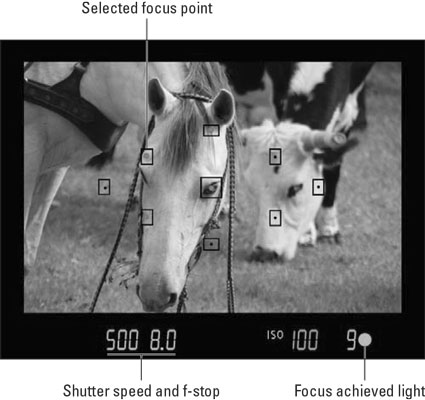
When the camera establishes focus, one or more of the autofocus points blink red to indicate which areas of the frame are in focus. In the following figure, for example, the focus points on the horse's face are lit.
In most cases, you also hear a tiny beep, and the focus indicator in the viewfinder lights, as shown. Focus is locked as long as you keep the shutter button halfway down.
 When you photograph stationary subjects, the green focus indicator lights when the camera locks focus.
If the camera senses motion in front of the lens, however, you may hear a series of small beeps, and the viewfinder's focus lamp may not light. Both signals mean that the camera switched to continuous autofocusing, which adjusts focus as necessary up to the time you take the picture. Your only job in this scenario is to keep the subject framed within the area covered by the autofocus points.
5. Press the shutter button the rest of the way down to take the photo.When the recording process is finished, the picture appears briefly on the camera monitor.
A few more pointers about shooting in Scene Intelligent Auto and Flash Off modes:- Exposure: After the camera meters exposure, it displays its chosen exposure settings at the bottom of the viewfinder, as shown in Figure 3-3. You can ignore all this data except for the shutter speed value, labeled in the figure. In dim lighting, that value may blink, which is the camera’s way of alerting you that the shutter speed may be slow enough that handholding the camera is risky. Any movement of the camera during the exposure can blur the image, so when you see the blinking shutter speed, use a tripod. Typically, this issue arises only when you use Flash Off mode in dim lighting. In Scene Intelligent Auto mode, the camera’s flash provides sufficient light to keep the shutter speed fast enough that most people can handhold the camera (although it never hurts to use a tripod just in case). Turning on Image Stabilization, which compensates for minor camera shake, also helps. On the kit lens, set the Stabilizer switch to the On position to take advantage of this feature. Keep in mind that if your subject moves during a long exposure, it may appear blurry regardless of whether you use a tripod.
Additionally, dim lighting may force the camera to use a high ISO setting, which increases the camera’s sensitivity to light. Unfortunately, a high ISO can create noise, a defect that makes your picture look grainy.
- Drive mode: By default, the camera uses the Single mode, which means you get one picture for each press of the shutter button. Your other choices are to use either the standard Self-Timer mode (10-second delay) or the continuous Self-Timer mode (record up to nine frames with each press of the shutter button). To change the setting, press the left cross key or use the Quick Control screen.
- Flash: The built-in flash has a relatively short reach, so if the flash fires but your picture is still too dark, move closer to the subject. In Scene Intelligent Auto mode, you can set the flash to the Red-Eye Reduction mode (the control lives on Shooting Menu 1), but you can't disable flash. To go flash free, you have to set the Mode dial to the Flash Off setting.
Live View photography in Scene Intelligent Auto and Flash Off modes
Follow these steps to take a picture in Live View mode using autofocusing and the default settings for Scene Intelligent Auto and Auto Flash Off modes:1. Set the Mode dial to Scene Intelligent Auto or Flash Off.
2. Set the lens focusing method to autofocusing.
On the 18–55mm kit lens, set the switch to AF.
3. Press the Live View button to engage Live View.The viewfinder goes to sleep, and the scene in front of the lens appears on the monitor. What data you see superimposed on top of the scene depends on your display mode; press DISP to cycle through the available displays.
If you press the Live View button and nothing happens, Live View may be disabled. To turn it back on, press the Menu button, pull up Shooting Menu 4, and set the Live View Shooting option to Enable.
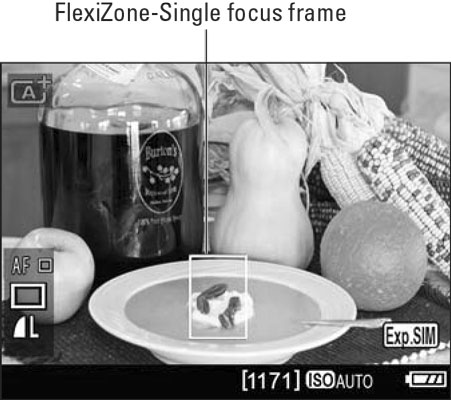
4. Focus.By default, the camera uses a Live View autofocusing option called FlexiZone-Single. In this mode, you use the cross keys to move the focus frame, labeled, over your subject. Then press the shutter button halfway and hold it there to initiate autofocusing. When focus is achieved, the focus frame turns green and the camera beeps, signifying that you're ready to shoot.
5. Press the shutter button fully to take the shot.You see your just-captured image on the monitor for a few seconds before the Live View preview returns.
6. To exit the Live View preview, press the Live View button.You can then return to framing your images through the viewfinder.
 Move the focus frame over your subject and press the shutter button halfway to focus.


