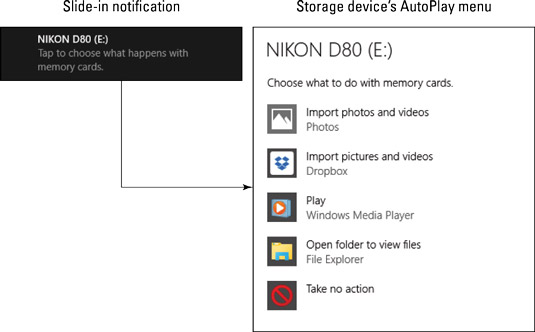
When new storage media is added to the laptop, Windows alerts you with an AutoPlay notification. The notification slides in from the right side of the screen.

Using the AutoPlay notification
Tap the AutoPlay notification to view the AutoPlay menu. Even if you don’t tap the notification, you can still use the storage; the notification simply presents the menu, which makes it easier to deal with the removable storage.
For example, to access files stored on removable media, tap the notification and choose the item Open Folder to View Files. You see a folder window appear, which lists the files and folders stored on the media.
To import photos from the media, choose the item Import Pictures and Videos.
When you don’t see the exact command you want on the AutoPlay menu, choose Open Folder to View Files and browse for available media, documents, or whatever is stored on the media.
The variety of options presented on the AutoPlay menu depends on which programs or apps are installed on your laptop as well as on the content of the removable media.
If the AutoPlay message doesn’t appear, open the This PC window: Press Win+E and choose This PC from the list of locations on the left side of the window. Right-click on the storage device’s icon and choose the Open AutoPlay command.
Controlling AutoPlay settings
Sometimes AutoPlay appears. Sometimes it doesn’t. Sometimes the laptop gets a mind of its own and overrides your AutoPlay desires. To keep things in line, visit the AutoPlay screen in the Settings app. Obey these directions:
Press Win+I to summon the Settings app.
Click the Devices button.
On the left side of the screen, choose AutoPlay.
Items shown on the right side of the screen affect the AutoPlay settings, which are triggered when you add media or other storage to the laptop.
Ensure that the AutoPlay toggle is in the On position.
Turning off this setting disables AutoPlay messages.
Select the AutoPlay defaults.
Two menus are available, one for removable drives and another for memory cards. Choose a setting from the list.
Close the Settings app window.
If you want to view the AutoPlay menu whenever new media is inserted, choose the option Ask Me Every Time in Step 5.


