Here is a breakdown of the features included in each of the four versions of Azure Information Protection. The AIP Premium P1 license is included in Microsoft 365 Business.
The evolution of Azure Information Protection
Azure Information Protection has gone through an evolution in the last few years, and you may have encountered this technology under a different name. Some of the technology's old names are Azure Rights Management Service (Azure RMS), Azure Active Directory Rights Management (AADRM), Windows Azure Active Directory Rights Managements, Information Rights Management (IRM), or to some, simply “The New Microsoft RMS.” You'll do yourself and Microsoft a great favor by forgetting all those old names and just sticking with Azure Information Protection.The latest iteration of this cloud technology now offers classification and labeling capabilities that can, in turn, apply rights management to protect files. At a high level, Azure Information Protection protects your data in three key steps:
- First, data is classified and labeled. For example, if a document is classified as confidential and should be available only to the recipients of the email, the label might be Confidential — Recipients Only.”
- Next, data is protected through encryption, access control, and policies based on the label. Continuing with the preceding example, a document marked with the Confidential — Recipients Only label will be encrypted so that only the recipients can read it.
- Finally, documents can be tracked, and access can be revoked if necessary. From the preceding example, the sender of the email may decide that one of the recipients should no longer have access to the document. In that case, the sender can revoke access for a specific user.
Activating Azure Information Protection
To start using Azure Information Protection, the first thing you need to do as an IT admin is to activate the service in your Microsoft 365 Business tenant. Even if you think the service is already enabled, it doesn't hurt to verify. Here's how:- Log in to Microsoft’s Admin portal with your global admin credentials.
- In the left navigation, under the Settings group, click Services & Add-in.
The Services & Add-ins page is displayed.
 Navigating to the Microsoft Azure Information Protection settings.
 - Select Microsoft Azure Information Protection
The Microsoft Azure Information Protection window is displayed on the right.
- In the Microsoft Azure Information Protection window, click Manage Microsoft Azure Information protection settings.
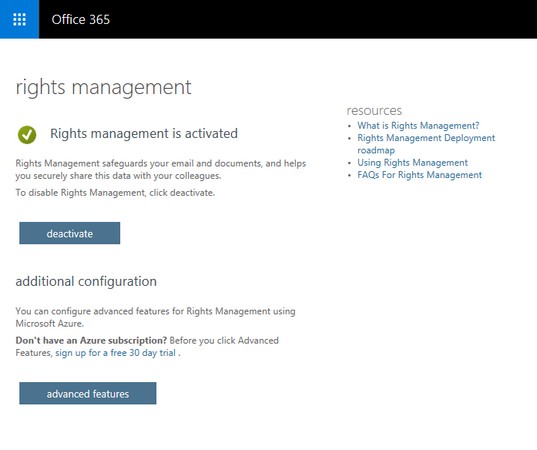
- Confirm that Rights Management is activated. If it isn't, click the Activate button
In this example, the tenant is already activated for Azure Information Protection.
 A tenant with Rights Management activated.
After you've confirmed the status of your Azure Information Protection settings, you can safely close the browser window or navigate back to Microsoft 365 Admin Center from the app launcher.
Getting familiar with Azure Information Protection labels
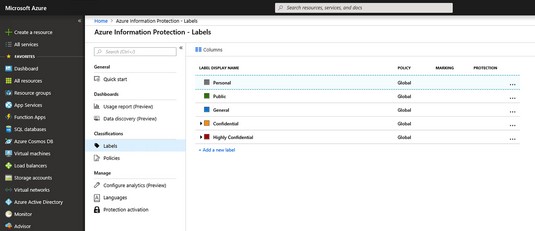
Azure Information Protection comes preconfigured with default policies and labels that are applicable for most organizations, including small businesses. Before you start thinking about configuring custom labels and policies for your organization, take the time to become familiar with the Azure Information Protection default settings. You might save yourself a lot of work creating and testing custom policies.If your Office 365 tenant was provisioned with Azure Information Protection after February 2018, the following labels and corresponding descriptions are already available:
- Personal: Non-business data, for personal use only.
- Public: Business data that is specifically prepared and approved for public consumption.
- General: Business data that is not intended for public consumption but can be shared with external partners as required. Examples include a company internal telephone directory, organizational charts, internal standards, and most internal communication.
- Confidential: Sensitive business data that could cause damage to the business if shared with unauthorized people. Examples include contracts, security reports, forecast summaries, and sales account data. The Confidential label is further broken down into two sub-labels:
- Recipients Only: Confidential data that requires protection and that can be viewed only by the recipients. This label will only appear in Outlook and will apply the Do Not Forward policy.
- All Employees: Confidential data that requires protection that allows all employees full permissions. Data owners can track and revoke content.
- Anyone (not protected): Data that does not require protection. Use this option with care and with appropriate business justification.
- Highly Confidential. Very sensitive business data that would cause damage to the business if it was shared with unauthorized people. Examples include employee and customer information, passwords, source code, and pre-announced financial reports. The Highly Confidential label is further broken down into three sub-labels:
- Recipients Only: Highly confidential data that requires protection and that can be viewed only by the recipients. This label will only appear in Outlook and will apply the Do Not Forward policy.
- All Employees: Highly confidential data that allows all employees to view, edit, and reply permissions to this content. Data owners can track and revoke content.
- Anyone (not protected): Data that does not require protection. Use this option with care and with appropriate business justification.
To further explore these labels and corresponding policies, you need to navigate to the Azure portal and access the Azure Information Protection service settings. Here's how:
- Follow Steps 1-4 above to activate Azure Protection Information.
- On the Rights Management page, click the Advanced Features button
A new browser window launches and the Azure Information Protection — Labels page is displayed.
 Azure Information Protection — Labels page in Azure.
The Confidential and Highly Confidential labels are collapsed by default. To view their sublabels, click the arrow to the left of the label to expand the selection.
A few words about Azure Information Protection policies
On the Azure Information Protection — Labels page, note that the labels all have Global under the Policy column. By default, Azure Information Protection comes with a Global policy that is applied to all users in the tenant. You can edit this policy, but you can't delete it. You can also create new policies and configure them to your heart's content, but the Global policy will always be there.To view the details of the Azure Information Protection Global policy, follow these steps:
- Follow Steps 1-4 above to activate Azure Protection Information.
- On the Rights Management page, click the Advanced Features button
A new browser window launches and the Azure Information Protection — Labels page is displayed.
- In the left menu, under the Classifications group, click Policies.
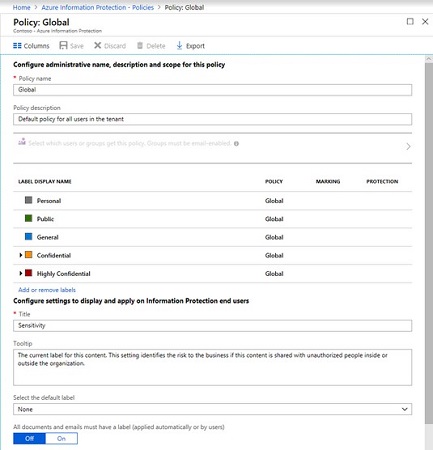
On the right, the Configure Administrative Name and Description for Each Policy blade is displayed.The Policy: Global blade is displayed.
 The Policy: Global blade in Azure Information Protection.
Be careful about changing the default settings in the Global policy because it is applicable to everyone in your organization. You might want to create another policy first and test it out. If you decide to change the Global policy, make sure to save your changes. (If you forget and simply close the blade, the system will prompt you to save your changes.)
Putting Azure Information Protection Into Action
Implementing Azure Information Protection is not something you would do without thoughtful planning and the involvement of keys stakeholders in your organization. You need to make sure that the rollout is communicated to end users, training is delivered, and support is planned.As an IT admin implementing Microsoft 365 Business, you should perform some testing and become familiar with the process before you implement Azure Information Protection for the entire organization. After you've explored the Azure Information Protection service in Microsoft Azure, the next step is to put what you know into action. In this phase, you need your end users to participate.
Installing the Azure Information Protection client
You can have the greatest policies and labels for Azure Information Protection in Azure, but they'll be no good if your end users can't see and apply them. The AIP client, a program that is run on the end users' devices, solves this problem.Before you install the AIP client, make sure Office ProPlus is already installed but not running on the device. When you're ready to install the AIP client, do the following:
- Navigate to the Azure Information Protection client download page.
The Microsoft Download Center appears.
- Click the Download button.
The Choose the Download You Want window is displayed.
- Select AzInfoProtection.exe by selecting the box and then click Next.
 Downloading the Azure Information Protection client.
 - From the notification that pops up at the bottom of your screen, click (or double-click) Run.
The system performs a security check on the download. When the check is complete, the Microsoft Azure Information Protection window pops up.
 Installation window for Azure Information Protection.
 - Click the I Agree button.
You can opt to install a demo policy (not recommended because it will clutter your user interface) or send usage statistics to Microsoft or both.
- In the User Account Control window that displays, click Yes to start the installation.
You see the progress of the installation.
- When the Microsoft Azure Information Protection window displays Completed Successfully, click the Close button.
The installation window disappears, and you're now ready to check that the Azure Information Protection client was successfully installed.To verify the installation, open a blank document in Word. You see the labels below the ribbon.
 Azure Information Protection labels displayed in Word.
Applying a label to a document
Now that the Azure Information Protection client is installed, and the labels are displayed in the Office applications, it's time to put it to the test.- Create a Word document and pretend that it's highly confidential.
- On the Sensitivity bar, click Highly Confidential and select All Employees.
 Applying the Highly Confidential/All Employees label.
The label is applied, and the other labels will disappear.
- Run Outlook, start a new email, and attach the Word document.
Note that Outlook displays the Sensitivity bar with the same labels you saw in Word.
- Enter the email address of a user in your organization.
- Enter an email address outside your organization, and then click Send.
Outlook sends the email to the recipients with the Highly Confidential/All Employees label.In this exercise, the email will still go out to both the internal and external user. The internal user will be able to open and read the document from the sharing invitation. The external user, however, will be blocked from opening the document and will be presented with the message shown here.
 An external user blocked from a sensitive document.
Revoking access to information
Azure Information Protection protects your company information from falling into the wrong hands — even after it has fallen into the wrong hands.For example, suppose you realize that you accidentally sent a document to the wrong people and want to remedy the situation by revoking all access to the document. Here's what you can do, continuing from the example above:
- Open the protected Word document from the preceding exercise.
A yellow bar appears, indicating the sensitivity of the document and containing a button to view the permissions for the document.
- On the Ribbon, click Home, and then click the Protect button.
A submenu appears below the Protect button.
 Accessing the document-tracking site.
 - On the submenu, click Track and Revoke to launch the document-tracking site.
Your browser launches to take you to the document-tracking site.
- If this is the first time you've visited the site, log in with your Microsoft 365 Business credentials.
After a successful login, the document-tracking site displays a summary of views of your document. Explore the tabs to see the robust features in Azure Information Protection.
 The document-tracking site.
 - At the bottom of the document-tracking site, click the Revoke access button.
The Revoke access page is displayed.
- Click the Confirm button at the bottom of the page.
The Revoke Complete window is displayed.
- Click Continue to go back to the document-tracking page.
In the Summary view, the document displays the Revoked stamp.


