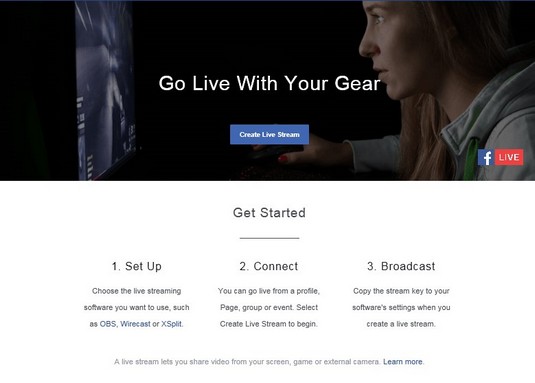
Go to the Facebook Live Creation page. On the page that appears, you're prompted to give Facebook access to your camera and microphone. (Facebook requires this only the first time you set it up.) If you don't use a Chrome or Firefox browser, you see a message that says, “Please try broadcasting on the latest desktop version of Chrome or Firefox to go live with your camera.” Next, a screen called Go Live With Your Gear shows you settings for your broadcast.
 Accessing the Facebook Live screen.
You can also set up a Facebook Live broadcast on your mobile or desktop from your Page in the section at the top that says Write Something. Click the live video icon and follow instructions. You may want to choose this option as you become more familiar with broadcasting.
These settings may look different depending on the entity you are broadcasting from — profile, Page, or public profile.
When broadcasting from your profile, follow the three items listed on the screen under Getting Started.Facebook Live set up
Follow these steps to select the live streaming software you intend to use:- Click one of the three choices, OBS, Wirecast, or XSplit (or your own choice).
- Follow the instructions to download and install the software and then return to the broadcast screen.
- Click the Create Live Stream button.
Connect with Facebook Live
Facebook asks you to choose where to post your live broadcast. From the drop-down menu on the right, the choices are as follows:- On your Timeline: You can choose to broadcast directly from your News Feed.
- In a Group: If you have an ongoing group, you can create a broadcast directly for them.
- In an Event: Broadcasting live from an event is a great way to generate excitement. It also lets you interview participants and show engagement.
- On a Page You Manage: If you have more than one Page, you can choose the one you want here:
- Public: This includes anyone on desktop or mobile who tunes in.
- Friends: You can choose those listed as Friends on Facebook to show your broadcast to.
- Friends except… : You can eliminate some friends from the broadcast.
- Specific friends: You can select individual friends who will see the broadcast.
- Only Me: You can use the Only Me setting to practice your broadcast. It’s a good idea to give yourself a practice run to smooth out all the wrinkles.
- Custom: This setting allows you to mix together several of the preceding options.
- Acquaintances: The acquaintance list is one that you set up separately that allows you to see less from these people but doesn’t unfriend them. Choose this to include them.
- Say something about this live video: In this field, enter a description of your broadcast that tells viewers what benefit they will get from watching the broadcast. You can edit it after the broadcast if you want.
Beneath the description, you see icons to insert an emoji, add a tag, insert your mood, and let people know your location. Don’t overlook tagging as a way to help people find your broadcast.
- Title: You are required to create a title for your broadcast. Make sure to include keywords that your audience cares about.
- Video Game: In this field, you can tag the name of a video game, if applicable.
Facebook Live broadcast
Copy and paste the Stream Key and URL into the settings of the streaming software that you chose previously. After copying, you see a preview of your screen with your choices.You can use that Stream Key for the next seven days. You’ll need a new one if you choose not to go live within five hours of previewing your screen.
Make sure that you have a strong signal (Wi-Fi or 4G) before you broadcast because if your signal isn’t strong enough, Facebook will disable the Go Live button.
Scheduling Facebook Live streams
If you want to schedule an upcoming date instead of going live right now:- Click the Schedule button next to the Go Live button.A schedule screen appears with important instructions and tips. Make sure you read them. They include two important caveats:
Make sure to verify your live feed 20 minutes before the broadcast to ensure that everything is ready to go.
The broadcast starts at the time you scheduled it. If you are not there 10 minutes before the start, your broadcast will be canceled.
- Choose the Scheduled Start Time by selecting a date on the drop-down calendar and setting a time in the Time field.
- If you have a Custom Image that you want to use for the broadcast, click Upload Image and choose an image.
After you have chosen your image, you see a preview of your broadcast on the right side of the screen. Make sure everything is correct.
- Click the Schedule button when you are finished.
Your broadcast announcement post will be published when the Schedule button is clicked.
You can choose to boost your broadcast announcement post as an ad if you want to ensure a larger audience. You can also boost your content after a broadcast. Experiment with your most important broadcasts.
- Click the Go Live button when you are ready.
When you have completed all your tasks, you can click the Go Live button. As noted above, if you have scheduled the broadcast for a later date and time, your broadcast will go live at that time and you need to be there 10 minutes before the broadcast starts.


