GitHub Actions is one of the newer, most exciting features of GitHub. At the time of writing, it's still a beta feature. GitHub Actions makes it possible to create custom workflows on GitHub. It lets you implement custom logic to respond to events on GitHub. In the previous section, we wrote a GitHub app to do that. With GitHub Actions, we don’t need to build a custom app. We can build workflows using existing actions that others have written, or we can write our own actions that run in a Docker container.
Hopefully, by the time you read this, GitHub Actions are generally available. But in the case they’re still in beta, email [email protected] and ask to be in the GitHub Actions beta program.
To demonstrate GitHub Actions, consider the following scenario. When you merge a pull request in your own repository, the branch for the pull request sticks around. GitHub presents a button to delete the branch, but a lot of people forget to do so and leave these branches sticking around.Not deleting the branch isn’t necessarily a bad thing, unless you’re the type of person that likes things to be tidy and cannot stand having a branch that’s no longer needed lingering around. If you are that type of person, you’re in luck. Jesse Frazelle is also that type of person, and she wrote a GitHub Action you can use in your own workflows. Her blog post, “The Life of a GitHub Action” is a good read to understand more details about the life cycle of a GitHub action.
Creating a GitHub action workflow
If you’ve been accepted in the GitHub Actions beta program or it has become more widely available, you should see an extra tab at the top labeled Actions when you view a repository.The following steps walk through the process for creating a GitHub action workflow for a repository.
- Click the Actions tab to see your existing workflows.
If you don’t have any workflows yet, you see a big green button to Create a new workflow, as shown.
 The landing page for GitHub Actions workflows.
 - Click the Create a new workflow button to bring up the workflow designer view.
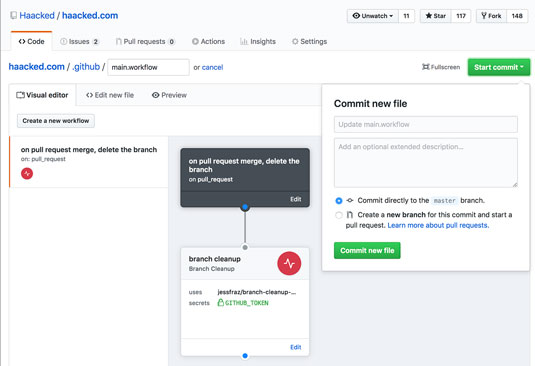
This visual designer lets you create workflows and connect them to actions. Workflows are stored in a file named
main.workflowin the.githubdirectory of your repository. There's also an editor view if you prefer to build your workflows with text. - Switch to the text editor and paste in the following text:
workflow "on pull request merge, delete the branch" {on = "pull_request"resolves = ["branch cleanup">}action "branch cleanup" {uses = "jessfraz/branch-cleanup-action@master"secrets = ["GITHUB_TOKEN">}If you switch back to the visual designer, it should look something like the following figure. - Click the Start commit button to commit this new main.workflow file to your repository.
 Committing a simple workflow.
Testing a GitHub Action
After you commit this file to your repository, the workflow is active. You can test it by creating a new pull request and then merging it. A few seconds or minutes later, you should see that the pull request branch was deleted. An update on the pull request says something likegithub-actions bot deleted the branch-name branch 1 minute ago
You can create pretty useful and complex workflows using existing actions. You can install actions from the GitHub Marketplace or reference them by pointing to a repository that contains an action. You can also write custom actions. How to do that is beyond the scope of this article, but you can look at the action that Jesse wrote to get an idea of what it takes.
With GitHub Actions, you can personalize GitHub to your tastes in nearly unlimited ways.


