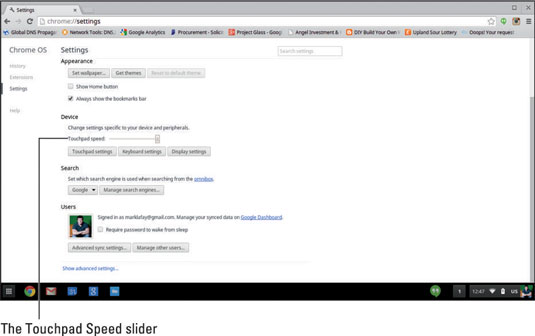
The Chromebook touchpad is not without customization. You can make changes to the touchpad settings from within the Chromebook Settings page. To open the touchpad settings, follow these steps:
Click the status area in the bottom-right of your desktop.
The settings panel opens.
Select Settings.
Your Chromebook Settings page opens in the Chrome browser.
Scroll down to the Device section and select Touchpad Settings.
The Touchpad dialog box appears, as shown.

In the Touchpad dialog box, you can make the following customizations:
Change the touchpad speed.
Adjust your click settings.
Change scroll directions.
Change the Chromebook touchpad speed
In the Device section of your Chromebook Settings page, the Touchpad Speed slider allows you to adjust the speed of your touchpad — that is, the distance your cursor moves onscreen in relation to the distance your finger travels on the touchpad. To move the cursor faster, move the slider to the right. To move it slower, move the slider to the left.

Adjust the touchpad click settings
Clicking the touchpad requires you to press down on the bottom half of the touch pad until you hear a click. If you wish to use less effort to click, you can also turn on the Tap to Click feature. Once you engage this feature, your touchpad treats any quick tap or touch of the touchpad as a click. To enable this feature, follow these steps:
Click the status area in the bottom-right of your desktop.
The settings panel opens.
Select Settings.
Your Chromebook Settings page opens in the Chrome browser.
Scroll down to the Device section and select Touchpad Settings.
The Touchpad dialog box appears.
Check the Enable Tap-to-Click check box.
After you enable this option, you can immediately tap the touchpad to click links, buttons, and so on. You can also double-click by tapping twice.
Change scroll directions
Scrolling on the Chromebook can be accomplished a few ways:
Move your pointer over to the right side or bottom of the screen to reveal available scroll bars. You can then scroll by clicking on the scroll bar and dragging up and down (to scroll vertically) or left and right (to scroll horizontally).
Place two fingers on the touchpad and move them up and down to scroll vertically or left and right to scroll horizontally.
By default, the Chromebook is set up to scroll traditionally, meaning that swiping your fingers up on the touchpad makes the window scroll up and swiping your fingers down makes it scroll down.
You may, however, be more familiar with the opposite action. Meaning that when you swipe up, it’s as if you’re pushing your finger on the screen and pulling more content from the bottom of the screen and vice versa if you swipe down. On Chromebook, this scrolling style is referred to as Australian scrolling. You can activate this feature by taking these steps:
Click the status area in the bottom-right of your desktop.
The settings panel appears.
Select Settings.
Your Chromebook Settings page opens in the Chrome browser.
Scroll down to the Device section and select Touchpad Settings.
The Touchpad dialog box appears.
Select the Australian Scrolling radio button.
Click OK.
Your scroll has now been changed!


