As a responsible parent, you want to set limits to keep your children safe. When you use your Mac parental controls, you get to say what your child can and cannot do.
You don’t have to have kids to implement parental controls. These controls work nicely in setting limits on employees, friends, or visiting relatives.
Presumably, you already set up your child as a managed account with parental controls. If not, click to select the Enable Parental Controls box in the Accounts window. When you do so, your child’s account goes from being a regular standard account to a managed account, with you as the manager.
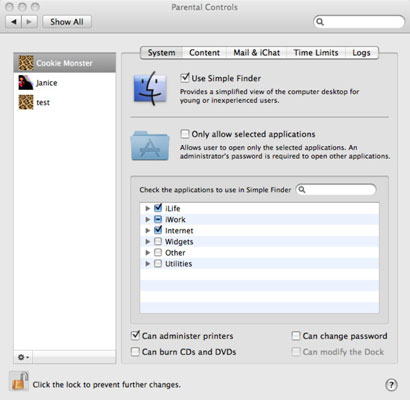
In the Accounts window, click Open Parental Controls. Alternatively click Parental Controls inside System Preferences. Either way, you’ll end up in the same place. In the Parental Controls window, select your child’s name in the list on the left. Now you can decide which controls to implement:

System: Parents can select the Use Simple Finder box to provide your child with the most restricted barebones desktop. Only three folders reside in the Simple Finder version of the Dock (My Applications, Documents, and Shared). Meanwhile, the only applications your kid gets to see are those you’ve designated by selecting the Only Allow Selected Applications option. In this System view, you can also choose whether your child can administer printers, burn CDs and DVDs, change a password, and modify the Dock. (Dock modification is categorically disallowed in Simple Finder.)
Content: By selecting this tab, you can filter out four-letter words in Dictonary. You can also restrict Web access so that all your child supposedly gets to see are clean sites. Apple will make the decision on your behalf if you select the Try to Limit Access to Adult Website Automatically option. If you click Customize, you can list your own approved sites, as well as those you don’t want your child to view. To see some of the sites that meet Apple’s approval, click Allow Access to Only These Websites. (Discovery Kids, PBS Kids, and Smithsonian Institution are among the sites that made Apple’s list.)
Mail & iChat: By selecting Limit Mail and/or Limit iChat, you get to approve who your child can exchange e-mails and hold chats with through instant messages. You can also receive an e-mail permission request should your child attempt to communicate with someone who isn’t on the OK list.
Time Limits: It’s not only a matter of who your child would like to interact with or what programs he wants to play around with — it’s also a matter of when you let him do so. By dragging the sliders shown in this figure, you can establish weekday and weekend time restrictions. In other words, you can prevent access to the Mac when it’s time for him to go bed, choosing different times on school nights and weekends. Your child will get a fair warning shortly before shut down time so that he can save his work. He’ll also get the opportunity to ask for more time.

Logs: Here’s where you get to, um, monitor (that’s the nice way of saying it) your child’s behavior. You can see the Web sites he visited or tried to visit), the applications he used, and who he chatted with. You can log activity for one week, one month, three months, and so on. And you can group logs by contact or date.
Is your child using another Mac in the house? You can remotely manage parental controls across all the Macs in your home network. You’ll have to set up an administrator account across all the computers you want to manage. In the lower-left corner of the Parental Controls window, click the small gear icon (just above the padlock). From the pop-up menu, select Allow Remote Setup. Repeat this exercise on each Mac you want to manage.


