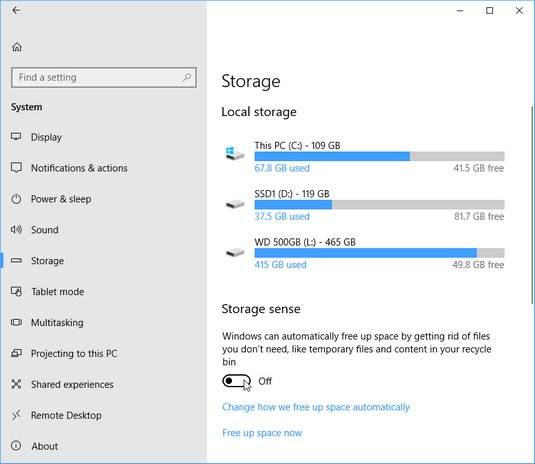
To turn on Storage Sense, which makes Windows 10 automatically empty its Recycle Bin and delete temporary files left behind by your apps and programs, follow these steps:
- Click the Start button and click the Settings icon.

The Settings app appears.
- Click the System category, and click the word Storage from the System page’s left column.
The Storage settings appear.
- Click the Storage Sense toggle switch to On.
 The Storage section offers many ways to increase storage space on your PC.
Windows will automatically begin taking care of its own housekeeping in the future. To fine-tune how Windows manages its storage space, the Settings app’s Storage section offers several other options:
- Change How We Free Up Space Automatically: Click this link to delete old versions of Windows, which frees up a lot of space. You also can toggle Storage Sense on and off. And you can tell Storage Sense to delete files in the Downloads folder that haven’t changed in 30 days, handy if you download a lot of stuff from the Internet but never use it. You also can click the Clean Now button, which tells Storage Sense to begin work immediately rather than waiting until your PC is low on space.
- Free Up Space Now: Meant for people who need extra space immediately, this option works like Disk Cleanup in older Windows versions.
- Change Where New Content is Stored: Normally, Windows stores everything on one drive. However, if your drive runs out of room and you’ve plugged in a portable hard drive, memory card, or second hard drive, visit this section. You can then tell Windows to store new files automatically on that second storage space. This option is handiest for small tablets that have a memory card slot.
- Manage Storage Spaces: Meant only for computer gurus, this option lets you set up an array of drives for automatic backups. Don’t visit here unless you bring a technically minded friend.
- Uninstall unused apps: If you’re no longer using an app, delete it.
- Copy photos and movies elsewhere: Photos and videos consume a lot of space, and they’re often the prime suspect when your computer’s storage space runs low. Consider buying a portable hard drive and copying those files there.
If you’ve upgraded to Windows 10, your old Windows version usually remains on your hard drive in a folder called “Windows.Old.” That folder consumes lots of space, and several options in the Settings app’s Storage section offer to let you delete it. Deleting it, of course, means your computer won’t be able to return to that older Windows version, a last-ditch troubleshooting task.


