After an image makes the journey from a digital camera scanner into the computer, it becomes a file on your PC’s mass storage system. Specifically, it becomes a picture file. Windows allows you to do quite a few things with picture files, and you should be familiar with a few picture-file concepts if you plan to get the most from your PC as the center of your digital photography universe.
To best work with picture files, you need an image editing program. Your version of Windows may have come with such a program, such as Windows Photo Gallery. In Windows 10, you can obtain the Photo Editor from the Store app.
Photoshop is the king of all image editing programs. It has a lite cousin named Photoshop Elements. For serious digital photographers, consider Adobe Lightroom, which works like a digital darkroom to do all sorts of fancy photo manipulation.
Storing pictures in Windows
Windows organizes your pictures into the Pictures folder. Any images you import or scan into the PC using Windows eventually end up in that location.
To view the Pictures folder, press the Win + E keyboard shortcut to summon the File Explore window. From the list of categories on the left side of the window, choose Pictures.
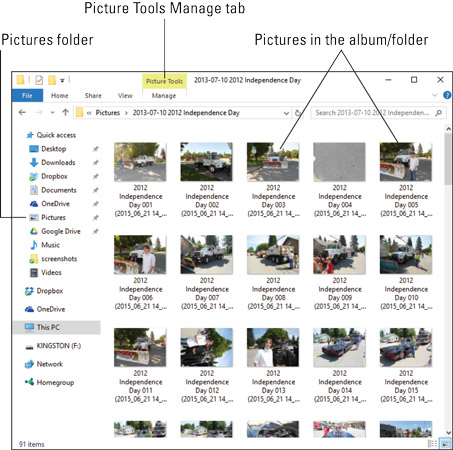
The Pictures folder window looks similar to what you see here, although that image shows a specific album. The folders represent albums. Icons represent images. In Windows 10, the Picture Tools Manage tab appears, which offers commands to rotate images, start a slide show, and use other handy tools — but no editing.

Viewing pictures in Windows
Images are viewed automatically in Windows simply by setting the proper icon size. The icon size is set using the folder’s window.
In Windows 10, click the View tab. Use options in the Layout group to choose how icons are displayed. The Large Icons and Extra Large Icons settings are ideal for previewing pictures.
In Windows 7, use the View menu to choose Large Icons or Extra Large Icons.
You can also preview images simply by opening their icons. Unless you’ve installed specific image editing software, Windows displays the image in a preview app or program. You can press the left or right arrow keys on the keyboard to page through the images.


