Although you can generally preview a previously shot picture or video on your Android, the place you go to look at the gamut of visual media is the app named Gallery.
Your Android phone may call the Gallery app by some other name.
Google features an app called Photos. It’s tied into both Google’s Picasa Web albums as well as Google+ social networking. You do not have to use the Photos app, although it’s a better choice than the Gallery app if you use Google.
Visiting the Gallery app
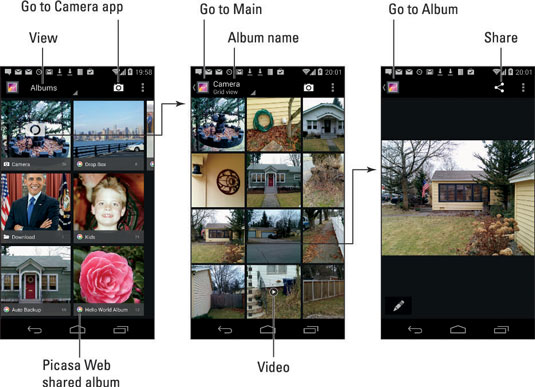
Start the Gallery app by locating its icon. It might be on the Home screen directly or in a folder. And it can always be found in the apps drawer. How the Gallery looks varies from phone to phone, but generally the images are organized by albums. The albums relate to the image’s source and how photos are synchronized between photo-sharing services and your phone.
The following figure shows a typical Gallery app with images organized into albums, or piles.

Touch an album in the Gallery app to display that album’s contents; the pictures appear in a grid of thumbnail previews (middle). Swipe the screen left and right to peruse them all.
Touch an individual thumbnail in the album to view that item full size on the screen, as shown on the right. You can rotate the phone horizontally (or vertically) to see the image in another orientation.
Videos stored in an album appear with a Play icon on the screen. Touch that icon to play the video. As the video is playing, touch the screen again to see the controls to pause the video.
You back up from an image or a video to an album by touching the Back icon or the app icon in the upper-left corner of the screen.
The Camera album contains pictures you’ve shot using the phone’s camera.
The Download album contains images downloaded from the Internet.
Albums labeled with the Picasa icon have been synchronized between your phone and Picasa Web on the Internet. As a Google Account holder, you have a Picasa Web account, which can be used to share images with your cohorts on the Internet.

Various apps may also create their own albums in the Gallery app.
If you synchronize pictures between your phone and a computer, the program that does the synchronizing also creates its own albums.
Setting and finding a picture’s location
Your phone’s camera not only takes pictures but also keeps track of where you stood on Planet Earth when you touched the Shutter icon. The feature is called Geo-Tag and people either love it or hate it. If you hate it, you can disable the feature by heeding these directions:
Ensure that the Camera app is in single-shot mode.
Touch the Control icon.
Your phone’s Camera app may instead feature a command button, a Settings icon, or perhaps a Menu or Action Overflow icon that contains the Camera app’s settings and configuration.
Choose Settings.

Choose Location.

The Geo-Tag feature has been disabled. The Control icon in the stock Android Camera app changes as shown.

To re-enable the Geo-Tag feature, repeat these steps.
When the Geo-Tag feature is enabled, you can coordinate between the phone’s Gallery and Maps apps to see exactly where a picture was taken. To do so, view the image in the Gallery app. With the image displayed on the screen, touch the Action Overflow icon (or the Menu icon) and choose the Show on Map command. The Maps app starts, displaying the spot where the image was taken.


