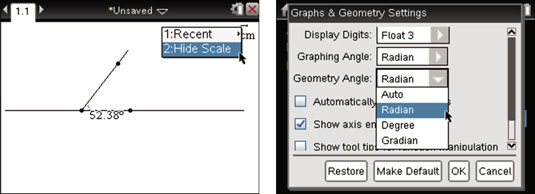
Press [MENU]→Measurement to access the TI-Nspire Measurement menu. On this menu, you will find the Length, Area, and Angle tools, which enable you to measure angles, hide the scale, and change the default settings.
How to measure angles on the TI-Nspire
To measure one of a pair of linear angles, follow these steps:
Press [MENU]→Measurement→Angle to open the Angle measurement tool.
Click the three points that form your angle, making sure that the second point you select is the vertex of the angle to be measured.
If you only have one point on your line, just press [CLICK] somewhere else on the line to create a third point for your angle. See the second screen.
Press [ESC] to exit the Angle measurement tool.
Notice that the measurement changes dynamically when you grab the point on the ray and move the angle.

How to hide the scale and change the settings
You might also want to get rid of the scale in the upper-right corner of the screen. To do this, move your cursor to the scale, right-click ([CTRL][MENU]), and choose Hide Scale.
The default setting for a Geometry page measures angles in degrees. To display this measurement in radians, press [ON]→Settings→Settings→Graphs & Geometry and change the Geometry Angle field of the dialog box from Degree to Radian. See the second screen.
You can also access the settings by clicking the battery icon in the top-right corner of the screen. Because this angle was not created on a coordinate plane, it is considered a geometry angle. Angles that are created on a coordinate plane are considered graphing angles, for which the default setting is radians.


