


Creating the aws utility configuration file
To use the aws utility to perform tasks using AWS CLI, you must create a configuration file. The configuration file contains a number of pieces of information, including both your public and secret keys. The following steps help you perform this configuration task:- Open a command prompt or terminal window.
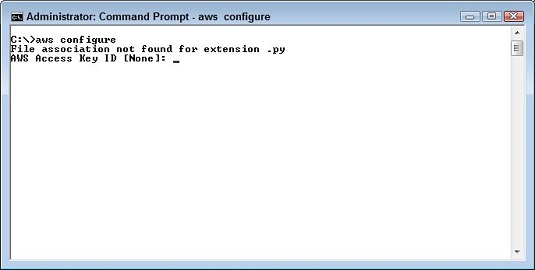
- Type aws configure and press Enter. You see a prompt asking for your public ke.
- Type your public key string and press Enter.
In most cases, you can copy and paste your key directly from the .csv file used to store it. The method you use depends on your operating system. For example, when working at the Windows command prompt, you right-click and choose Paste from the context menu. You see a prompt asking for your private key.
- Type your private (secret) key string and press Enter.
You see a prompt asking for the default region used to access data. The region you provide, such as us-west-2, should match the region you use when interacting with AWS from the consoles.
- Type the region information and press Enter.
The configuration routine asks for an output format. Choose one of the following options:
- json: The default format outputs the data using the JavaScript Object Notation (JSON) technique, which relies on name/value pairs. An advantage of this format is that it works well for direct input with some languages, such as Python. Check out this basic JSON tutorial.
- text: Outputs the data using simple text. The advantage of this approach is that no formatting is involved, so you can easily modify it to meet any need. However, the output can be a little hard to read.
- table: Outputs the data using table-formatted text. The advantage of this approach is that the output is easily read directly at the command line.
- Type the output format and press Enter.
You return to the command prompt.
 Provide the public key that you obtained from AWS.
The configuration command creates two new files for you. Both of these files appear in the .aws folder on your system. The precise location depends on the operating system you use. For example, on a Windows system, you generally find the files in the C:\Users\\.aws folder. After you complete this task, the config file contains the region you want to use and the output format. However, you can add other entries as needed. The credentials file contains your public and private keys.
Obtaining S3 information
To ensure that your aws utility works as expected, you need to try a test access of AWS. Type aws s3 ls and press Enter. You begin with the aws utility, followed by the name of the service you want to access, which iss3. The ls command lists the content of an S3 object. Because you haven’t provided a specific location in S3, what you see as output is a listing of the S3 buckets you’ve created. Note that the output contains the execution date and time. The bucket name will match the name you provided.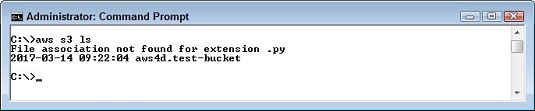 Using the ls command by itself displays a list of buckets.
You can try uploading a file to your bucket. To perform this task, you use the copy or cp command. The cp command requires that you provide a source location and a destination location. The source and destination can be a local folder or S3 bucket. Although you wouldn’t use this technique to perform a local copy, you can copy from a local folder to an S3 bucket, from an S3 bucket to a local folder, or between S3 buckets.
For example, to copy a file named colorblk.gif from a local folder named win to the S3 bucket, you would type something like aws s3 cp "c:\win\colorblk.gif" s3://aws4d.test-bucket/colorblk.gif and press Enter. You must provide a source and destination that match your setup. To ensure that the file is actually uploaded, you use the ls command again, but this time you add the bucket name.
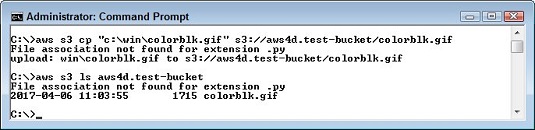 Copy a file to your bucket and then list the bucket content.

