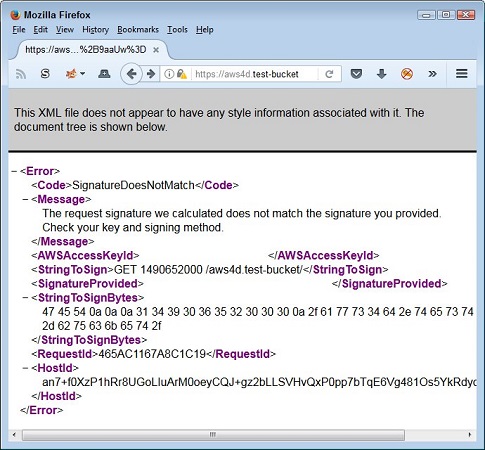
 Error messages can take various forms.
The problem can come from various sources. The first fix is to URL-encode the signature to ensure that special characters in the URL string don’t confuse AWS. A tool you can use to overcome this problem is the URL Decoder/Encoder. To use this tool, just paste the signature (not the entire URL) into the field and click Encode. The resulting signature doesn’t contain any special characters, but rather uses URL encoding to prevent problems.
 URL-encode the signature to prevent problems.
Even if you use the Amazon-supplied code snippets, the signature calculation process can also go wrong. Look again at the first image, at the StringToSign and StringToSignBytes elements. These elements tell you what AWS was expecting when it checked the signature. Of course, it still doesn’t give you a clue as to what value you should have provided for a signature. Fortunately, the Amazon Signature Tester can provide this information.
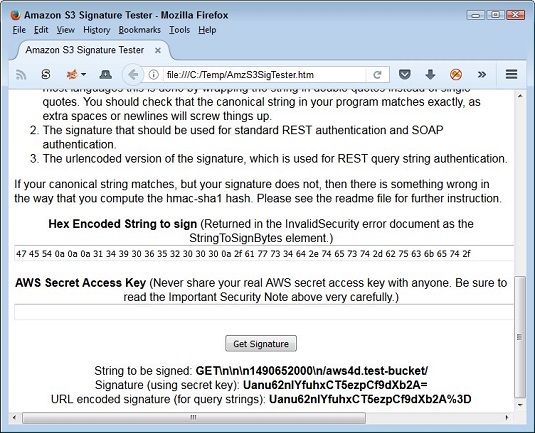
You download the Amazon Signature Tester to your hard drive. What you get is a README file and an HTML page that you load into your browser. The image below shows how the bottom of this page appears. You want to work at the bottom of the page because it contains two fields that you need to supply: the StringToSignBytes element value and your secret key.
 The signature testing tool enables you to validate your signature code.
When you click Get Signature, you see the StringToSign element value as AWS sees it, the actual signature, and the URL-encoded signature. You use the URL encoded signature with your call to AWS. To validate this signature, simply replace the current value in the URL string with this new value. If the problem is in your signature code, the call should work as expected.
The reason you want to recheck the StringToSign element value is that AWS may see it differently than you do. For example, notice that in this case, there are three newline characters between GET and the Expires value of 1490652000. If your signature calculation code doesn’t take this requirement into consideration, the signature will be wrong. You can find additional troubleshooting aids here.


