Before network users can print on the network, the network’s printers must be properly configured. For the most part, this is a simple task. All you have to do is configure each client that needs access to the printer.
Before you configure a network printer to work with network clients, read the client configuration section of the manual that came with the printer. Many printers come with special software that provides more advanced printing and networking features than the standard features provided by Windows. If so, you may want to install the printer manufacturer’s software on your client computers rather than use the standard Windows network printer support.
Adding a network printer
The exact procedure for adding a network printer varies a bit, depending on the Windows version that the client runs. The following steps describe the procedure for Windows 7 (the procedure for Windows Vista is similar):
Choose Start→Devices and Printers.
Click the Add a Printer button on the toolbar.
This step starts the Add Printer Wizard.

Select the Add a Network, Wireless or Bluetooth Printer option.
The wizard searches the network for available printers and displays a list of the printers it finds.

Click the printer you want to use.
If you can’t find the printer you want to use, click The Printer That I Want Isn’t Listed and enter the UNC or IP address for the printer when prompted.
Click Next to add the printer.
The wizard copies to your computer the correct printer driver for the network printer. (You may be prompted to confirm that you want to add the driver. If so, click Install Driver to proceed.)
The Add Printer Wizard displays a screen that shows the printer’s name and asks whether you want to designate the printer as your default printer.
If you want, designate the printer as your default printer.
Click Next to continue.
A final confirmation dialog box is displayed.
Click Finish.
You’re done!
Accessing a network printer using a web interface
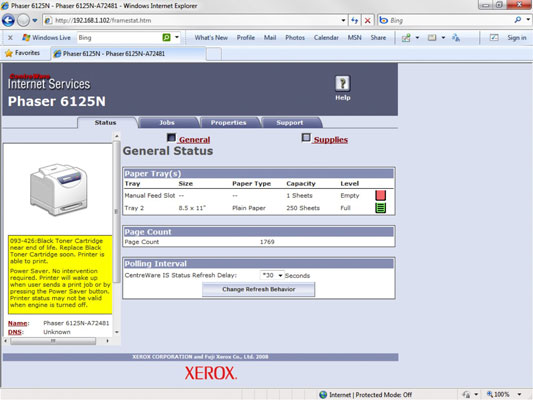
Printers that have a direct network connection often include a built-in web server that lets you manage the printer from any browser on the network. For example, the following illustration shows the home page for a Xerox Phaser 6125 printer. This web interface lets you view status information about the printer and check the printer’s configuration. You can even view error logs to find out how often the printer jams.

To call up a printer’s web interface, enter its IP address or host name in the address bar of any web browser.
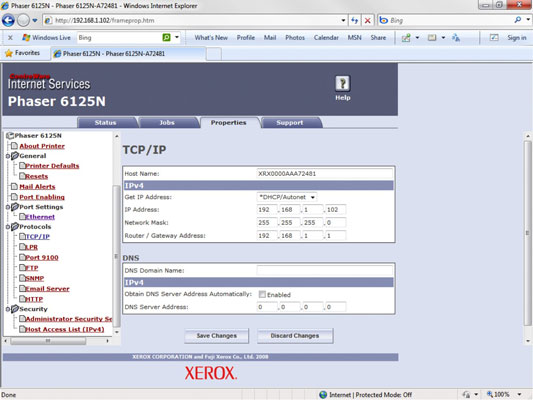
In addition to simply displaying information about the printer, you can also adjust the printer’s configuration from a web browser. For example, the following illustration shows the Network Settings page for the Xerox printer. Here, you can change the network configuration details, such as the TCP/IP host name, IP address, subnet mask, domain name, and so on.
Other configuration pages allow you to tell the printer to send an e-mail notification to an address that you specify whenever you encounter a problem with the printer.

As the network administrator, you may need to visit the printer’s web page frequently, in fact you should add it to your browser’s Favorites menu so that you can get to it easily. If you have several printers, add them under a folder named Network Printers.


