


GitHub products make using Git easy, but if you’re curious, you can also use Git to track your solo projects on your computer.
Try simple Git on the terminal
With the help of Git for Windows, using the terminal on Mac, Windows, or Linux computers is exactly the same. A terminal is an application that enables you to interact with your computer in a text-based way — in other words, instead of double-clicking and dragging, you type commands to navigate your computer.If you’re on Mac or Linux, a terminal is already installed on your computer. If you’re using a Windows computer, install Git for Windows. Click Download to gain access to Git Bash, an emulator that allows you to interact with Git just like you would on a Linux or Mac terminal. You also get Git GUI, which gives you a user interface for almost all Git commands you might type into Git Bash, and shell integration so that you can quickly open Git Bash or Git GUI from any folder.
Many developers on Windows prefer to use PowerShell as their terminal environment. You can use Git within PowerShell.
First, find the Terminal application:- On Mac, you can click the magnifying glass at the top right of your desktop, type Terminal, select the terminal from the list of applications, and press Enter or click it.
- On Linux, press Ctrl-Alt-T all at the same time, and the terminal window opens.
- On Windows, click the Windows menu in the bottom right of your desktop, search Git Bash, select the Git Bash application from the list of search results, and press Enter or click it.
git --version in the terminal. If you have Git installed, you should see a version number, as shown in the following code (the $ should already be on the line, so you do not need to type it). Otherwise, you can follow these instructions.
When using the command line, you have to be very careful about exactly what you're typing. In the following code, the first instruction is for you to type git --version. You should note that a space appears between git and the rest of the instruction but no other spaces. You should also note the two dashes before the word version. They can be easy to miss, so be careful!
$ git --version
git version 2.16.3
$
For Windows, you should see something like this:
$ git --version
git version 2.20.1.windows.1
$
Next, using the terminal, go to your desktop and create a new folder called git practice. To do this, you should type the following commands:
$ cd ~/Desktop
$ mkdir git-practice
$ cd git-practice
$
If you type pwd, you should see that you are now in the folder git-practice, which is on your desktop. It might look something like this:
$ pwd
$ /Users/sguthals/Desktop/git-practice
$
Now, you can tell git to track this folder using the init command.
$ git init
Initialized empty Git repository in /Users/sguthals/Desktop/git-practice
$
Then make sure that you have a clean folder. You can check with the status command:
$ git status
On branch master
No commits yet
nothing to commit (create/copy files and use "git add" to track)
$
Then, you can create a file to have Git start tracking and confirm the file is in the folder:
$ echo "practicing git" > file.txt
$ ls
file.txt
$
On Mac, you can open this folder in a Finder with the open <path> command:
$ open .
$
On Linux, you can open this folder with the nautilus <path> command:
$ nautilus .
$
On Windows, you can open this folder with the explorer <path> command:
$ explorer .
$
In this example, we put . as the <path> for each command. . tells the terminal to open the current folder. You could also use a different path with these commands to open other folders.
After the folder is open, double-click the file called file.txt, and the file opens with TextEdit on Mac, gedit on Linux, and Notepad on Windows. You can see that the words “practicing git” are actually there.
Close the file. Now, you can tell Git that you want to save this as a particular version. Back in the terminal:
$ git add file.txt
$ git commit -m "Adding my file to this version"
[master (root-commit) 8d28a21> Adding my file to this version
1 file changed, 1 insertion(+)
Create mode 100644 file.txt
$ git status
On branch master
nothing to commit, working tree clean
$
You can make a change to your file in the text file. Open the file again, change the text to say “Hi! I'm practicing git today!” and then click File→ Save and close the text application.
When you go back to the Terminal to check the status of your project again, you should see that Git has noticed that the file has changed:
$ git status
On branch master
Changed not staged for commit:
(use "git add <file…" to update what will be committed)
{use "git checkout -- <file>…" to discard changed in working directory)
modified: file.txt
no changed added to commit (use "git add" and/or "git commit -a")
$
Commit this version of your file again and notice that Git recognizes that everything has been saved to a new version:
$ git add file.txt
$ git commit -m "I changed the text"
[master 6d80a2a> I changed the text
1 file changed, 1 insertion(+), 1 deletion(-)
$ git status
On branch master
nothing to commit, working tree clean
$
If your terminal starts to get too cluttered, you can type clear to clear some space and make it more visually appealing. Don't worry; you can always scroll up and see everything you typed earlier!
$ git log
commit 6d80a2ab7382c4d308de74c25669f16d1407372d (HEAD -> master)
Author: sguthals <[email protected]>
Date: Sun Dec 9 08:54:11 2018 -0800
I changed the text
commit 8d28a21f71ec5657a2f5421e03faad307d9eec6f
Author: sguthals <[email protected]>
Date: Sun Dec 9 08:48:01 2018 -0800
Adding my file to this version
$
Then ask Git to show you the first commit you made (the bottom most one). Make sure that you're typing your unique commit hash. In these examples, the hash starts with 8d28a2. Make sure you type the entire hash that appears in your Git log:
Instead of typing the entire hash (and possibly having a typo), you can highlight the hash with your mouse, right-click and choose copy, and then after git checkout, you can right-click and choose Paste. Using the keyboard shortcuts Ctrl+C or Command -C doesn't work
$ git show 8d28a21f71ec5657a2f5421e03faad307d9eec6fcommit 8d28a21f71ec6567a2f5421e03faad307d9eec6f
Author: sguthals <[email protected]>
Date: Sun Dec 9 08:48:01 2018 -0800
Adding my file to this version
<strong>diff --git a/file.txt b/file.txt</strong>
<strong>new file mode 100644</strong>
<strong>index 0000000..849a4c7</strong>
<strong>--- /dev/null</strong>
<strong>+++ b/file.txt</strong>
@@ -0,0 +1 @@
+practicing git
$
You can see that practicing git was added to the file in that original commit.
For more information on how to use git on the command line, check out the following resources:
Another couple of resources are available for learning and understanding Git, which enable users on Windows to experience a similar workflow because they’re visualizations hosted on a website. The first link is a good self-guided set of exercises, while the second link is best used for folks who have a decent understanding of Git and want to explore what will happen in different scenarios, or for folks who have a more expert Git user guiding them.Git branching by collaborator
Git is different from other version control systems because it has fast branching, shown in the following figure. Branching is a Git function that essentially copies code (eachbranch is a copy of the code), allows you to make changes on a specific copy, and then merges your changes back into the main (master) branch.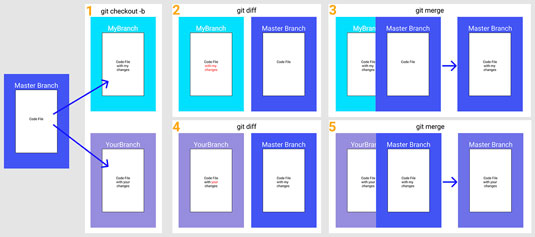 Example workflow for Git branches.
When you're writing code, you will add files and commit changes to your master branch. The figure outlines a specific workflow where two people are collaborating on the same file. Person 1 creates a new branch called MyBranch and makes some changes to the file. Person 2 also creates a new branch called YourBranch and makes some changes to the same file. You can see this change in box #1.
You can see the difference (called diff) between the master branch and MyBranch in box #2.
Then, Person 1 merges their changes with the master branch, as you can see in box #3.
Person 2 has made their own changes, but before merging, they will make sure they have the most updated version of the master branch, which now has the changes from Person 1. The diff can be seen in box #4. Notice what text is in both files.
Finally, Person 2 acknowledges that their changes will overwrite Person 1's changes and merges their changes with master, making the final version have the changes from Person 2. Box #5 shows this final merge, with the master branch having the final changes.
The figure shows just one workflow that can exist when more than one person is working on code and is meant to describe branching. Get a more in-depth overview on Git and branching.
Git branching by feature
Another common way to usebranching is to have each feature that you develop be on a different branch, regardless of the collaborator who is building the feature.You can extend the idea of branching by feature to also have one branch that is your production branch. This branch is what your users will see. Then you can have a development branch, which is one that you can merge features into without changing what your users see.
This type of branching allows you to build a lot of different features, merge them each into the development branch, make sure they all work the way you want, and then merge the development branch into the production branch when you know it's ready for your users.
Git branching for experimentation
You can also create branches to test to see whether something works and then completely throw thebranch away.
This type of branching can be useful if you want to try a completely new layout of a website, for example. You can create three different branches, each with a different layout. After you decide which layout you like best, you can simply delete the other two branches and merge the branch with your favorite layout into master.


