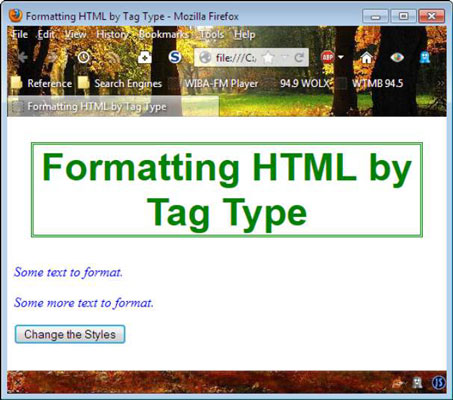
The focus of CSS is on the HTML element. CSS answers the question of how a tag appears to the viewer. There are two methods of working with HTML elements statically: as part of the individual tag and within a header that defines a style for all tags of the same type.
It’s a mistake to assume that all browsers render CSS precisely the same. Two browsers on the same system running the same operating system often offer slightly different presentations. In addition, it’s an error to think that a browser will provide a consistent appearance on all platforms it supports.
For example, Firefox presents slightly different displays when using Mac OS X, Linux, and Windows. A browser can also show the page differently when device constraints demand. A page shown on a smartphone screen differs from the same page shown on a PC. Think of CSS as more of a guideline than an absolute requirement.
How to work with HTML tags
One of the options for configuring the HTML tags on a page is to grab all the tags of a certain type and format them as part of a loop. That’s what the following example does.
function ChangeStyles()
{
  // Modify the <h1> tag style.
  var Header = document.getElementsByTagName("h1")
  for (var i = 0; i < Header.length; i++)
  {
   Header[i].style.fontFamily = "Arial";
   Header[i].style.fontSize = "45px";
   Header[i].style.fontWeight = "bold";
   Header[i].style.color = "green";
   Header[i].style.textAlign = "center";
   Header[i].style.marginLeft = "20px";
   Header[i].style.marginRight = "20px";
   Header[i].style.border = "medium double green";
  }
  // Modify the <p> tag style.
  var Para = document.getElementsByTagName("p");
  for (var i= 0; i < Para.length; i++)
  {
   Para[i].style.fontFamily = "serif";
   Para[i].style.fontStyle = "italic";
   Para[i].style.fontSize = "1em";
   Para[i].style.color = "blue";
  }
}
In this case, the example uses getElementsByTagName() to obtain an array of all of the elements of a particular type on a page. The example formats both the and tags on the page. When you have a list of these elements, you can format each element in turn by using a for loop as shown. The example shows a number of common formatting tasks, including setting element margins.
When you’re working with graphic additions, such as a border, it helps to have an understanding of where the various styles fit into the picture. For example, the margin affects the distance between the edge of the screen and the border, and padding affects the distance between the border and the content it encloses.
You should notice a few features in this example. A fontFamily property can contain a family name, such as Arial, or a generic name, such as serif. The font size can appear in pixels (px) or ems (one em is equal to 16 px), amongst other value types. You can also use relative measures for the font size, such as small.

How to work with heading styles
Most developers are used to working with a tag that appears in the element of a page. JavaScript is able to construct a tag for you programmatically as shown in the following example.
function ChangeStyles()
{
  // Obtain access to the header.
  Head = document.getElementsByTagName("head")[0];
  // Create a <style> tag.
  StyleTag = document.createElement("style");
  // Set the <style> tag type.
  StyleTag.type = "text/css";
  // Create a variable to hold the style information.
  var Styles =
   "h1 {font-family:Arial;font-size:45px;" +
   "font-weight:bold;color:green;text-align:center;" +
   "margin-left:20px;margin-right:20px;" +
   "border:medium double green;}" +
   "p {font-family:serif;font-style:italic;" +
   "font-size:1em;color:blue}";
  // Add the style to the <style> tag.
  StyleTag.appendChild(document.createTextNode(Styles));
  // Add the <style> tag to the heading.
  Head.appendChild(StyleTag);
}
The difference in this example is that the formatting information appears in the tag rather than with each element individually. To make this example work, you construct the tag content as a string.
The application then uses the createTextNode() function to turn the string into a text node and inserts it as content for the tag, StyleTag, using appendChild(). To add the tag to the element, the code calls the appendChild() function a second time.
How to work with IDs
To change the appearance of specific tags, you must work with specific IDs as shown in the following example.
function ChangeStyles()
{
  // Modify the <h1> tag style.
  var Header = document.getElementById("Header");
  Header.style.fontFamily = "Arial";
  Header.style.fontSize = "45px";
  Header.style.fontWeight = "bold";
  Header.style.color = "green";
  Header.style.textAlign = "center";
  Header.style.marginLeft = "20px";
  Header.style.marginRight = "20px";
  Header.style.border = "medium double green";
  // Modify the <p> tag style.
  var Para = document.getElementById("Paragraph");
  Para.style.fontFamily = "serif";
  Para.style.fontStyle = "italic";
  Para.style.fontSize = "1em";
  Para.style.color = "blue";
}
In this case, only the elements with the specific identifiers provided by the code to the getElementById() function are modified in appearance. For example, when the code calls document.getElementById("Header"), Header receives a reference to the object with an id of Header, and the changes that follow only affect that particular object. The output is similar to the other two examples except the second paragraph remains unchanged.


