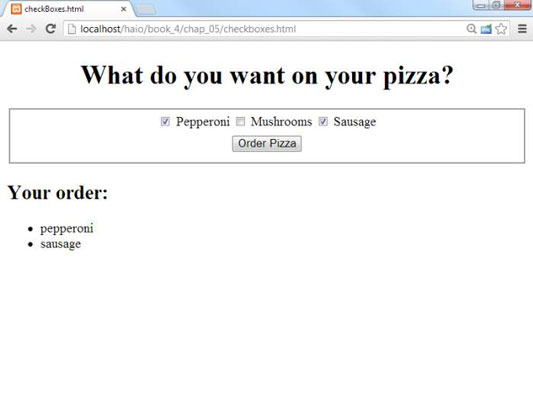
Check boxes fulfill another useful data input function in JavaScript for HTML5 and CSS3 programming. They're useful any time you have Boolean data. If some value can be true or false, a check box is a good tool.
Check boxes are independent of each other. Although they're often found in groups, any check box can be checked or unchecked regardless of the status of its neighbors.

How to build the check box page
To build the check box, start by looking at the HTML:
 <body>
 <h1>What do you want on your pizza?</h1>
 <form action = ">
  <fieldset>
  <input type = "checkbox"
    id = "chkPepperoni"
    value = "pepperoni" />
  <label for = "chkPepperoni">Pepperoni</label>
  <input type = "checkbox"
    id = "chkMushroom"
    value = "mushrooms" />
  <label for = "chkMushroom">Mushrooms</label>
  <input type = "checkbox"
    id = "chkSausage"
    value = "sausage" />
  <label for = "chkSausage">Sausage</label>
  <button type = "button"
    onclick = "order()">
   Order Pizza
  </button>
  </fieldset>
 </form>
 <h2 id="tab2" >Your order:</h2>
 <div id = "output">
 </div>
 </body>
Each check box is an individual input element. Note that check box values aren't displayed. Instead, a label (or similar text) is usually placed after the check box. A button calls an order() function.
Note the labels have a for attribute which connects each label to the corresponding check box. When you connect a label to a check box in this way, the user can activate the check box by clicking on the box or the label. This provides a larger target for the user, making their life easier. Happy users make fewer mistakes, which makes your life easier.
How to respond to the check boxes
Check boxes don't require a lot of care and feeding. After you extract it, the check box has two critical properties:
You can use the value property to store a value associated with the check box.
The checked property is a Boolean value, indicating whether the check box is checked or not.
The code for the order() function shows how it's done:
   //from checkBoxes.html
  function order(){
  //get variables
  var chkPepperoni = document.getElementById("chkPepperoni");
  var chkMushroom = document.getElementById("chkMushroom");
  var chkSausage = document.getElementById("chkSausage");
  var output = document.getElementById("output");
  var result = "<ul> n"
  if (chkPepperoni.checked){
   result += "<li>" + chkPepperoni.value + "</li> n";
  } // end if
  if (chkMushroom.checked){
   result += "<li>" + chkMushroom.value + "</li> n";
  } // end if
  if (chkSausage.checked){
   result += "<li>" + chkSausage.value + "</li> n";
  } // end if
  result += "</ul> n"
  output.innerHTML = result;
  } // end function
For each check box,
Determine whether the check box is checked.
Use the checked property as a condition.
If so, return the value property associated with the check box.
Often, in practice, the value property is left out. The important thing is whether the check box is checked. If chkMushroom is checked, the user obviously wants mushrooms, so you may not need to explicitly store that data in the check box itself.


