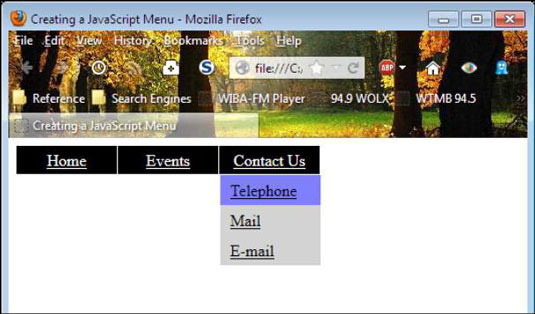
The concept of a JavaScript-based menu is straightforward. When you hover a mouse pointer over a menu, it opens any submenu and lets you choose one of the options on the submenu, if desired. Moving the mouse to a different menu closes the first submenu and opens another.
How to design the HTML for the menu
This example is based on heavily formatted lists. There are many other ways to create menus, but this approach works quite well. Theoretically, you could easily store the menus on disk or in a database and use JavaScript to construct the required list code for you. However, for now, concentrate on the fact that this menu system is static and provides specific options as shown in the following code:
<ul id="menu">
  <li id="Item1">
   <a href="http://www.somewhere.com"
     onmouseover="CloseMenu()">Home</a>
  </li>
  <li id="Item2">
   <a href="http://www.somewhere.com"
     onmouseover="OpenMenu('Item2Submenu')">Events</a>
   <ul id="Item2Submenu"
     onmouseover="KeepSubmenu()"
     onmouseout="CloseMenu()">
     <a href="http://www.somewhere.com">Event 1</a>
     <a href="http://www.somewhere.com">Event 2</a>
     <a href="http://www.somewhere.com">Event 3</a>
   </ul>
  </li>
  <li id="Item3">
   <a href="http://www.somewhere.com"
     onmouseover="OpenMenu('Item3Submenu')">
      Contact Us
   </a>
   <ul id="Item3Submenu"
     onmouseover="KeepSubmenu()"
     onmouseout="CloseMenu()">
     <a href="http://www.somewhere.com">Telephone</a>
     <a href="http://www.somewhere.com">Mail</a>
     <a href="http://www.somewhere.com">E-mail</a>
   </ul>
  </li>
</ul>
There are three main menu options: Home, Events, and Contact Us. The Home menu lacks submenus. The Events menu does have a submenu consisting of Event 1, Event 2, and Event 3. The Contact menu provides Telephone, Mail, and E-mail as submenus.

Define the menu styles
The lists that you created won’t look much like a menu at the outset. The secret is the formatting provided by the CSS that follows:
<style type="text/css">
  #menu
  {
   margin: 0;
   padding: 0;
  }
  #menu li
  {
   margin: 0;
   padding: 0;
   list-style: none;
   float: left;
  }
  #menu li a
  {
   display: block;
   margin: 0 1px 0 0;
   padding: 4px 10px;
   width: 80px;
   background: black;
   color: white;
   text-align: center;
  }
  #menu li a:hover
  {
   background: green;
  }
  #menu ul
  {
   position: absolute;
   visibility: hidden;
   margin: 0;
   padding: 0;
   background: grey;
   border: 1px solid white;
  }
  #menu ul a
  {
   position: relative;
   display: block;
   margin: 0;
   padding: 5px 10px;
   width: 80px;
   text-align: left;
   background: lightgrey;
   color: black;
  }
  #menu ul a:hover
  {
   background: #7f7fff;
  }
</style>
This CSS code is presented in the order of detail. The #menu formatting is for the topmost tag. The main menu items are formatting in turn by the #menu li and #menu li a styles. When a user hovers the mouse over a main menu item, the #menu li a:hover style changes the background color to green.
The submenu formatting is accomplished by the #menu ul and #menu ul a styles. Again, when the user hovers the mouse over a submenu item, the #menu ul a:hover style defines a color change for that menu item.
How to create the JavaScript functions
The JavaScript functions have to perform four tasks. The first task is to track the status of the menu system and ensure that the menu remains stable. The following code performs that task:
// Holds the current open menu item.
var Item;
// Holds the timeout value.
var Timer;
// Hide the menu after clicking outside it.
document.onclick = CloseMenu;
The Item variable contains the current menu item. Timer holds a value that determines when a submenu will close automatically. If you don’t provide this value, the menu behaves quite erratically, and users may find it difficult to select items. Finally, the code must provide a means to automatically close menu items when a user clicks outside the menu system, which is what the document.onclick = CloseMenu assignment does.
The second task is to provide a means for opening the submenus, which are hidden at the outset. Making the submenu visible allows access to the entries it provides. The following code shows a technique for opening the submenus:
function OpenMenu(Menu)
{
  // If there is an item that is open, close it.
  if (Item)
  {
   Item.style.visibility = "hidden";
  }
  // Obtain an item reference for the new menu.
  Item = document.getElementById(Menu);
  // Make it visible.
  Item.style.visibility = "visible";
}
Notice that the code first checks to ensure that the previous submenu is actually closed. Otherwise, the user could see two open submenus, which would definitely be confusing. After the code makes the previous submenu hidden, it makes the current submenu visible. In both cases, the example relies on the visibility property to perform the task.
The third task is to provide a method for closing a menu. This particular feature is a little tricky because you don’t necessarily want the menu to close immediately. Otherwise, the user won’t have time to select a submenu item before it closes. The following code shows how to perform this task with a time delay in place:
function CloseMenu()
{
  // Set a timer for closing the menu.
  Timer = window.setTimeout(PerformClose, 500);
}
function PerformClose()
{
  // If the item is still open.
  if (Item)
  {
   // Close it.
   Item.style.visibility = "hidden";
  }
}
When the application requests that a submenu close, the code creates a 500 millisecond delay, after which the window automatically calls PerformClose(). When an item exists, PerformClose() sets its visibility property to hidden to hide the submenu from view.
There are three ways in which a submenu can close. A submenu can close when a user selects another main menu item, when the user moves the mouse cursor off of the submenu, or when the user clicks on a main or submenu item. When a user is hovering the mouse over a submenu item, the code must keep the submenu open. That’s the fourth task the application must perform:
function KeepSubmenu()
{
  // Reset the timer.
  window.clearTimeout(Timer);
}
As long as the user hovers the mouse over the submenu, it will remain open because the timer is constantly reset. The moment the user moves the mouse off the submenu or clicks one of the submenu items, the timer restarts, and the submenu closes.


