It’s time to build a few JavaScript applications to see what jQuery can do for you when you’re retrieving results from AJAX calls. Although your real-world situations will be more complex, the process is going to be the same.
How to work with standard output
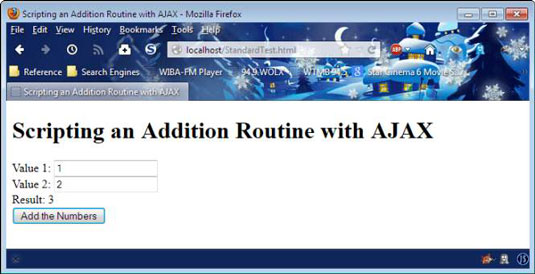
This example uses the DoMath.php script to perform math and change just the result field of a form on a page. You must use your server setup to make this example work because the server executes the PHP script and then returns the result. Using jQuery makes the process of working with AJAX significantly easier. The following code shows the form used for this task.
<form id="DataEntry">
  <h1>Scripting an Addition Routine with AJAX</h1>
  <div>
   <label>Value 1:</label>
   <input id="val1"
       name="val1"
       value="1"
       type="text" />
  </div>
  <div>
   <label>Value 2:</label>
   <input id="val2"
       name="val2"
       value="2"
       type="text" />
  </div>
  <div>
   <label>Result:</label>
   <span id="result"></span>
  </div>
  <input id="btnChange"
     type="button"
     value="Add the Numbers"
     onclick="PerformAdd()" />
</form>
The example uses standard controls for data input. Notice that you must define the name attributes for these controls, or the jQuery .serialize() method won’t work. It’s a good idea to assign the controls default values. The output is a simple .
The application performs its task when the user clicks Add the Numbers, which is an control. This approach provides an alternative to using a submit style button. However, either approach works equally well. The advantage of this approach is that you can use a named function, PerformAdd(), to handle the click event. The following code shows how PerformAdd() does its work:
function PerformAdd()
{
  $("#result").load(
   "http://localhost/DoMath.php",
   $("#DataEntry").serialize());
}
The example places the output in a with an id of result. You access this by its identifier and call load() to fill it with information from the desired source. You provide the location of the source, which is DoMath.php.
The PHP script requires input data, which you add as a second argument. To obtain the data, you access the tag, which has an identifier of DataEntry, and you call serialize(), which serializes every control that has a name attribute assigned to it. When using the default values, the serialized data is val1=1&val2=2. Taken together, the complete URL is http://localhost/DoMath.php?val1=1&val2=2.

The benefits of JSON
Working with XML provides a cross-platform, cross-browser solution for storing data that also works with just about every programming language on the planet. It really isn’t possible to get any more generic than XML. XML can be difficult to parse into a form that the computer can understand. Consequently, developers looked for an easier way to store complex data. JavaScript Object Notation (JSON) is one of the new solutions.
Like XML, JSON works with any platform and with any browser. Using jQuery makes working with JSON easy. Interestingly enough, PHP provides the functions required to translate complex PHP data into JSON format.
How to create the JSON data
As its name implies, JSON relies on JavaScript objects to store information. You actually use object literals to store data.
This example stores the JSON data on disk in a file.
{
 "Users" :
 [
  {
   "Name" : "George Smith",
   "Number" : 28,
   "Birthday": "/Date(377244000000)/"
  },
  {
   "Name" : "Amy Jones",
   "Number" : 41,
   "Birthday": "/Date(414914400000)/"
  },
  {
   "Name" : "Sammy Wang",
   "Number" : 33,
   "Birthday": "/Date(-147380400000)/"
  }
 ]
}
The data consists of a group of users. There are three users in the file. Each user entry has the same fields associated with it: Name, Number, and Birthday. Notice that strings appear in quotes. Numbers appear without quotes. JSON doesn’t actually provide support for standard object types, so this example uses one of the types you commonly see.
If this file contained a Boolean value, it would appear as true or false without quotes. In sum, JSON supports these data types:
String
Number
Boolean
null
In addition, JSON files support two structure types: object literal and array. This example demonstrates both structure types for you so that you know how to handle them in JavaScript using jQuery.
How to view the JSON data onscreen
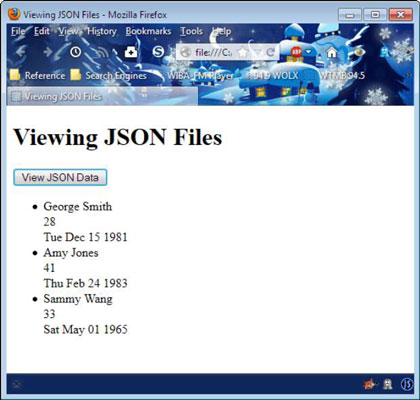
The form for this example includes the heading and an control. When the user clicks the button, it calls ViewData, which is shown in the following example code.
function ViewData()
{
  // Obtain the data from disk.
  $.getJSON("Test.json",
   function(data)
   {
     // Create an array to hold the data.
     var items = [];
     // Parse the data by looking at
     // each entry in the Users object.
     $.each(data.Users,
      function(key, value)
      {
        items.push("<li>" +
         value.Name + "<br />" +
         value.Number + "<br />" +
         (new Date(
           parseInt(value.Birthday.substr(6)))
         ).toDateString()
         + "</li>");
      });
     // Place the result in an unordered list.
     $('<ul/>', {html: items.join(")}).
      appendTo('body');
   });
}
The example begins by calling .getJSON(), which loads Test.json from the drive and places the content in data. The anonymous function accepts data as input. To create the output for this example, the code creates an empty array, items. Using items simplifies the code.
The next step is to process each of the user entries in the Users array found in Test.json. The code calls .each() and passes it data.Users, so that the loop will process each of the object literals it contains. The anonymous function receives a key and value pair for each of the user entries.
To access each of the key/value pairs for the object literal entries, you interact with the appropriate properties: Name, Number, and Birthday. Processing Name and Number is straightforward — simply pass them to the output as is.
To process the odd-looking .NET date, you must separate the text part from the numeric part of the string and then turn that value into an integer that contains the number of milliseconds since January 1, 1970.
If you want to provide a date earlier than January 1, 1970, you use a negative number of milliseconds. The number of milliseconds is used to create a new Date() object. The code calls toDateString() to provide nicer-looking output.
At this point, items contains three array elements, each of which is a list item tag containing facts about the users. The code creates a new unordered list tag and places items within it by calling join(). The resulting list is added to the current document by using the appendTo() method.


