


In JavaScript, the getElementBy methods provide easy access to any element or groups of elements in a document without relying on parent/child relationships of nodes. The three most commonly used ways to access elements are
getElementById
getElementsByTagName
getElementsByClassName
getElementById
By far the most widely used method for selecting elements, getElementById is essential to modern web development. With this handy little tool, you can find and work with any element simply by referencing a unique id attribute. No matter what else happens in the HTML document, getElementById will always be there for you and will reliably select the exact element that you want.
This example demonstrates the awesome power of getElementById to enable you to keep all your JavaScript together in your document or to modularize your code. By using getElementById, you can work with any element, anywhere in your document just as long as you know its id.
<html>
<head>
 <title>Using getElementById</title>
 <script>
 function calculateMPG(miles,gallons){
  document.getElementById(“displayMiles”).innerHTML = parseInt(miles);
  document.getElementById(“displayGallons”).innerHTML = parseInt(gallons);
  document.getElementById(“displayMPG”).innerHTML = miles/gallons;
 }
 </script>
</head>
<body>
 <p>You drove <span id=“displayMiles”>___</span> <br/>miles.</p>
 <p>You used <span id=“displayGallons”>___</span> <br/>gallons of gas.</p>
 <p>Your MPG is <span id=“displayMPG”>___</span>.
 <script>
 var milesDriven = prompt(“Enter miles driven”);
 var gallonsGas = prompt(“Enter the gallons of gas used”);
 calculateMPG(milesDriven,gallonsGas);
 </script>
</body>
</html>
getElementsByTagName
The getElementsByTagName method returns a node list of all the elements with the specified tag name. For example, getElementsByTagName is used to select all h1 elements and change their innerHTML properties to sequential numbers.
<html>
<head>
 <title>Using getElementsByTagName</title>
 <script>
 function numberElements(tagName){
  var getTags = <br/>document.getElementsByTagName(tagName);
  for(i=0; i < getTags.length; i++){
  getTags[i].innerHTML = i+1;
  }
 }
 </script>
</head>
<body>
 <h1>this text will go away</h1>
 <h1>this will get overwritten</h1>
 <h1>JavaScript will erase this</h1>
 <script>
 numberElements(“h1”);
 </script>
</body>
</html>
getElementsByClassName
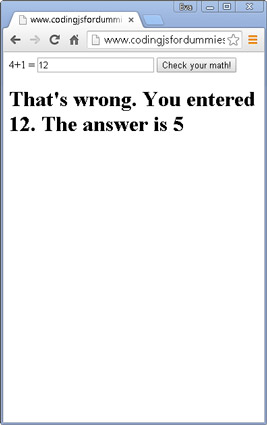
The getElementsByClassName method works in much the same way as the getElementsByTagName, but it uses the values of the class attribute to select elements. This function selects elements with a class of “error” and will change the value of their innerHTML property.
<html>
<head>
 <title>Using getElementsByClassName</title>
 <script>
 function checkMath(result){
  var userMath = <br/>document.getElementById(“answer1”).value;
  var errors = <br/>document.getElementsByClassName(“error”);
  if(parseInt(userMath) != parseInt(result)) {
  errors[0].innerHTML = “That’s wrong. You entered “ + userMath + “. The answer is “ + result;
  } else {
  errors[0].innerHTML = “Correct!”;
  }
 }
 </script>
 </head>
<body>
 <label for = “number1”>4+1 = </label><input type=“text” id=“answer1” value=““>
 <button id=“submit” onclick=“checkMath(4+1);”>Check your math!</button>
 <h1 class=“error”></h1>
</body>
</html>(continued)
The result of running this code in a web browser and entering a wrong answer is shown here.
 getElementsByClassNa
Notice that the code above uses an onclick attribute inside the button element. This is an example of a DOM event handler attribute.


