How to Create an Info Panel in Twitch
When people click on to your name to visit (and hopefully, follow) you, your Channel should tell them something about you, about your stream, and about your approach to the platform. Info Panels are blocks of real estate on your Twitch Channel that allow for you to tell visitors to your page something about you, your content, and how to connect with you away from Twitch. This grid serves as your ambassador when you are offline.- Scroll past the screen where your feed would appear and click on the switch that reads Edit Panels and then click on the Add a Panel area. For this exercise, you will set up an “About Me” page, using my own information as stand-in text in order to teach you some of the nuances of what Info Panels can do.
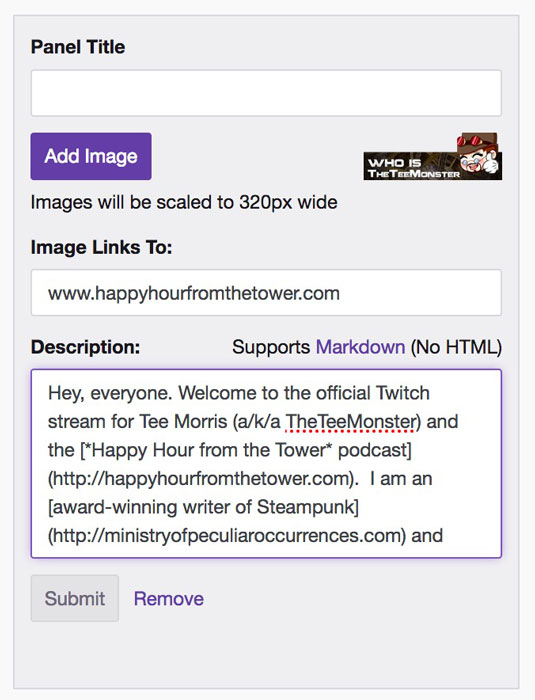
- In the Panel Title field, type “About Me” for your bio title.
A good amount of Twitch Streamers create custom graphics to reflect an established theme of their Channel. These graphics add a touch of flair and design to your Channel. There are also artists available for hire (or maybe some eager fans in your stream) who will apply their talents to your page.
- In the Description field add in the following text: “Hey, everyone. Welcome to the official Twitch stream for Tee Morris (a/k/a TheTeeMonster) and the Happy Hour from the Tower podcast. I am an award-winning writer of Steampunk and non-fiction. Being a productive writer, though, is hard when you're gaming. And I love Destiny. And Fortnite. And … I'm starting to venture into other games on my RADAR. No, I'm not the best gamer, but I do love video games. So stick around and have some fun.” What you put into the Description field can be as brief or as in-depth as you like, but you should not make it a deep dive into who you are, what your astrological sign is, who is your favorite boy band, whether or not you like Piña Coladas, or why getting caught in the rain is your jam. Maybe three or four points to let people know something about you. Something simple as a takeaway for your audience. This should be the approach for all the Info Panel Description fields.
- Go back to the bio and edit the phrase “Happy Hour from the Tower” to read as follows: [*Happy Hour from the Tower* podcast>(http://happyhourfromthetower.com). Twitch offers some ability to apply Markdown (a coding language, seen in the figure that follows) into your Info Panels to add in basic formatting and active hyperlinks into your Info Panels. By placing asterisk marks around a phrase, you apply italics. Placing a word or phrase within brackets designates that word or phrase as a hyperlink. To set a destination for your hyperlink, place a full URL within a set of parenthesis.
- Edit the phrase “award-winning writer of Steampunk and non-fiction.” to read as follows: [award-winning writer of Steampunk>(http://ministryofpeculiaroccurrences.com) and [non-fiction>(http://podcastingfordummies.com).
- Edit the phrase “No, I'm not the best gamer,” to read as follows: No, I'm not the **best** gamer, If you surround a word with a pair of asterisks, you bold a word using Twitch’s markup language.
- Click the Submit button. Now take a step back and look at your first Info Panel. This is one of those “Wash. Rinse. Repeat.” things you’ll be doing in the building and developing of your Channel. It takes a chunk of time to sit down and get your page laid out to the way you want it to look, but this is how you represent you and your Channel in between your streams.
 Twitch uses its own flavor of markup language called “Markdown” to allow you the ability to format text and apply hyperlinks on your Twitch Channel.
So now that you know how to make Info Panels …
What Info Panels should you create in Twitch?
Across the Twitch platform, there are a few common threads that you can apply to your own up-and-coming Channel. These Info Panels I suggest as a starting point, and if you come up with ones not listed here, then by all means, go on and create your own. This is your Channel. Make it yours. You got this.But if you are looking for a few ideas, your Info Panels should cover …
- Streamer’s bio. We did this one already but it might surprise you how many streamers don’t share a bio on their page. I believe it’s a great way to get additional background on the streamer hosting this Channel. As mentioned above, this is not War & Peace or Les Misérables that you are writing. This is a brief “Who is …” and your audience is more accustomed to Twitter than they are to blog posts. So let people know who you are, what it is you do, and what people might expect if they hang out on your stream.
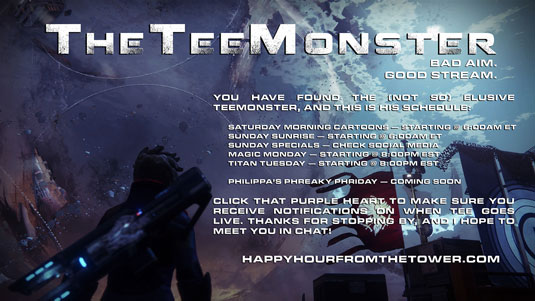
- Streaming schedule. There’s a real mixed opinion about streaming schedules. For some people, they just fire up the stream machine and go! For others, it’s a special occasion that they go out of their way to promote. The good thing about streaming schedules (for an example, see the following figure) is you are making a promise to your loyal and potential audiences when they can find you online. Think of it as your favorite TV show just going live when it did. How would you catch it, unless you keep a schedule? Of course, they will get the Twitch notifications when you go live, but a schedule also serves as a routine for you and helps you find a rhythm for streaming content.
- Rules for Chat. It’s never a bad idea to make it clear that you have a zero tolerance for certain things. This is, after all, your stream. Your stream, your rules. Skip around from Channel to Channel, and you will find that a good amount of streamers adhere to a few simple tips on creating the best kind of Chat:
1. Have fun.
2. Stay positive.
3. Don’t be a jerk.
There are other rules you can probably think of for your own Channel, and if a follower or subscriber can’t abide by them, then okay. No real loss. This is your scene, so set the stage the way you want it to be. Not just for you, but for your Chat as well.
- Social media links. Are you online? Got a podcast? Then go on and list your various social media links here. While you can list all of your various social links in one Info Panel, I have found that separate panels for individual platforms — especially if you decide to create custom art for your stream — work best. So decide what other social media platforms related to you and your stream you want to share with your Twitch stream, and point people in that direction.
Yes, technically people can contact you through your Social Media links. People can also contact you directly through Twitch itself. In this particular case, the Contact panel would be a direct contact between you and those visiting your Twitch Channel. Most of the time, the contacts listed here are more for professional queries, but maybe the odd fan letter or voicemail option will appear. That can happen, but that is the approach with a Contact panel on a Twitch Channel.
- Amazon Wish List. Maybe this isn’t your thing, but go on and create your ultimate streaming studio as an Amazon Wish List; and then set up an Info Panel sending people to it. The generosity of others just may surprise you. I have donated accessories to other streamers, and streamers have stories of other viewers contributing to their dream setups on account of shared Wish Lists. The Twitch Community has a lot going for it, and having your Wish List on your Channel also gives you and your Channel goals to strive for that you can reference anytime.
 Streaming schedules not only help you maintain a schedule with your viewers, but can also help you build up a set routine for your streaming.
From here, you can decide what other Info Panels you need to represent your Channel in the best way. With studio updates and changes in your Twitch stream, you will add, edit and delete Info Panels. All this is part of the evolution of your Channel and you as a Twitch streamer.
How to edit and delete Twitch Info Panels
Creating Info Panels is the hardest part because you’re trying to deduce what you want to share and how you want to convey your message without sounding verbose but not so terse that you come across as vague. Once the panels are created, editing and deleting are a cinch:- Scroll past the screen where your feed would appear and click on the Edit Panels switch to get your Channel Page into Edit mode.
- In About Me’s Description field, edit the text to read: “Hey, everyone. Welcome to the official Twitch stream for Tee Morris (a/k/a TheTeeMonster) and the [*Happy Hour from the Tower* podcast>(http://happyhourfromthetower.com). I am an [award-winning writer of Steampunk>(http://ministryofpeculiaroccurrences.com) and [non-fiction>(http://podcastingfordummies.com). Being a productive writer, though, is hard when you're gaming. And I love Destiny. And Fortnite. And Tomb Raider. And Detroit: Become Human. And … I'm starting to venture into other games on my RADAR. No, I'm not the **best** gamer, but I do *love* video games. So stick around and have some fun.” As you find, editing the text is easy. Just like working on a word processor or simple text editor.
- Single-click the Submit button to accept the changes. There is, at the time of writing this book, no universal “Accept All Changes” command for the Info Panels. They all are accepted one panel at a time.
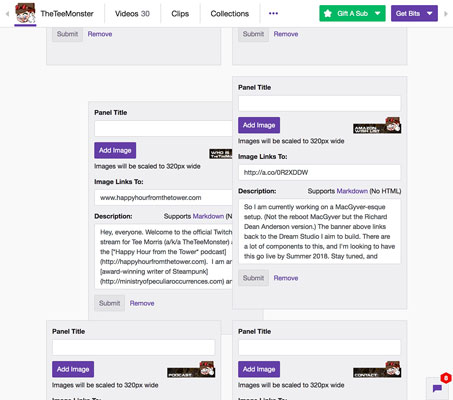
- Click and hold your mouse on the gray area of one Info Panel, and then drag the panel into the direction where you would like your panel to reside.
If you want to change the arrangement of the Info Panels, it's a simple click-and-drag method (pictured in the following figure), where you can move panels in any direction. You will see other Info Panels adjust automatically as you do so.
When you begin moving panels around, the reshuffling of your other panels may completely throw the order you’re wanting. This may mean toggling back and forth the “Edit Panels” switch to see what the layout looks likes and how you need to compensate. There’s a bit of fiddling and some trial-and-error in this process. Just know that Info Panel arrangement is more about patience and determination rather than design.
- To remove a panel from the page, find the Info Panel you want to delete and single-click the Remove option at the lower-right of the Info Panel.
- Toggle the Edit Panels switch back to the Off position, and then review your Channel layout.
 To adjust your Info Panels layout, simply click-and-drag a panel in any direction. Remaining panels will adjust accordingly.
With your Info Panels all set, your Channel is almost ready. Yes, almost. We have set up our Twitch account, filled in all the important details we need to make the right impression with people new to our Channel and our stream, and have a sharp channel ready to show off. What we need to do is connect our consoles, and then we make our first stream happen.


