Converting Photoshop and Illustrator files to PDF
Both Adobe Photoshop CC and Adobe Illustrator CC can save documents directly into the Adobe PDF file format. To do so, simply choose File→ Save or File→ Save As. Then, from the File Type drop-down list, choose Adobe PDF (Illustrator) or Photoshop PDF (Photoshop). In these programs, you can create PDF files without Adobe Acrobat or Acrobat Distiller because PDF creation capabilities are integrated into them.You can use Adobe Reader or Acrobat to view PDF files created from Photoshop or Illustrator. You can also open and edit PDF files using the same program in which they were created — so Photoshop PDF files can be reopened and edited using Photoshop, and the same is true for Illustrator PDF files.
Converting InDesign documents to PDF
Like Photoshop and Illustrator, the capability to convert InDesign documents to PDF is integrated into the application. With Adobe InDesign, you can choose File→ Export and select either Adobe PDF (Interactive) or Adobe PDF (Print) from the File Type drop-down list. Interactive PDF documents are suitable for sharing online, such as by posting the file to a website, and are designed primarily to incorporate interactive PDF features such as buttons, page transitions, and multimedia elements. If you’re creating a PDF document that will be printed, your best option is to select Adobe PDF (Print), even if it will be posted to a website.If you choose Adobe PDF (Print) when exporting from InDesign, you will find many options for controlling the size and quality of the resulting PDF file. Many of these options are similar to those available in PDF Maker for Microsoft Office.
At the top of the Adobe InDesign Export PDF dialog box, which appears after selecting Save in the Export dialog box, you can choose an option from the Preset drop-down. The choices are many, but the following are the most commonly used settings:
- Smallest File Size: Creates compact Adobe PDF files that are intended for display on the Internet or to be distributed via email. Use this setting to create PDF files that will be viewed primarily onscreen.
- High Quality Print: Creates Adobe PDF files that are intended for desktop printers and digital copiers.
- Press Quality: Use this setting to create PDF files that will be delivered to a commercial printer for high-quality, offset print reproduction.
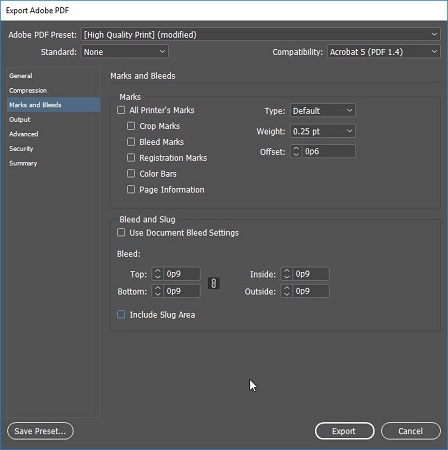
When creating PDF files to be used for high-resolution printing, there are specific settings you should use. Select Marks and Bleeds in the list on the left of the Export Adobe PDF dialog box, as you see below, and specify the amount of space items need to extend off the page, referred to as bleed. If you’re delivering the file to a printing firm, it can provide you with guidance regarding the required value.
good rule to follow is to use at least 0.125 inch if you have any items in your layout that extend to the edge of your document pages and beyond. Specify the value you want by entering the number in the Bleed and Slug section of the Marks and Bleeds tab. If the amount of bleed needs to be the same on all four sides, type the value in the Top left text box and then click the link chain in the center of all the Bleed text boxes. In this image, picas has been selected as the unit of value for the bleed. Setting the bleed values in the Export Adobe PDF dialog box.


